Microsoft Word has been around long enough to remember floppy disks, Clippy, and the emotional drama of losing a document because someone forgot to click Save. Thankfully, modern Word is much more polished. But one thing still confuses plenty of users: toolbars.
If you are wondering how to add a toolbar in Word, show a missing toolbar, customize the Ribbon, or make your favorite commands easier to reach, you are in the right place. In current versions of Microsoft Word, especially Word for Microsoft 365, Word 2024, Word 2021, and Word for Mac, the old-school “toolbar” idea has mostly evolved into the Ribbon, the Quick Access Toolbar, the Mini Toolbar, and the Status Bar. Same mission, fancier names.
This guide explains how to show, add, and customize toolbars in Microsoft Word without needing a computer science degree, a magnifying glass, or a motivational speech from your IT department.
What Counts as a Toolbar in Microsoft Word?
Before changing anything, it helps to know what Word actually means by toolbars today. Depending on your version, you may see different names, but the main areas are usually the same.
The Ribbon
The Ribbon is the large command area at the top of Microsoft Word. It includes tabs such as Home, Insert, Design, Layout, References, Review, and View. Each tab contains related groups of commands. For example, the Home tab includes font formatting, paragraph alignment, styles, and editing tools.
The Quick Access Toolbar
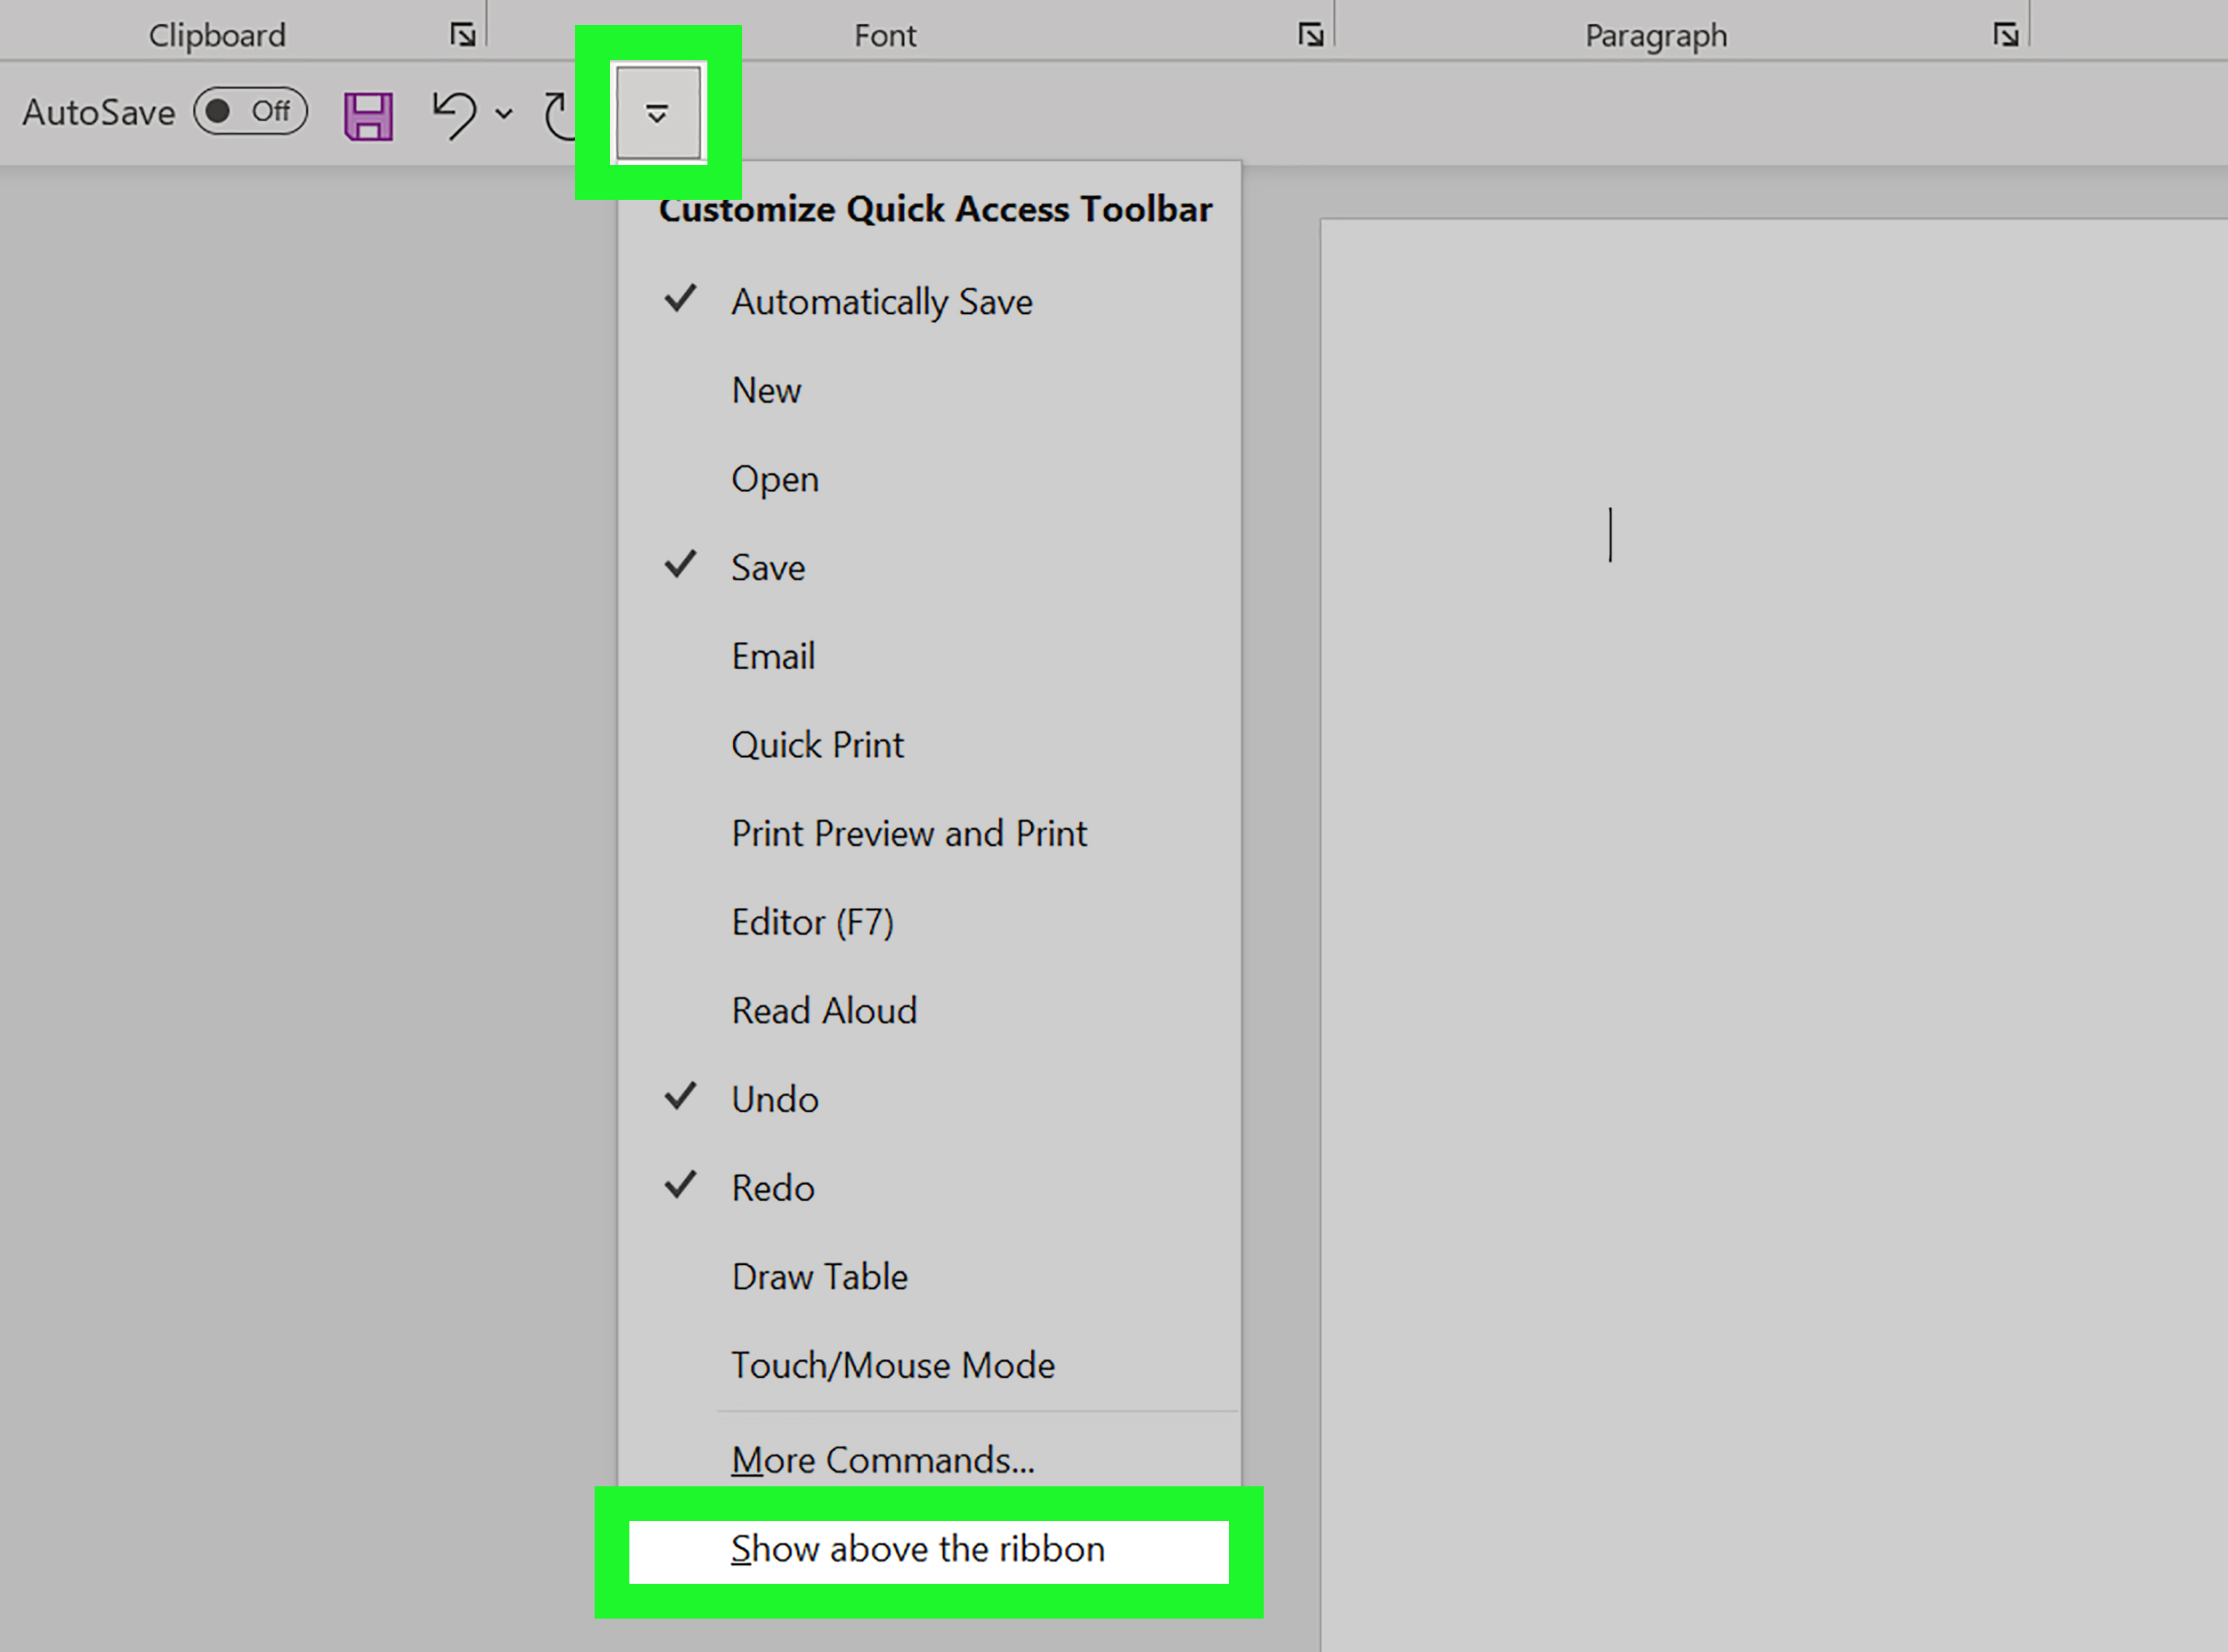
The Quick Access Toolbar, often called the QAT, is a small customizable toolbar for commands you use constantly. Think of it as your VIP lounge for buttons like Save, Undo, Redo, Print Preview, New Document, or Track Changes. It can appear above or below the Ribbon, depending on your preference.
The Mini Toolbar
The Mini Toolbar appears when you select text and hover nearby. It gives you fast access to basic formatting commands such as bold, italic, font size, highlighting, and text color. It is helpful, though sometimes it pops up like a nosy neighbor.
The Status Bar
The Status Bar sits at the bottom of Word. It can show page number, word count, language, accessibility status, view shortcuts, and zoom controls. It is not a toolbar in the classic sense, but it is customizable and useful for everyday writing.
How to Show the Ribbon Toolbar in Microsoft Word
If your Ribbon disappeared, do not panic. It probably has not packed its bags and left the document. Word simply has several display modes, and one of them may be hiding the Ribbon.
Method 1: Use Ribbon Display Options
- Open Microsoft Word.
- Look near the upper-right area of the Word window.
- Select the Ribbon Display Options icon if available.
- Choose Always show Ribbon to keep all tabs and commands visible.
This is the best option if you want Word to look traditional and predictable. The Ribbon stays open, your commands remain visible, and nobody has to play hide-and-seek with the Bold button.
Method 2: Show Tabs Only
If you want more writing space, choose Show tabs only. This keeps the tab names visible but hides the command groups until you click a tab. It is a clean setup for smaller laptop screens or distraction-free writing.
Method 3: Full-Screen or Auto-Hide Mode
Some versions of Word include a full-screen or auto-hide option. This hides most of the interface so your document gets maximum space. To bring the Ribbon back temporarily, move your cursor to the top of the screen, click the ellipsis, or press the Alt key on Windows.
Method 4: Use the Keyboard Shortcut
On Windows, press Ctrl + F1 to collapse or expand the Ribbon. This shortcut is easy to hit accidentally, which explains many “Where did my toolbar go?” moments. If the Ribbon suddenly vanishes, try Ctrl + F1 before blaming the printer, the Wi-Fi, or Mercury retrograde.
How to Show or Hide the Quick Access Toolbar
The Quick Access Toolbar is one of the most practical features in Microsoft Word because it gives you one-click access to your favorite commands. If it is hidden, you can show it quickly.
Show the Quick Access Toolbar on Windows
- Right-click anywhere on the Ribbon.
- Select Show Quick Access Toolbar.
- The toolbar will appear, usually near the Ribbon or title bar.
Hide the Quick Access Toolbar
- Right-click the Ribbon or the Quick Access Toolbar.
- Select Hide Quick Access Toolbar.
Hiding the toolbar is useful if you prefer a minimalist interface. But if you use the same commands repeatedly, keeping it visible can save a surprising amount of time.
How to Move the Quick Access Toolbar
Microsoft Word lets you place the Quick Access Toolbar in two main locations: above the Ribbon or below the Ribbon. Above the Ribbon is compact. Below the Ribbon is easier to see and usually easier to click.
Move the Toolbar Below the Ribbon
- Select the small drop-down arrow on the Quick Access Toolbar.
- Choose Show Below the Ribbon.
Move the Toolbar Above the Ribbon
- Select the Quick Access Toolbar drop-down arrow.
- Choose Show Above the Ribbon.
If you use many custom commands, below the Ribbon is usually better. It gives the toolbar more breathing room and makes command labels easier to read in versions that support labels.
How to Add Commands to the Quick Access Toolbar
Adding commands to the Quick Access Toolbar is the fastest way to customize Microsoft Word for your workflow. You can add common tools, hidden commands, and features buried deep inside Word’s menus.
Add a Command from the Ribbon
- Find the command you want on the Ribbon.
- Right-click the command.
- Select Add to Quick Access Toolbar.
For example, if you constantly use Track Changes, go to the Review tab, right-click Track Changes, and add it to the Quick Access Toolbar. Now it is always available, no tab-hopping required.
Add a Command That Is Not on the Ribbon
- Select the Quick Access Toolbar drop-down arrow.
- Choose More Commands.
- Open the Choose commands from menu.
- Select Commands Not in the Ribbon or All Commands.
- Choose the command you want.
- Select Add.
- Select OK.
This is where Word hides some surprisingly useful treasures. You may find commands for advanced formatting, document inspection, macros, printing options, and other features that are not immediately visible on the Ribbon.
Good Commands to Add
- Save As: Great for creating new versions of a file.
- Print Preview and Print: Useful if you print often.
- Track Changes: Essential for editing and collaboration.
- Accept Change: Handy for reviewing documents quickly.
- Paste Special: A lifesaver when formatting gets weird.
- New Document: Faster than opening the File menu.
- Speak: Helpful for proofreading by listening.
How to Remove Commands from the Quick Access Toolbar
If your toolbar becomes crowded, it can start to look like a tiny command garage sale. Clean it up by removing tools you do not use.
- Right-click the command on the Quick Access Toolbar.
- Select Remove from Quick Access Toolbar.
You can also go to File > Options > Quick Access Toolbar, select a command on the right side, and choose Remove.
How to Change the Order of Toolbar Commands
The order of commands matters. Put your most-used tools first so your mouse does not have to go on a cross-country road trip every time you format a document.
- Go to File > Options > Quick Access Toolbar.
- In the right-side list, select a command.
- Use the Move Up or Move Down arrows.
- Select OK.
A smart order might be: Save, Undo, Redo, Save As, Print Preview, Track Changes, Accept Change, and Paste Special.
How to Customize the Ribbon in Microsoft Word
The Ribbon is more than a row of tabs. You can customize it by showing or hiding tabs, creating new tabs, adding custom groups, and placing your favorite commands exactly where you want them.
Open the Customize Ribbon Window
- Select File.
- Choose Options.
- Select Customize Ribbon.
On the left, you will see available commands. On the right, you will see the main tabs and custom tabs. This is Word’s command control room. Try not to feel too powerful.
Show or Hide Ribbon Tabs
- Open File > Options > Customize Ribbon.
- Look under Main Tabs.
- Check a tab to show it.
- Clear a tab checkbox to hide it.
- Select OK.
You can hide tabs you rarely use, such as Mailings, if you never create mail merges. You cannot hide the File tab, because Word needs at least one doorway to the backstage area.
How to Add the Developer Tab in Word
The Developer tab is not shown by default, but it is extremely useful for macros, forms, templates, add-ins, XML tools, and advanced document controls.
Add the Developer Tab on Windows
- Go to File > Options.
- Select Customize Ribbon.
- Under Main Tabs, check Developer.
- Select OK.
Add the Developer Tab on Mac
- Open Word.
- Select Word from the menu bar.
- Choose Preferences.
- Select Ribbon and Toolbar.
- Choose Customize the Ribbon.
- Check Developer.
- Select Save.
Once enabled, the Developer tab usually stays visible unless you turn it off, reset Word, or reinstall Office.
How to Create a Custom Ribbon Tab
A custom tab is perfect when you have a repeatable workflow. For example, editors may create an “Editing Tools” tab. Teachers may create a “Lesson Prep” tab. Legal professionals may create a “Review Package” tab. Students may create a “Please Help Me Finish This Before Midnight” tab. Word will not judge.
Create a New Tab
- Go to File > Options > Customize Ribbon.
- Select New Tab.
- Select the new tab and choose Rename.
- Enter a meaningful name.
- Select OK.
Add a Custom Group
- Select your custom tab.
- Choose New Group.
- Select Rename.
- Give the group a clear name, such as “Review Tools” or “Formatting Shortcuts.”
Add Commands to the Custom Tab
- Select your custom group.
- Choose a command from the left-side command list.
- Select Add.
- Repeat until your group includes the commands you need.
- Select OK.
Important tip: Word usually requires commands to be added to custom groups, not directly into default groups. If the Add button is unavailable, create a custom group first.
How to Rename Ribbon Tabs, Groups, and Commands
You can rename custom tabs and groups to make them easier to understand. This is especially useful if you are setting up Word for a team, classroom, office, or shared computer.
- Go to File > Options > Customize Ribbon.
- Select the tab or group you want to rename.
- Select Rename.
- Type the new name.
- Select OK.
Keep names short. “Editing” is better than “Every Single Tool I Might Possibly Need When Reviewing Someone Else’s Draft.” Word has limits, and so does everyone’s patience.
How to Reset Toolbars and Ribbon Customizations
Customization is wonderful until you customize yourself into confusion. If Word starts looking like the cockpit of a spaceship, you can reset your toolbar or Ribbon.
Reset the Quick Access Toolbar
- Go to File > Options > Quick Access Toolbar.
- Select Reset.
- Choose Reset only Quick Access Toolbar.
- Confirm the change.
Reset Ribbon Customizations
- Go to File > Options > Customize Ribbon.
- Select Reset.
- Choose whether to reset selected tabs or all customizations.
- Confirm and select OK.
Resetting can save time if you inherited a shared computer with mysterious toolbars, missing tabs, or commands arranged by someone who apparently enjoyed chaos as a design principle.
How to Export and Import Word Toolbar Customizations
If you spend time building the perfect Word setup, export your customizations. This is useful when moving to a new computer or sharing a consistent layout with coworkers.
Export Customizations
- Go to File > Options > Customize Ribbon.
- Select Import/Export.
- Choose Export all customizations.
- Save the customization file somewhere safe.
Import Customizations
- Open File > Options > Customize Ribbon.
- Select Import/Export.
- Choose Import customization file.
- Select the saved file.
- Confirm the import.
One warning: importing a customization file can replace existing Ribbon and Quick Access Toolbar settings. Export your current setup first if you might want to restore it later.
How to Customize Toolbars in Word for Mac
Word for Mac has many of the same customization options, but the path is slightly different. Instead of File > Options, you usually work through the Word menu and Preferences.
Customize the Ribbon on Mac
- Open Word for Mac.
- Select Word in the menu bar.
- Choose Preferences.
- Select Ribbon and Toolbar.
- Use the Ribbon settings to add, remove, rename, or reorder tabs and groups.
- Select Save.
Customize the Quick Access Toolbar on Mac
- Open Word > Preferences.
- Select Ribbon and Toolbar or Quick Access Toolbar, depending on your version.
- Add or remove commands using the available arrows or options.
- Save your changes.
Some commands may not be available for the Quick Access Toolbar on Mac. If you cannot find a command, it may not be supported in that location.
How to Use Keyboard Shortcuts with the Ribbon
Toolbar customization is not only about mouse clicks. Microsoft Word also supports keyboard access to Ribbon commands.
Press Alt on Windows to display Key Tips. Small letters appear over Ribbon tabs and commands. For example, Alt + H opens the Home tab, and Alt + Q moves to the Search or Tell Me box. This can be faster than clicking through menus, especially if you work in Word all day.
Keyboard shortcuts are especially helpful for users who prefer accessibility-friendly workflows or want to avoid repetitive mouse movement.
Best Toolbar Setups for Different Word Users
For Students
Add Save As, Word Count, Insert Footnote, Spelling and Grammar, and Export to PDF. These tools are useful for essays, research papers, and assignments that somehow always become urgent at 11:47 p.m.
For Editors
Add Track Changes, New Comment, Accept Change, Reject Change, Compare, and Restrict Editing. This setup keeps review tools visible and reduces time spent switching tabs.
For Business Users
Add Print Preview, Save As, Share, Insert Table, Paste Special, and Signature Line. These commands are useful for reports, contracts, proposals, and internal documents.
For Writers
Add Navigation Pane, Word Count, Thesaurus, Read Aloud or Speak, Save As, and Full Screen. Writers benefit from fewer distractions and quick access to review tools.
Common Microsoft Word Toolbar Problems and Fixes
The Ribbon Is Missing
Try Ctrl + F1, click a visible tab, or choose Always show Ribbon from Ribbon Display Options.
The Quick Access Toolbar Is Gone
Right-click the Ribbon and choose Show Quick Access Toolbar.
A Command Cannot Be Added
Try selecting All Commands in the customization window. If you are on Mac, the command may not be supported for that toolbar.
Custom Tabs Are Confusing
Rename tabs and groups with simple labels. If the layout is too messy, reset customizations and rebuild only what you truly use.
Toolbars Changed After an Update
Microsoft 365 updates can slightly change interface behavior. Check Ribbon Display Options, Quick Access Toolbar settings, and your customization file if you exported one.
Practical Experience: What Actually Works Best When Customizing Word Toolbars
After helping many people set up Microsoft Word for writing, editing, schoolwork, business reports, and everyday document cleanup, one lesson becomes obvious: the best toolbar setup is not the one with the most buttons. It is the one with the fewest clicks.
A common mistake is adding every interesting command to the Quick Access Toolbar. At first, this feels productive. Ten minutes later, the toolbar looks like a tiny airport runway full of icons, and nobody remembers what half of them do. A better approach is to start with five to eight commands that solve your daily annoyances. For most users, Save As, Print Preview, Paste Special, Track Changes, New Comment, Word Count, and Export to PDF are a strong starting point.
For editing work, placing the Quick Access Toolbar below the Ribbon usually feels more comfortable. The buttons are easier to see, especially on high-resolution screens where tiny title-bar icons can become microscopic. If command labels are available, turning them on below the Ribbon can also help users who do not want to memorize icons. After all, not every symbol is obvious. Some Word icons look like they were designed during a meeting where everyone had one minute left before lunch.
Custom Ribbon tabs work best when they match a real workflow. For example, an editor might create a tab called “Review Setup” with groups for Comments, Track Changes, Compare, and Protection. A teacher might create a tab called “Class Materials” with commands for tables, headers, page breaks, comments, and PDF export. A student might create a tab called “Research Paper” with citations, footnotes, word count, headings, and spelling tools. The goal is to group related actions together so Word feels like your workspace, not a maze.
Another useful habit is to avoid hiding too many default tabs. Hiding unused tabs can make Word cleaner, but it can also create confusion later when you need a command and forget where it went. If you are new to customization, keep the default Ribbon mostly intact and use the Quick Access Toolbar for your favorite shortcuts. Once you know your habits, then consider custom tabs or hiding clutter.
Exporting customizations is one of the most underrated steps. If you use Word professionally, your toolbar layout becomes part of your workflow. Losing it after a new computer setup can feel like someone rearranged your kitchen drawers in the dark. Export your Ribbon and Quick Access Toolbar customizations after you create a setup you like. Store the file with your backups or cloud documents so you can restore it quickly.
Finally, review your setup every month or two. If you have not clicked a toolbar button in weeks, remove it. If you keep digging through menus for the same command, add it. Microsoft Word customization is not a one-time makeover. It is more like organizing a desk: the perfect setup is the one that helps you work faster without making the place look like a stationery explosion.
Conclusion
Learning how to add, show, and customize toolbars in Microsoft Word can make the program feel faster, cleaner, and much more personal. Whether you simply want to show the Ribbon again, add a few commands to the Quick Access Toolbar, enable the Developer tab, or build a custom Ribbon tab for your workflow, Word gives you plenty of control.
The best strategy is simple: keep visible what you use often, hide what distracts you, and avoid turning your toolbar into a button museum. Start small, test your setup, and adjust as your work changes. A well-customized Word interface saves clicks, reduces frustration, and makes document creation feel less like wrestling a menu monster.
Note: Menu names and toolbar behavior may vary slightly between Word for Microsoft 365, Word 2024, Word 2021, Word for Mac, and Word for the web. If a command is not available in one location, check the Ribbon customization window, the Quick Access Toolbar settings, or the full command list.