A dollar store candy bouquet is proof that a gift does not need a luxury price tag to make someone smile like they just found the last chocolate bar in the house. It is colorful, personal, fun to build, and wonderfully budget-friendly. Instead of handing someone a plain bag of candy and calling it a day, you can turn simple sweets into a cheerful “bouquet” that looks like it came from a boutique gift shop.
The best part? You do not need advanced crafting skills, a glitter-covered craft room, or a bank account that cries every time a birthday appears on the calendar. With a container, floral foam, wooden skewers or craft sticks, tissue paper, ribbon, and a handful of favorite treats, you can create a DIY candy bouquet for birthdays, graduations, teacher appreciation, Valentine’s Day, Father’s Day, Mother’s Day, holidays, movie nights, office celebrations, or “you survived Monday” moments.
This guide walks you through how to make a dollar store candy bouquet, what supplies to buy, how to customize it for different people, and how to make it look full, balanced, and gift-worthy without overspending. Think of it as flower arranging, except everything is edible and nobody has to pretend they know what a peony is.
What Is a Dollar Store Candy Bouquet?
A dollar store candy bouquet is a handmade gift arrangement made by attaching candy, snacks, or small treats to sticks and placing them upright in a container filled with floral foam. The finished gift resembles a flower bouquet, but instead of roses, tulips, or daisies, the “blooms” are chocolate bars, lollipops, gummies, snack packs, gum, mints, and small novelty items.
The concept is simple: build height, color, and variety. Larger candy bars usually go toward the back, medium-sized treats fill the middle, and small candies, tissue paper, ribbon, or paper shreds create volume at the base. The result is a bright, playful gift that feels more thoughtful than a standard candy box and more practical than flowers that wilt before the weekend.
Why Candy Bouquets Make Such Great Gifts
A candy bouquet works because it hits the sweet spot between personal and easy. It is customizable, affordable, and useful for almost anyone who enjoys treats. You can design one around a favorite candy brand, color scheme, hobby, school colors, team colors, holiday theme, or inside joke.
They Look More Expensive Than They Are
Dollar store supplies can go a surprisingly long way. A few theater-size candy boxes, a small bucket or mug, tissue paper, ribbon, and wrapped candies can create a gift that looks generous without costing much. Presentation does the heavy lifting. When candy stands tall in a bouquet instead of lying flat in a bag, it instantly feels more festive.
They Are Easy to Personalize
One person loves sour candy. Another wants chocolate only. Someone else is loyal to peanut butter cups with the seriousness of a sports fan during playoffs. A candy bouquet lets you tailor the gift to the recipient instead of guessing your way through a generic gift aisle.
They Work for Many Occasions
Dollar store candy bouquets are perfect for birthdays, graduation parties, hospital get-well gifts, office thank-yous, teacher gifts, care packages, Father’s Day, Mother’s Day, Valentine’s Day, Easter baskets, Christmas stockings, and party centerpieces. They also make cute raffle prizes, classroom rewards, and last-minute gifts when time is short but you still want to look like you planned ahead.
Dollar Store Supplies You Need
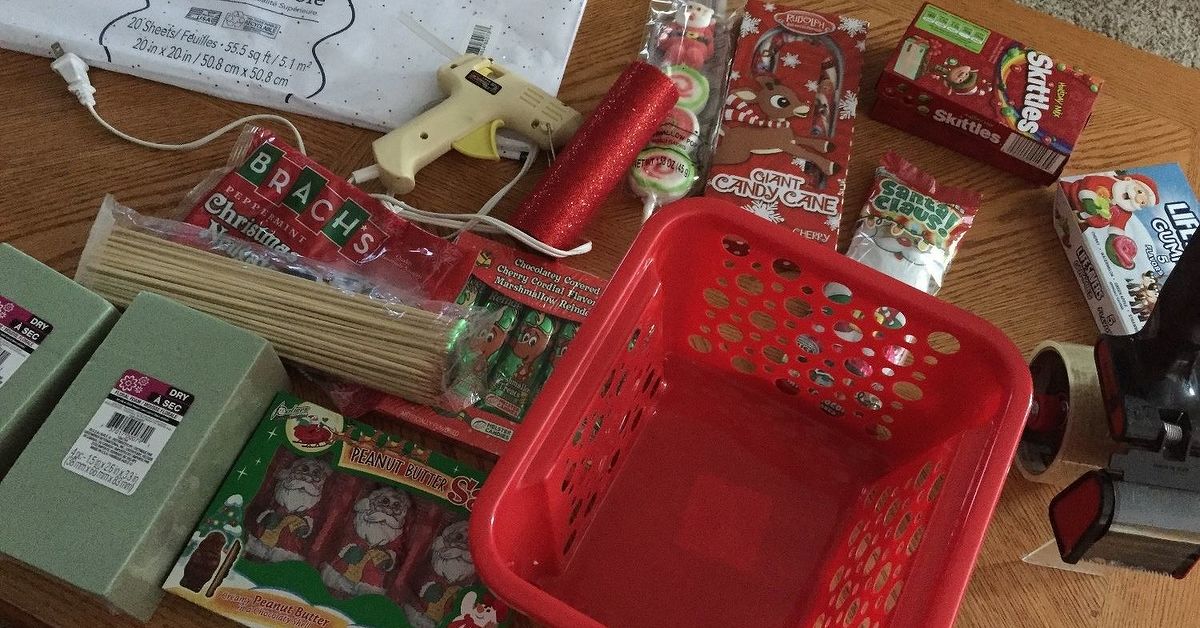
You can usually find most of the materials at a dollar store, discount store, craft aisle, or supermarket. Before you shop, choose a rough theme. That one decision keeps your bouquet from looking like a candy drawer exploded in public.
Basic Supply List
- A small bucket, mug, gift box, basket, plastic cup, or decorative container
- Floral foam or craft foam block
- Wooden skewers, craft sticks, paper straws, or balloon sticks
- Wrapped candy bars, lollipops, gummies, gum, mints, or snack packs
- Clear tape, packing tape, glue dots, or a low-temperature hot glue gun
- Tissue paper, paper shreds, Easter grass, or crinkle paper
- Ribbon, bows, stickers, gift tags, or small signs
- Cellophane wrap, optional but helpful for transport
Choosing the Right Container
The container sets the personality of the bouquet. A coffee mug is great for teachers, coworkers, and coffee lovers. A popcorn bucket works perfectly for a movie-night candy bouquet. A small gift box feels polished and modern. A holiday pail adds instant seasonal charm. For kids, use a colorful plastic cup or themed container. For adults, a simple black, white, metallic, or kraft-paper box can make the gift look more stylish.
Make sure the container is sturdy enough to hold the arrangement. Candy can become top-heavy once attached to sticks. If the container is lightweight, add a few wrapped candies, glass gems, or small bags of candy at the bottom before inserting the foam. This adds weight and keeps the bouquet from doing an unexpected table dive.
How to Make a Dollar Store Candy Bouquet Step by Step
Making a candy bouquet is easy once you understand the structure. The goal is to create layers: tall pieces in the back, medium pieces in the center, and shorter pieces in front. This gives the bouquet a full, professional look.
Step 1: Prepare the Base
Cut the floral foam so it fits snugly inside your container. It should not wobble. If needed, stack two pieces of foam or add tissue paper around the sides to secure it. Cover the top with paper shreds, tissue paper, or Easter grass so the foam is hidden. This small detail makes the bouquet look finished instead of like a science project involving snacks.
Step 2: Attach Candy to Sticks
Use clear tape, glue dots, or a small amount of hot glue to attach each candy package to a skewer or craft stick. Place the stick on the back of the candy wrapper so the front label remains visible. For heavier candy bars, use two sticks for extra support. For small candy packs, one stick is usually enough.
If you use hot glue, be careful not to melt thin candy wrappers or chocolate. A low-temperature glue gun is usually safer for lightweight craft projects. Tape is often the easiest option because it is quick, clean, and less risky around candy packaging.
Step 3: Arrange the Tallest Treats First
Start by placing the tallest candy sticks in the back of the foam. Angle them slightly outward so the bouquet opens up visually. Theater-box candy, long chocolate bars, and oversized lollipops work well in the back row because they create height.
Step 4: Fill the Middle
Add medium-height candies in the center. Mix colors, shapes, and textures so the arrangement looks lively. Place similar colors in different spots instead of grouping them all together. This keeps the bouquet balanced and prevents one side from looking like it joined a candy parade without telling the other side.
Step 5: Add Shorter Pieces in Front
Use small candy packs, mini chocolate bars, gum, mints, or wrapped lollipops near the front. These pieces fill gaps and make the bouquet look generous. You can also tuck loose wrapped candies into the paper shreds at the base for extra color.
Step 6: Decorate the Bouquet
Add ribbon around the container, a bow on the front, a gift tag, or a small printable sign that says “You’re Sweet,” “Happy Birthday,” “Thanks a Bunch,” or “You Deserve a Treat.” Cellophane wrap gives the bouquet a polished gift-shop look and keeps everything together during transport.
Best Candy Ideas for a DIY Candy Bouquet
The best candy bouquet includes variety. Use different sizes, colors, and textures to make the arrangement visually interesting. Wrapped candy is the easiest and safest choice because it stays clean and is simple to attach to sticks.
Chocolate Candy
Chocolate bars are popular because they are flat, easy to tape to skewers, and instantly recognizable. Use full-size bars for height and mini bars for filler. If the bouquet will be outside, mailed, or kept in a warm car, choose non-melting options instead. Chocolate is wonderful, but it is also dramatic in the heat.
Sour and Fruity Candy
Sour belts, gummy worms, fruit chews, hard candy, and lollipops add bright color and playful energy. These are great for kids, teens, college students, and anyone who believes candy should come with a tiny facial expression workout.
Movie Night Candy
Theater-box candy makes an excellent base or background for a bouquet. Add microwave popcorn, mini soda cans, pretzels, or snack packs to create a movie-night gift. Use a popcorn bucket as the container and suddenly your gift has a theme, a purpose, and a strong chance of being eaten before the movie starts.
Low-Sugar or Allergy-Friendly Options
If you are gifting to someone with dietary needs, read labels carefully. Consider sugar-free candy, nut-free treats, gluten-free labeled products, fruit snacks, or non-food items like stickers, pens, socks, lip balm, or small toys. For school gifts, always check classroom rules and allergy policies before bringing edible treats.
Creative Candy Bouquet Themes
The easiest way to make a dollar store candy bouquet feel special is to give it a theme. A theme helps you choose colors, candy types, container style, and decorations.
Birthday Candy Bouquet
Use bright tissue paper, confetti-style ribbon, and the recipient’s favorite candy. Add a small birthday candle decoration or a tag that says “Hope your day is sweet.” For kids, include lollipops, gummies, and colorful candy packs. For adults, use chocolate, mints, caramels, or a mix of sweet and salty snacks.
Graduation Candy Bouquet
Choose candy wrappers that match school colors. Add a small graduation cap cutout, a “Congrats Grad” sign, or rolled dollar bills tied with ribbon if you want to include cash. Candy bouquets are great for graduates because they feel celebratory without being overly formal.
Teacher Appreciation Bouquet
Use a mug, pencil cup, or small desk organizer as the container. Add candy, sticky notes, pens, highlighters, tea bags, or hand sanitizer. A tag that says “Thanks for helping me grow” or “You’re the sweetest teacher” adds a thoughtful touch.
Valentine’s Day Candy Bouquet
Use red, pink, and white candies with heart-shaped decorations. Add chocolate hearts, conversation hearts, strawberry-flavored treats, or heart-patterned tissue paper. A small plush toy or handwritten note makes it feel more personal.
Father’s Day Candy Bouquet
Choose a sturdy mug, mini toolbox, or snack bucket. Add chocolate bars, beef jerky sticks if appropriate, nuts if there are no allergy concerns, gum, mints, and salty snacks. Use a tag that says “Dad, you’re the king-size bar of humans.” It is cheesy, yes. But dads are legally required to appreciate dad-level jokes.
Get-Well Candy Bouquet
Use cheerful colors and comforting treats. Add tea bags, cough drops, tissues, puzzle books, or a small card. Keep it simple and avoid strong scents. If the person is recovering from illness or surgery, check whether they have dietary restrictions before giving candy.
How to Make It Look Full on a Small Budget
The secret to a great candy bouquet is not buying the most candy. It is arranging the candy wisely. Height, color, filler, and spacing make a huge difference.
Use Paper Shreds Generously
Paper shreds hide foam, fill empty spaces, and add color. Fluff them before placing them in the container. You can also tuck shreds between candy sticks to make the bouquet look fuller.
Layer the Candy
Do not line everything up at the same height. Place tall items in the back, medium items in the middle, and short items in front. This creates depth and makes the gift easier to view from the front.
Use a Smaller Container
A smaller container looks full faster. A large basket may seem like a good idea until you realize it needs half the candy aisle to look complete. For budget gifts, choose a mug, pail, or small box.
Add Non-Candy Fillers
Small dollar store extras can make the bouquet more useful. Try socks, lip balm, nail polish, pens, stickers, bookmarks, mini notebooks, keychains, face masks, or small toys. These add variety and help the bouquet feel more thoughtful.
Common Mistakes to Avoid
Even a simple DIY candy bouquet can go sideways if the base is weak or the arrangement is too crowded. Avoid these common mistakes for a cleaner result.
Using a Container That Is Too Light
If the container tips easily, the bouquet will be frustrating to carry and display. Add weight to the bottom or choose a heavier mug, jar, or basket.
Overloading the Top
Too many large candy bars at the top can make the bouquet unstable. Spread heavier pieces evenly and insert sticks deep into the foam.
Ignoring Allergies
Food allergies are serious. Always check labels, especially for peanuts, tree nuts, milk, wheat, soy, eggs, sesame, and other common allergens. If you are unsure, choose sealed treats with clear labels or include non-food goodies instead.
Forgetting Transportation
If you are driving with the bouquet, wrap it in cellophane or place it in a box so it does not tip over. Keep chocolate away from heat. A beautiful candy bouquet can become modern art very quickly in a hot car.
Budget Breakdown: How Much Does It Cost?
A basic dollar store candy bouquet can often be made for a modest budget, depending on store prices, the number of treats, and the size of the container. A small version may need only one container, one foam block, five to eight candy items, tissue paper, and ribbon. A larger version may use 12 to 20 treats plus extra decorations.
To control costs, buy multipacks and divide them between bouquets. Use one larger candy item as the focal point and surround it with smaller treats. Reuse ribbon, leftover tissue paper, or craft supplies you already own. The goal is not to spend the most. The goal is to make the gift feel intentional.
Experience-Based Tips for Making a Candy Bouquet People Actually Love
After making a few dollar store candy bouquets, you learn that the magic is not just in the candy. It is in the details. The first time I made one, I grabbed a random mix of candy, stuck everything into foam, and proudly stepped back to admire what looked like a sugar-powered porcupine. It was still cute, but it taught me an important lesson: arrangement matters.
The best bouquets usually start with the recipient, not the supplies. Before buying anything, think about what the person actually likes. Are they a chocolate person? A sour candy person? A movie snack person? A “please do not give me anything with coconut” person? Personal preference is what turns a cheap candy arrangement into a memorable gift. Even a small bouquet feels special when every item says, “I picked this because I know you.”
Another helpful trick is to build the bouquet on a table and view it from the front as you work. Most candy bouquets are displayed from one main angle, so the front should look polished. Put the best-looking candy labels facing forward. Hide tape on the back. Angle the sticks slightly instead of placing everything straight up and down. That one adjustment makes the bouquet look less stiff and more like an actual arrangement.
Color also matters more than people think. A bouquet with red, yellow, blue, green, purple, and neon orange can be fun, but it can also look chaotic. For a cleaner design, choose two or three main colors. For example, a Valentine’s bouquet can use red, pink, and white. A graduation bouquet can match school colors. A movie-night bouquet can use red, black, and yellow. A chocolate-lover bouquet can use gold, brown, and cream. Coordinated colors make dollar store supplies look surprisingly elevated.
One of the most practical lessons is to secure the foam tightly. If the foam shifts, everything shifts. If everything shifts, the bouquet slowly leans like it has lost confidence. Cut the foam to fit snugly and test it before adding candy. If it wiggles, add tissue paper or cardboard around the sides. For heavier bouquets, add weight to the bottom of the container before placing the foam.
I also recommend adding one unexpected item. It could be a funny note, a mini plush, a gift card, a small toy, a pair of cozy socks, or a handwritten coupon for a movie night. Candy is fun, but a personal extra gives the bouquet a story. For a teacher, add a nice pen. For a coworker, add coffee sticks. For a teen, add lip balm or stickers. For a parent, add a handwritten note. These little touches are inexpensive but meaningful.
Finally, do not wait until the last minute if you want the best candy choices. Dollar stores often carry seasonal items early, and the cutest containers disappear fast around holidays. Buy the base and decorations ahead of time, then pick up candy closer to the gifting date so everything stays fresh. Store the finished bouquet in a cool, dry place, especially if it contains chocolate.
The real charm of a dollar store candy bouquet is that it feels joyful. It is not trying to be fancy in a serious way. It is colorful, playful, and generous. It says, “I made this for you,” which is often the best part of any gift. Whether you are creating one for a birthday, a thank-you, a holiday, or a just-because surprise, this budget-friendly bouquet can deliver a big reaction without a big bill.
Conclusion
A dollar store candy bouquet is one of the easiest DIY gifts to make, but it still feels personal, creative, and festive. With a simple container, floral foam, sticks, ribbon, paper shreds, and the recipient’s favorite treats, you can create a gift that works for almost any occasion. It is affordable enough for last-minute gifting and customizable enough to feel planned, thoughtful, and fun.
Whether you are making a birthday candy bouquet, a teacher appreciation gift, a graduation surprise, a Valentine’s Day treat, or a movie-night snack arrangement, the same rule applies: choose a theme, build height, balance the colors, and add a personal touch. The result is a sweet gift that looks impressive, tastes delicious, and proves once again that creativity beats overspending every time.