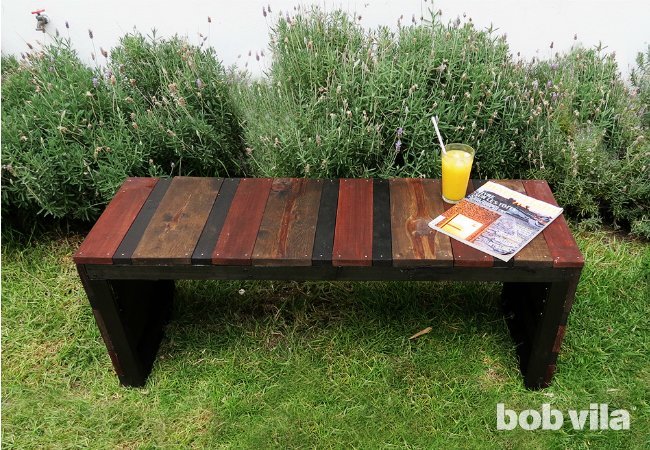
A backyard without a comfortable seat is basically an oversized patch of grass asking you to stand around awkwardly. Fortunately, you do not need a furniture-store budget, a professional workshop, or the woodworking confidence of someone who owns seven different routers. A straightforward DIY outdoor bench can be built with common lumber, basic hand and power tools, and one productive afternoon.
This beginner-friendly project takes inspiration from the simple, slatted DIY Lite bench popularized by Bob Vila. Its compact frame, mixed-width seat boards, and flexible finishing options make it approachable for first-time builders while leaving plenty of room for customization. The original concept uses a 39-inch-long wooden frame, short U-shaped leg assemblies, decorative slats, glue, screws, brackets, stain, and an exterior protective finish.
The result is a practical garden bench for a patio, porch, fire pit, balcony, or quiet corner beneath a tree. Even better, every compliment comes with the legal right to say, “Thanks, I built it,” preferably while leaning casually against the bench like this happens all the time.
Why This DIY Outdoor Bench Is a Great Beginner Project
Outdoor furniture can become complicated quickly. Curved backs, angled arms, mortise-and-tenon joints, and elaborate templates are wonderful when you have experience. They are less wonderful when you are holding a drill for the first time and wondering why the screw is moving sideways.
This DIY Lite bench keeps the construction manageable. The primary frame consists of straight cuts and right-angle connections. Separate leg assemblies attach beneath the seat frame, while short wooden slats cover the top and sides. Because the decorative surface hides much of the supporting structure, minor cosmetic imperfections are easier to forgive.
Beginner-oriented outdoor bench plans from major home-improvement publishers commonly rely on the same sensible principles: straightforward frames, pilot holes, strong exterior fasteners, careful sanding, and a weather-resistant finish. Some simple versions can be completed in a day, although drying time for stain or varnish may extend the calendar portion of the project.
Tools and Materials
Recommended lumber
For a version close to the Bob Vila–style design, purchase the following nominal lumber:
- Two 10-foot lengths of 2-by-2 lumber for the supporting frame
- Two 8-foot lengths of 1-by-2 lumber
- Two 8-foot boards approximately 1 by 4 inches
- One 8-foot length of 1-by-6 lumber
Nominal lumber measurements describe the name of the board, not its exact finished dimensions. Measure the stock you actually purchase before finalizing the cut layout. The lumber aisle enjoys surprises almost as much as a game-show host.
Hardware and supplies
- Exterior-rated wood glue
- Approximately 24 exterior screws, 2 1/2 inches long
- Approximately 24 exterior screws, 1 inch long
- Four heavy-duty metal corner brackets
- Exterior-rated finishing nails or trim screws
- Wood stain, exterior paint, or penetrating outdoor oil
- Exterior varnish, spar urethane, or another outdoor topcoat
- 80-, 120-, and 180-grit sandpaper
- Wood filler rated for exterior use, if needed
Ordinary interior glue should not be treated as an outdoor product merely because you ask it nicely. Choose an adhesive specifically rated for exterior woodworking or waterproof applications. Exterior screws should also have a corrosion-resistant coating or be made from an appropriate grade of stainless steel, especially when used with preservative-treated lumber.
Tools
- Tape measure
- Pencil and carpenter’s square
- Circular saw, miter saw, or handsaw
- Drill and driver bits
- Small drill bit for pilot holes
- Clamps
- Hammer or brad nailer
- Random-orbit sander or sanding block
- Paintbrushes and clean lint-free rags
- Safety glasses, hearing protection, and a dust mask
Choosing the Best Wood for an Outdoor Bench
The lowest-cost option is usually construction-grade pine or fir. These woods are easy to cut, widely available, and friendly to a beginner’s budget. However, untreated boards require a dependable exterior finish and regular maintenance because moisture, sunlight, insects, and fungal decay are not known for respecting a bargain.
Cedar and redwood cost more but offer natural resistance to decay. The American Wood Council identifies cedar, redwood, and black locust among naturally durable species, while USDA Forest Products Laboratory guidance emphasizes that both wood selection and protective treatment affect outdoor service life. Weathering and decay are the two major forces working against exposed wooden furniture.
Pressure-treated lumber is another practical choice for the frame. If it is still damp from the treatment process, allow it to dry adequately before applying paint or stain. A finish applied too early may struggle to penetrate or adhere. Home Depot’s outdoor bench guidance similarly recommends waiting when treated boards are wet and notes that sealing or painting improves appearance and protection.
Whichever species you choose, inspect each board before buying. Look for relatively straight stock with limited twisting, deep cracks, loose knots, and damaged edges. Sight down the board from one end. If it resembles a wooden propeller, return it to the rack before it becomes your problem.
Cut List for the Bench Frame
Cut the two 10-foot 2-by-2 boards into the following pieces:
- Two pieces at 39 inches for the long seat rails
- Four pieces at 15 inches for the legs
- Six pieces at 11 inches for the crosspieces and lower leg supports
Four of the 11-inch pieces form the cross supports inside the seat frame. The remaining two connect the bottoms of the leg pairs. The decorative 1-by boards are cut into 15-inch slats and arranged across the seat and down its sides.
Mark every component before cutting. Writing “leg,” “rail,” or “crosspiece” on painter’s tape saves time later and prevents the classic DIY experience of staring at seven nearly identical boards while questioning every decision that led to this moment.
How to Build the DIY Outdoor Bench
Step 1: Make accurate, square cuts
Measure each piece carefully and mark the waste side of the cut line. Use a carpenter’s square to draw straight guidelines around the lumber. Support long boards on a stable work surface, clamp them when practical, and keep hands away from the blade path.
Cut the frame components first. After confirming that the frame dimensions work, cut the decorative slats. This order reduces wasted material if you decide to modify the bench width or depth.
Step 2: Dry-fit the seat frame
Place the two 39-inch rails parallel to each other on a flat surface. Position four 11-inch crosspieces between them: one near each end and two distributed through the center. The internal supports should be evenly spaced so the decorative slats receive consistent support.
Measure the diagonals from opposite corners. When the diagonal measurements match, the frame is square. If they differ, gently push one corner until the assembly behaves itself.
Step 3: Glue and screw the frame together
Mark the location of each crosspiece. Apply exterior wood glue to the mating ends, reposition the pieces, and clamp them. Drill pilot holes through the long rails and into the crosspieces before driving the 2 1/2-inch screws.
Pilot holes reduce splitting and help screws travel straight, particularly near board ends. Use two screws at each major frame connection when the board dimensions permit. Drive them until the heads sit flush, but do not keep tightening until the wood begins begging for mercy.
Step 4: Assemble the legs
Create two U-shaped leg frames. Each assembly uses two 15-inch vertical pieces connected by one 11-inch horizontal support near the bottom. Use exterior glue, pilot holes, and 2 1/2-inch screws.
Build both leg assemblies against the same square or temporary spacer so they match. A bench with one wider leg assembly may still function, but it will look as though it is attempting to walk away.
Step 5: Attach the legs to the seat frame
Turn the seat frame upside down. Position one leg assembly at each end and verify that both are centered, square, and aligned. Secure the legs with appropriately sized metal corner brackets and exterior screws.
Brackets make this beginner design easier to assemble, but they should be sturdy enough for furniture use. Do not substitute lightweight picture-hanging hardware. The bench will eventually support people, not an inspirational quote.
After installation, turn the frame upright and test it on a level surface. Press down firmly at each corner. If the structure racks or wobbles, correct the alignment and tighten the connections before adding the decorative slats.
Step 6: Prepare the mixed-width slats
Cut the 1-by-2, 1-by-4, and 1-by-6 boards into 15-inch lengths. The combination of several widths creates the bench’s most recognizable visual feature. Arrange the pieces in different sequences before fastening anything.
You might repeat a narrow-medium-wide pattern, create a symmetrical arrangement from the center outward, or use a deliberately random composition. Lay the entire pattern across the frame and measure the remaining gap. Rip or trim the final slat when necessary rather than forcing a large, awkward space into the design.
Step 7: Sand before final assembly
Sand the frame and every decorative slat while all surfaces remain accessible. Begin with 80 grit only where the wood is rough or uneven, continue with 120 grit, and finish exposed seating surfaces with 180 grit.
Ease sharp corners and round the upper edges slightly. This improves comfort and reduces splinters. Major retailer guidance for outdoor benches likewise recommends smoothing all surfaces and rounding cut edges before finishing.
Remove sanding dust with a vacuum, soft brush, or slightly damp cloth. Finish manufacturers generally require the surface to be clean, dry, and free of grease, loose material, and failing old coatings.
Step 8: Apply stain or paint
Staining the slats before installation makes it easier to cover their sides and ends. For the multitone look, select two or three complementary colors. A combination of warm walnut, medium cedar, and natural oak can create depth without making the bench resemble a sample rack that escaped from a flooring store.
Another option is to paint the frame one solid color while leaving the slats stained. Exterior latex or acrylic paint should resist moisture and ultraviolet exposure while remaining flexible enough to accommodate seasonal wood movement. Semi-gloss paint is relatively easy to clean, which is useful when birds begin reviewing your work.
Step 9: Fasten the slats
Once the stain or paint has dried as directed, return the slats to the planned sequence. Apply a small amount of exterior glue where each piece contacts the frame. Secure the boards with corrosion-resistant finish nails, brads, or trim-head screws.
Do not depend on glue alone outdoors. Humidity and temperature changes cause wood to move. Mechanical fasteners provide dependable support while the adhesive helps reduce shifting and squeaks. Similar outdoor furniture plans commonly combine glue with exterior screws or concealed pocket-hole fasteners.
Keep fasteners a safe distance from the ends of narrow slats, and drill pilot holes whenever splitting is likely. Recoat freshly cut or trimmed ends because end grain absorbs moisture more readily than a smooth face.
Step 10: Protect the finished bench
Apply an exterior topcoat after all stain has dried. Spar urethane is formulated for wood exposed to moisture, sunlight, and temperature changes. Some products include UV blockers, moisture protection, and oils that help the coating move with seasonal expansion and contraction. Follow the manufacturer’s label for preparation, coat thickness, drying time, sanding, and the recommended number of coats.
Seal the tops, bottoms, sides, joints, and exposed end grain. The underside may not receive much applause, but rainwater will find it anyway. Allow the final coat to cure fully before sitting on the bench or adding cushions.
Common DIY Bench Mistakes to Avoid
Using interior hardware outdoors
Uncoated screws can rust, discolor the wood, and weaken over time. Use fasteners labeled for exterior exposure and verify compatibility with pressure-treated lumber.
Skipping the dry fit
Assembling immediately after cutting can turn one measuring error into six connected measuring errors. Lay out the parts first, confirm the dimensions, and check for square.
Driving screws without pilot holes
Small frame components and narrow slats can split near their ends. A pilot hole takes seconds and is considerably less annoying than cutting a replacement part.
Applying a thick finish
One heroic coat is not necessarily better than several controlled coats. Heavy applications may sag, wrinkle, remain soft, or dry unevenly. Follow the product instructions instead of inventing a finishing system based on optimism.
Placing the bench directly on wet soil
Continuous contact with damp ground accelerates deterioration. Put the bench on a patio, pavers, gravel, a deck, or small outdoor furniture feet that allow air to circulate beneath the legs.
Easy Ways to Customize the Design
Add color by painting each slat in a coordinated palette. For a quieter look, use one stain throughout and vary only the board widths. A lightly whitewashed treatment can produce a relaxed cottage appearance while allowing some wood grain to remain visible.
You can also extend the rails for a wider two-person bench, but longer spans may require thicker rails, another center support, or stronger joinery. Other practical upgrades include adjustable leveling feet, a fitted outdoor cushion, hidden pocket-hole connections, planter boxes at the ends, or a lower shelf for gardening shoes.
For a porch or compact balcony, retain the 39-inch length and use a shallow seat. Around a fire pit, build two or three matching benches and alter the slat pattern on each one. The pieces will look related without appearing factory-cloned.
Maintaining a Wooden Outdoor Bench
Inspect the bench at the beginning and end of the outdoor season. Tighten loose screws, check brackets, sand developing splinters, and examine horizontal surfaces for finish failure. Pay special attention to the feet, fastener holes, joints, and end grain.
Clean ordinary dirt with a soft brush and mild soapy water, then allow the wood to dry. Avoid trapping moisture beneath nonbreathable covers. Store removable cushions indoors when they are not in use, particularly during extended rain.
Renew the finish before bare wood becomes widely exposed. Maintenance is easier when it involves light cleaning, gentle sanding, and one fresh coat rather than stripping a bench that has spent three winters pretending to be driftwood.
Hands-On Experience: What Building This Bench Really Teaches You
The most useful lesson from a simple DIY outdoor bench is that accuracy matters more than speed. During a first build, it is tempting to hurry through the cuts because the design looks uncomplicated. Then the frame goes together, one corner sits slightly high, and the bench develops a tiny wobble that suddenly becomes the only thing you can see.
A better approach is to cut the first matching component, use it as a physical template for the second, and label both pieces. This works especially well for the four legs and multiple cross supports. Measuring each part independently creates more opportunities for small differences. Copying a verified piece keeps matching components consistent.
Clamps also make a much larger difference than beginners expect. Holding a joint with one hand while drilling with the other feels efficient for approximately three seconds. Then the bit wanders, the boards slide out of alignment, and the screw enters at an angle last seen in abstract sculpture. Even one inexpensive clamp can keep the work square while pilot holes are drilled.
The mixed-width slats are usually the most enjoyable part of the project because they transform an ordinary support frame into something intentional. Lay the boards out on the floor and photograph two or three patterns with a phone. Comparing pictures is easier than repeatedly rearranging the lumber while trying to remember whether version two looked better than version four.
Prefinishing the slats is another experience-based improvement. Staining separate boards takes more setup space, but it provides cleaner coverage along the edges and prevents pale lines from appearing if the wood shifts slightly after installation. Place the pieces on scrap blocks so the coated edges do not stick to the work surface.
Finishing outdoors introduces its own comedy. Wind deposits dust into wet varnish. Insects examine the surface as though they have been hired as inspectors. Direct afternoon sun may cause a coating to dry too quickly. A sheltered, well-ventilated work area usually produces better results than finishing in the middle of the yard.
The first sit test should be cautious rather than theatrical. Put the bench on a level surface, press down at several points, and listen for movement. Sit near one end, then the other, before inviting another person to join you. Any creaking or racking should be investigated, not dismissed as the bench “developing character.”
Once completed, the project provides more than seating. It teaches how to plan cuts, square a frame, drill pilot holes, control a driver, sand progressively, select exterior hardware, and protect wood from weather. Those skills transfer directly to planter boxes, patio tables, storage benches, shelves, and dozens of other weekend projects.
The finished bench may contain a slightly uneven stain color or a screw that is not perfectly centered. Those details rarely matter once the piece is placed outside with a cushion and a cup of coffee. Handmade furniture earns its personality honestly, one corrected measurement and one sanded edge at a time.
Conclusion
A Bob Vila–inspired DIY Lite outdoor bench succeeds because it combines a simple structure with a decorative surface that looks more ambitious than it really is. Straight cuts, a compact wooden frame, U-shaped legs, mixed-width slats, and exterior-rated materials make the project accessible without reducing it to a temporary backyard prop.
Take time to choose straight lumber, predrill near board ends, use corrosion-resistant hardware, sand every touchable surface, and apply a finish designed for outdoor exposure. With those fundamentals in place, your new garden bench can provide a comfortable seat for morning coffee, evening conversations, and many years of explaining that, yes, you really did build it yourself.
Editorial note: This original guide synthesizes established bench-building and outdoor woodworking guidance from Bob Vila, The Home Depot, Lowe’s, This Old House, the USDA Forest Products Laboratory, the American Wood Council, Simpson Strong-Tie, Titebond, Minwax, Kreg Tool, and WOOD Magazine.