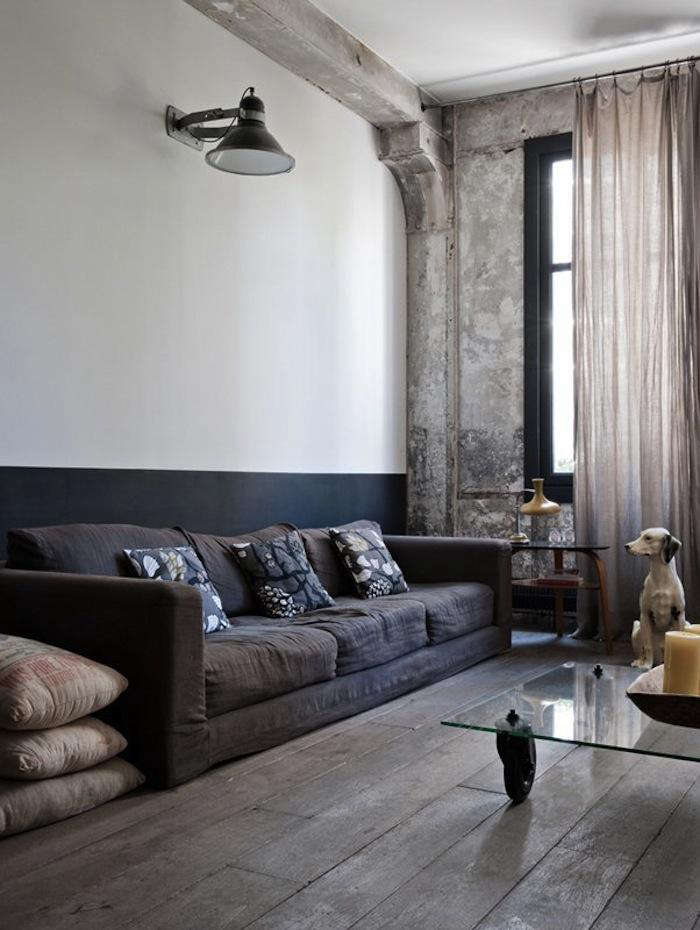
A glass coffee table has a neat visual trick: it gives you a useful surface without making the living room feel crowded. Add wheels, and the table becomes even more practical. You can roll it closer for game night, move it aside for yoga, or chase the dust bunnies that have been holding secret meetings beneath the sofa.
This DIY glass coffee table on wheels combines a custom tempered-glass top, a sturdy wooden base, a lower storage shelf, and lockable furniture casters. The finished piece looks polished enough for a modern living room but remains approachable for an intermediate beginner with basic woodworking tools.
The sample design uses a 24-by-40-inch glass top and finishes at approximately 17 to 18 inches high. Those dimensions work well for many seating areas, but the plan is easy to resize. The important part is adjusting the wooden base, caster height, and glass dimensions together rather than changing one measurement and hoping the rest of the table develops a cooperative attitude.
Why Build a Glass Coffee Table on Wheels?
A rolling coffee table is especially useful in multipurpose rooms. Unlike a heavy stationary table, it can move when you need additional floor space. Locking casters keep it steady during normal use, while the transparent top preserves sightlines and allows the base or lower shelf to remain visible.
Glass also works with several decorating styles. Pair it with a black-painted base for an industrial look, natural oak for warm modernism, or a bright color for a playful statement piece. Because the top does not visually block the shelf below, books, trays, baskets, and decorative objects become part of the design.
Typical coffee tables are approximately 16 to 19 inches high, although the best height depends on the sofa. A useful starting point is to make the tabletop level with the seat cushions or slightly lower. Designers also commonly leave about 14 to 18 inches between the table and sofa so people can reach a drink without performing an accidental living-room lunge.
Recommended Dimensions and Design
Sample Finished Size
- Glass tabletop: 24 inches wide by 40 inches long
- Wooden base: 20 inches wide by 36 inches long
- Glass overhang: 2 inches on each side
- Finished height: Approximately 17 1/2 inches
- Caster size: Approximately 3 inches in total installed height
The slightly smaller base makes the glass appear to float above the frame. A two-inch overhang is noticeable without becoming so large that knees, pets, or enthusiastic vacuuming equipment constantly collide with it.
How to Calculate the Correct Height
Use this simple formula before cutting the legs:
Desired finished height − installed caster height − glass thickness − shelf and frame thickness = required leg space.
Do not rely only on the advertised wheel diameter. The installed height includes the wheel, swivel assembly, and mounting plate. Measure the actual caster from the floor to the top of its plate.
Choosing the Glass
Order a custom tempered glass tabletop with polished edges and softened or radius corners. For a top that rests primarily on a perimeter frame, 3/8-inch tempered glass is a practical starting point, but the correct thickness depends on the dimensions, support arrangement, and expected load. A professional glass fabricator should approve the final specification. Glass suppliers commonly recommend thicker material when the panel is large or has limited support.
Finalize every dimension, edge treatment, corner radius, and required hole before ordering. Fully tempered glass cannot be cut, drilled, ground, or reshaped afterward. Once it has been tempered, the design is no longer accepting creative revisions.
Materials and Supplies
| Material | Suggested Quantity | Purpose |
|---|---|---|
| 3/8-inch tempered glass, 24 by 40 inches | 1 piece | Tabletop |
| 1-by-4 lumber | Approximately 10 linear feet | Upper support frame |
| 2-by-2 lumber | Approximately 4 linear feet | Legs |
| 3/4-inch cabinet-grade plywood | One 20-by-36-inch panel | Lower shelf and caster platform |
| Wood blocks or doubled plywood pads | 4 | Reinforcing caster mounting points |
| Locking swivel plate casters | 4 | Mobility and stability |
| Wood screws or pocket-hole screws | As needed | Frame assembly |
| Wood glue | 1 bottle | Strengthening joints |
| Clear non-slip glass bumpers | 8 to 12 | Cushioning the tabletop |
| Furniture-glass retaining clips | 4 or more | Preventing the top from sliding |
| Wood stain, paint, or clear finish | As needed | Protecting and decorating the base |
Tools
- Tape measure, pencil, and combination square
- Miter saw or circular saw with a straightedge
- Drill and driver bits
- Pocket-hole jig, doweling jig, or countersink bit
- Random-orbit sander or sanding block
- Clamps
- Level
- Safety glasses, hearing protection, and dust mask
- Socket wrench if the casters use through-bolts
How to Choose the Right Furniture Casters
Casters are not merely decorative wheels. They determine how easily the table moves, whether it stays still when locked, and whether your flooring survives the relationship.
For most indoor rolling coffee tables, choose non-marking rubber or polyurethane wheels. These materials generally roll more quietly than hard metal wheels and are kinder to hardwood, laminate, and tile. Larger wheels move more easily across rugs and uneven transitions, while smaller wheels create a more discreet appearance.
Plate-mount casters are usually easier to install securely on a flat wooden platform than stem-mount versions. Check the load rating for each caster and multiply it by four. The combined capacity should comfortably exceed the estimated weight of the completed table, glass, shelf contents, and anything normally placed on top. Selecting casters by floor type, wheel material, mount style, and load rating is more important than simply choosing the shiniest set in the hardware aisle.
Four locking swivel casters provide maximum maneuverability. A combination of two fixed and two swivel casters tracks more predictably in a straight line, but it is less convenient in a tight living room. For this project, four locking swivel casters are usually the most flexible choice.
Safety Before You Start
- Wear eye and hearing protection while cutting or drilling.
- Use a dust mask when sanding wood or plywood.
- Support lumber fully before making cuts.
- Ask another adult to help lift and position the glass.
- Never place a glass panel directly on concrete, tile, or a metal tool bench.
- Do not attempt to cut, grind, or drill tempered glass.
- Keep the casters locked whenever the table is being used.
- Do not sit, stand, or allow children to climb on the table.
Basic furniture-building guides consistently recommend safety glasses and respiratory protection during cutting and sanding. It may feel excessive for a small weekend project, but sawdust has never paused midair to admire anyone’s confidence.
Step-by-Step: Build the Rolling Coffee Table
Step 1: Measure the Room and Sofa
Before purchasing glass, mark the proposed tabletop footprint on the floor with painter’s tape. Confirm that you can walk around it comfortably and that it does not crowd nearby chairs, cabinets, or doorways.
Measure the sofa-seat height and choose a finished tabletop height close to it. Record the exact installed caster height and glass thickness before calculating the leg length.
Step 2: Cut the Upper Frame
For a 20-by-36-inch outer frame made from 1-by-4 boards, cut two long rails and two shorter end rails. The exact short-rail length depends on your joinery method and the actual thickness of the lumber, so lay out the frame before cutting every piece at once.
Use square butt joints reinforced with pocket holes, dowels, or countersunk screws. Apply wood glue, clamp the assembly, and check both diagonals. When the diagonal measurements match, the frame is square.
Step 3: Cut and Attach the Legs
Cut four identical legs from 2-by-2 lumber. Position one leg inside each corner of the upper frame. Use glue and screws driven through the rails, pocket-hole screws, or small interior corner brackets.
Check each leg with a square before tightening the fasteners. A small error at the top can become a surprisingly dramatic lean at the floor. Tables are very good at displaying fractions of an inch as personality flaws.
Step 4: Prepare the Lower Shelf
Cut the plywood shelf to approximately 20 by 36 inches or size it to fit between the legs. You can leave the plywood edge visible, cover it with iron-on edge banding, or add narrow solid-wood trim.
Attach reinforcing blocks beneath the shelf at all four caster locations. The blocks give the caster screws more material to grip. For maximum strength, use bolts, washers, and locking nuts rather than short screws driven only into plywood.
Step 5: Attach the Shelf to the Base
Position the shelf at the bottoms of the legs. Confirm that it is level and square before securing it with glue and screws. The shelf does more than hold books; it ties the legs together and helps prevent the base from racking as the table rolls.
A flush-mounted shelf creates a clean cart-like silhouette. Raising it one or two inches above the caster platform produces a lighter furniture appearance and makes the wheels less visually dominant.
Step 6: Sand the Entire Base
Fill visible screw holes and small gaps with wood filler. Sand the base with medium-grit paper, then progress to finer paper. Always sand in the direction of the grain on visible solid-wood surfaces.
Ease every sharp wooden edge with sandpaper. A slight rounding is more comfortable to touch and helps finishes wear more evenly. Wood-finishing guidance commonly recommends progressing from approximately 120-grit to 220-grit and lightly sanding between protective coats after the previous coat has dried.
Step 7: Paint, Stain, or Clear-Coat the Wood
Remove all sanding dust before applying the finish. Stain creates warmth and emphasizes the grain, while paint can make inexpensive lumber look more uniform. A clear polyurethane or water-based protective finish helps the base resist spills, scuffs, and damp cleaning cloths.
Apply thin coats and follow the manufacturer’s drying instructions. Lightly sand between coats when directed. Two protective coats are generally better than one, and a third coat is useful on the lower shelf, where baskets and books may slide repeatedly.
Allow the finish to cure before installing the casters or placing the glass. “Dry to the touch” does not always mean “ready to have a wheel tightened against it.”
Step 8: Install the Casters
Turn the base upside down on a padded surface. Position each caster plate the same distance from its corner and mark the mounting holes. Drill correctly sized pilot holes to reduce splitting and make the fasteners easier to control.
Attach the casters using bolts or manufacturer-recommended screws. Tighten them evenly, but do not crush the wood fibers. Plate-mount caster installation typically involves positioning the plate, marking and drilling the holes, and fastening it with screws or bolts, nuts, and washers.
Turn the table upright and roll it in every direction. Lock all four wheels and push gently from each side. The base should remain stable without rocking or drifting.
Step 9: Add the Glass Supports
Place clear rubber or silicone bumpers around the upper frame. Use at least two per side, with additional pads near the corners. Every pad should be the same thickness so the glass is supported evenly.
Because this is a mobile coffee table, use discreet retaining hardware designed specifically for furniture glass. The clips should prevent horizontal movement without clamping the edges so tightly that they create concentrated pressure.
Avoid improvising with ordinary screws, metal tabs pressed directly against glass, or an adhesive that was not designed for the materials. If you choose an adhesive-assisted system, confirm that it is compatible with tempered glass, the wood finish, and the bumper material.
Step 10: Position the Glass Top
Lock the casters before installing the tabletop. With another adult, lower the glass straight onto the bumpers. Do not drag it across the wooden frame.
Measure the overhang on all four sides and adjust the panel until it is centered. Install the retaining clips according to their instructions, then test for side-to-side movement using gentle hand pressure.
Finally, unlock the casters and roll the table slowly. Listen for rattling and watch the glass. If the top shifts, stop and improve the retaining system before regular use.
Style Ideas for a Custom Look
Industrial
Paint the base matte black and choose dark rubber casters. Add a lower shelf stained in a medium walnut tone to keep the result from feeling like equipment borrowed from a restaurant kitchen.
Warm Modern
Use oak, maple, or birch plywood with a clear satin finish. Select low-profile polyurethane casters and polished flat-edge glass. Keep the lower shelf mostly open, with one tray and a small stack of books.
Vintage Cart
Use larger wheels, an aged stain, and dark metal hardware. Distress the wood lightly at the corners, but avoid weakening joints or creating rough edges near the glass.
Color-Forward
Paint the base navy, olive, terracotta, or another saturated color. The transparent tabletop prevents a bold base from visually overwhelming the room.
Display Table
Add a shallow removable tray beneath the glass for postcards, photographs, textiles, or small collectibles. Leave enough clearance so displayed objects never press against the underside of the tabletop.
Common Mistakes to Avoid
- Ordering glass too early: Build or fully mock up the base before confirming the final glass dimensions.
- Forgetting caster height: Wheels can turn an elegant coffee table into a glass-topped dining platform for very small guests.
- Using ordinary window glass: Specify furniture-appropriate tempered or laminated safety glass through a qualified fabricator.
- Mounting casters into thin material: Reinforce the mounting points or use through-bolts.
- Choosing non-locking wheels: A coffee table should not retreat whenever someone reaches for a snack.
- Relying only on loose bumpers: A rolling table needs a positive method of preventing the glass from sliding.
- Ignoring caster capacity: Include the weight of the glass, wooden base, shelf contents, and normal tabletop items.
- Applying thick finish coats: Several thin coats usually level and cure better than one heroic puddle.
- Installing the glass alone: Even a manageable panel can be awkward, slippery, and vulnerable at its edges.
Cleaning and Long-Term Maintenance
Clean the glass with a soft microfiber cloth and a nonabrasive glass cleaner. Spray the cleaner onto the cloth rather than flooding the edges, wooden frame, and retaining hardware.
Inspect the table every few months. Tighten loose caster fasteners, confirm that the locks engage fully, and replace hardened or missing glass bumpers. Remove hair and fibers wrapped around the caster axles before the wheels begin squeaking like tiny haunted shopping carts.
Do not roll the table over tall thresholds, electrical cords, or sharply uneven flooring. Lift it with assistance when moving it between rooms. Casters are intended for convenient repositioning, not for turning furniture into an off-road vehicle.
If the glass becomes chipped, cracked, or deeply scratched near an edge, stop using the table and have the panel evaluated by a glass professional. Do not try to polish away structural edge damage yourself.
Real-World Build Experience: What Usually Surprises DIYers
The first lesson in a project like this is that mobility magnifies small construction errors. A stationary table can hide a slightly uneven leg on a felt pad. A rolling table announces the problem every time it crosses the room. If the caster plates are mounted at different heights, the table may rock, one wheel may spin without carrying its share of the load, or the frame may twist when pushed. Careful measuring at the caster stage is therefore just as important as making the visible upper frame square.
The second surprise is the physical presence of the glass. On paper, a 24-by-40-inch panel sounds modest. In your hands, it feels larger, heavier, and much more interested in nearby doorframes. Clear glass also makes edges difficult to see under certain lighting. Builders quickly learn to create a padded staging area before delivery, keep the route to the table clear, and recruit a helper before opening the packaging. Planning the lift is safer than standing in the middle of the room holding a glass panel while suddenly remembering the coffee table is still upside down.
Caster choice also changes the personality of the finished furniture. Very small hard wheels may look refined in photographs, but they can struggle on rugs and click loudly across tile joints. Oversized industrial casters roll beautifully but may dominate the design and raise the table too high. The happiest compromise is usually a medium-size non-marking wheel with a sturdy mounting plate and an easy-to-reach brake. A brake hidden tightly beneath the shelf may look cleaner, but it becomes irritating when you must kneel and negotiate with it every evening.
Finishing often requires more patience than assembly. Cutting and screwing the base together creates visible progress, while waiting for clear coat to cure feels like the project has entered a long administrative review. Rushing this stage can leave impressions around the caster plates, fingerprints in the finish, or shelf marks beneath baskets. Completing the sanding and finishing before installing hardware produces cleaner results and keeps metal dust, grease, and wheel debris away from fresh surfaces.
Living with the table reveals whether the design decisions were practical. A lower shelf that is too close to the glass becomes difficult to access. An oversized overhang invites bumped knees. Casters without dependable locks make the table feel unstable even when it is structurally strong. By contrast, a well-proportioned rolling coffee table becomes surprisingly useful. It can serve as a snack station during movie night, move beside a chair as a temporary work surface, or roll away when guests need open floor space.
The final lesson is that the safest details are often nearly invisible. Rounded glass corners, polished edges, evenly spaced bumpers, reinforced caster blocks, and discreet retaining clips do not draw attention in finished photographs. They simply make the furniture feel solid and thoughtfully made. That quiet reliability is the real difference between a project that merely looks good for a day and one that earns a permanent place in the living room.
Conclusion
A DIY glass coffee table on wheels delivers a useful mix of style, storage, and flexibility. The wooden frame makes the project customizable, the transparent top keeps the design visually light, and lockable casters let the table adapt to daily life.
The success of the build depends on details that are easy to overlook: calculating the finished height before cutting, choosing casters with adequate capacity, reinforcing their mounting points, ordering properly fabricated tempered glass, and preventing the tabletop from shifting while the table moves.
Take your time with the measurements and finish, and the result will look less like a weekend experiment and more like a piece of furniture you deliberately refused to overpay for.
Note: Have the final glass size, thickness, edge treatment, and support arrangement reviewed by a qualified glass fabricator. This project guide is intended for general DIY education and does not replace product-specific engineering or installation instructions.