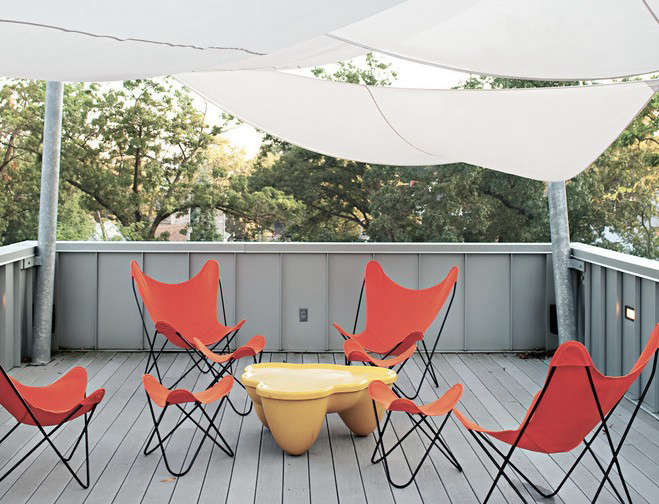
There is a moment in every backyard’s life when the patio chair becomes a skillet, the deck turns into a waffle iron, and everyone suddenly remembers they “love spending time outdoors” only after sunset. That is where shade sails enter the scene: crisp, architectural, breezy, and far more interesting than a sad umbrella leaning like it has given up on summer.
A shade sail is a tensioned piece of outdoor fabric stretched between posts, walls, trees, or other secure anchor points to create shade over a patio, pool, garden, play area, driveway, or outdoor dining zone. The best ones look effortless, but the secret is that they are not random triangles flapping dramatically in the wind. They are designed. They are planned. They are the outdoor equivalent of a well-tailored linen shirt: relaxed, practical, and quietly showing off.
In this design sleuth guide, we will investigate shade sails from every angle: materials, shapes, UV protection, installation, color choices, placement, maintenance, and real-life experience. By the end, you will know how to choose a shade sail that makes your outdoor space cooler, more comfortable, and much less likely to roast your guests like artisanal vegetables.
What Are Shade Sails?
Shade sails are outdoor fabric canopies inspired by ship sails. They are typically made from high-density polyethylene, polyester, or PVC-coated fabrics and are tensioned tightly between fixed points. Unlike a solid roof, a shade sail creates a lighter visual effect. It gives you protection from direct sun while keeping the space open, airy, and connected to the garden.
The most common shade sail shapes are triangles, rectangles, squares, and custom polygons. Triangle shade sails are dramatic and sculptural, especially when layered. Rectangular shade sails provide more coverage and work well over dining tables, decks, or long seating zones. Square sails are clean and balanced, while custom designs can solve awkward spaces that refuse to behave like nice little rectangles.
Why Shade Sails Are Suddenly Everywhere
Shade sails have become popular because they solve several outdoor design problems at once. They cool a space, define a zone, add architectural style, and cost less than many permanent structures such as pergolas, roof extensions, or covered patios. They also have a modern resort-like quality, which explains why you see them around pools, hotels, playgrounds, cafés, and stylish backyards where someone definitely owns matching outdoor cushions.
For homeowners, the appeal is simple: shade sails can transform an exposed patio into a usable outdoor room. A hot concrete slab becomes a breakfast spot. A glaring pool deck becomes a lounge area. A child’s play space becomes safer and more comfortable. A grill zone becomes a place where the cook no longer has to squint heroically into the afternoon sun.
The Main Benefits of Shade Sails
They Help Reduce Heat
Direct sunlight can make patios, decks, and outdoor furniture painfully hot. A shade sail blocks a large portion of solar exposure, helping the area beneath feel cooler and more usable. While it will not air-condition your yardsadly, science has not yet given us a backyard thermostatit can dramatically improve comfort during warm months.
They Offer UV Protection
Many quality shade sails are designed to block a high percentage of harmful UV rays. This makes them especially useful over places where people linger: patios, outdoor dining areas, pools, playgrounds, and garden benches. Shade should not replace sunscreen, hats, or protective clothing, but it is an important part of a smart sun-protection strategy.
They Create Visual Structure
A shade sail does more than block sun. It adds lines, planes, and movement to an outdoor space. In design terms, it creates a ceiling without building a roof. That overhead plane makes a patio feel intentional, almost like a room. Suddenly, the furniture arrangement makes sense. The grill has a zone. The fire pit has a frame. The backyard stops looking like a collection of random purchases and starts looking like a plan.
They Are Flexible
Shade sails can be temporary, seasonal, or permanent depending on the product and installation. Some homeowners remove them during storms or winter. Others install heavy-duty custom sails designed for longer-term use. This flexibility is one reason they work in so many settings, from suburban patios to commercial courtyards.
Choosing the Right Shade Sail Material
The fabric is the heart of a shade sail. Pick the wrong material and you may end up with a sagging, faded triangle of regret. Pick the right one and you get years of cooler, better-looking outdoor living.
HDPE Shade Fabric
High-density polyethylene, often called HDPE, is one of the most common materials for residential shade sails. It is usually knitted, breathable, and designed to block UV rays while allowing air to pass through. That airflow helps prevent heat from becoming trapped underneath the sail. It also reduces wind pressure compared with solid waterproof fabrics.
HDPE shade sails are great for hot, dry climates and sunny patios where the main goal is shade rather than rain protection. Because the fabric is porous, water can pass through it. That means it will not create a waterproof roof, but it also means less risk of water pooling when installed correctly.
Waterproof Polyester or PVC-Coated Fabric
Waterproof shade sails are usually made from polyester or PVC-coated fabric. These are better suited for areas where light rain protection matters. However, waterproof sails require careful installation because water must drain off the surface. Without enough slope and tension, rain can collect in the middle, creating a heavy sagging pouch that looks less “modern outdoor design” and more “sad backyard soup bowl.”
If you choose a waterproof sail, pay close attention to pitch, drainage direction, and anchor strength. These sails can catch more wind than breathable mesh, so the structure supporting them needs to be robust.
Commercial-Grade Fabric
For schools, restaurants, pools, and public spaces, commercial-grade shade sail fabric may be necessary. These products are often engineered for higher UV resistance, stronger stitching, reinforced edges, and long-term exposure. Homeowners in windy, coastal, or extremely sunny climates may also benefit from investing in a heavier-duty option.
Shade Sail Shapes: Which One Works Best?
Triangle Shade Sails
Triangle shade sails are the design darlings of the category. They look dynamic, modern, and a little bit nautical. They are excellent for small patios, entryways, pool corners, and layered installations. The downside is that a single triangle does not always provide as much shade as people expect. It may look dramatic while leaving your lunch table half sunny, which is rude behavior from geometry.
Square and Rectangle Shade Sails
Square and rectangular sails provide more consistent coverage. They are practical over dining areas, outdoor sofas, play zones, and decks. They also work well when the goal is to shade a predictable footprint. If you want maximum function with a clean look, a rectangle may be the sensible hero of the shade sail family.
Layered Shade Sails
Layering two or more shade sails creates a more custom, architectural effect. Designers often overlap triangles or combine different shapes at varied heights. This approach can provide better coverage throughout the day as the sun moves. It also adds depth and shadow, which makes the space feel more intentional.
Placement: Follow the Sun, Not Your Feelings
The most common mistake with shade sails is placing them based on where the patio looks empty instead of where the sun actually hits. Before buying anything, study your outdoor space at different times of day. Morning sun comes from the east. Afternoon sun hits from the west and is often hotter and more intense. Midday sun is high overhead, but seasonal changes can shift the shade pattern significantly.
Mark the area you want to shade. Is it the dining table at noon? The lounge chairs at 3 p.m.? The kids’ play area from 10 a.m. to 2 p.m.? Your answer determines the sail’s position, angle, size, and shape. A shade sail that looks perfect at 9 a.m. may be shading the neighbor’s fence by 4 p.m. The fence may appreciate it, but your guests will not.
Design Tip: Use Height and Slope
A flat shade sail is usually a bad idea. Proper installations typically use varied anchor heights to create slope and tension. This does two important things: it helps water run off and gives the sail a sculptural twist known as a hypar effect. That slight twist is why professionally installed shade sails look sleek instead of saggy.
For breathable fabric, slope still matters because it improves the shape and helps with wind performance. For waterproof fabric, slope is essential. Water must have a clear path to drain. A general design rule is to create a noticeable pitch rather than hoping gravity will “figure it out.” Gravity is powerful, but it is not your project manager.
Anchor Points: The Part You Cannot Fake
A shade sail is only as good as the points holding it. Anchor points may include house walls, beams, steel posts, wood posts, or specially installed poles. They must be strong enough to handle fabric tension, wind movement, and weather stress. A flimsy fence post is not an anchor point. It is a future cautionary tale.
Common hardware includes pad eyes, eye bolts, snap hooks, shackles, turnbuckles, tensioners, and stainless-steel cable. Stainless steel or galvanized hardware is often preferred outdoors because it resists corrosion. Turnbuckles are especially important because they allow you to tighten the sail properly. A loose sail flaps, wears faster, and looks like laundry with ambition.
Posts: Wood, Steel, or Something Else?
Posts are often needed when there are not enough existing structures in the right locations. Steel posts are strong, slim, and modern. Powder-coated steel can blend with contemporary architecture, while galvanized posts offer durability. Wood posts create a warmer, more natural look, especially in rustic or garden settings, but they must be properly sized, treated, and installed to resist rot and movement.
For permanent shade sail installations, posts generally need deep footings and careful placement. Soil type, frost depth, wind exposure, sail size, and local building requirements can all affect the installation. When in doubt, consult a professional installer or structural expert. This is not because shade sails are mysterious. It is because wind is extremely committed to testing your confidence.
Color Choices: Pretty, Practical, or Both?
Shade sail color affects both style and performance. Light colors such as white, cream, sand, and pale gray feel airy and coastal. They reflect more light and can make a small patio feel larger. Dark colors such as charcoal, navy, forest green, and black create stronger contrast and often feel more architectural. They may also hide dirt better and provide a moodier, resort-like atmosphere.
Neutral colors are safest for long-term design. A sand or charcoal sail can work with many furniture styles and landscaping plans. Bright colors can be fun around pools, schools, playgrounds, or vacation homes, but they should be chosen carefully. A fire-engine red triangle above your patio may be exciting in June and visually exhausting by August.
Shade Sails vs. Pergolas, Umbrellas, and Awnings
Shade sails are not the only way to create outdoor shade. Pergolas add structure and can support vines, lights, curtains, and fans. Umbrellas are portable and easy to move. Awnings attach to the house and can often be retractable. Each option has strengths.
Shade sails stand out because they are visually light, relatively affordable, and highly adaptable. They are excellent when you want shade without a bulky structure. They also work well in awkward areas where a standard umbrella base would get in the way or where a pergola would feel too heavy.
However, shade sails are not perfect for every space. They require strong anchor points, careful measurement, and proper tension. They may need to be removed in severe weather. They also do not provide the enclosed feeling of a covered porch. The best choice depends on your climate, budget, style, and how you use the space.
How to Measure for a Shade Sail
Start by identifying the exact area you want shaded. Then choose potential anchor points around that zone. Remember that the sail itself should usually be smaller than the distance between anchor points because you need room for tensioning hardware. If the sail is the exact size of the gap, you may discover that your turnbuckle has nowhere to go, which is a very specific and annoying problem.
Measure diagonally as well as side to side. Outdoor spaces are often less square than they appear. Account for clearance above doors, grills, windows, rooflines, and tree branches. Also consider headroom. A sail installed too low can make a patio feel cramped, while one installed too high may cast shade somewhere other than where you need it.
Installation Basics
A typical shade sail installation includes planning the layout, installing or confirming anchor points, attaching hardware, connecting each corner, and tensioning the fabric evenly. The sail should be pulled taut, with no major wrinkles or sagging. Corners should align cleanly with the anchor points, and the fabric should sit under consistent tension.
For DIY projects, always follow the manufacturer’s instructions. Use hardware rated for outdoor structural use, not random pieces from the mystery drawer in the garage. Check whether your wall, fascia, tree, or post can safely support the load. For larger sails, commercial spaces, high-wind areas, or permanent installations, professional help is a wise investment.
Maintenance: Keep It Handsome
Shade sails are low-maintenance, not no-maintenance. Inspect the fabric regularly for fraying, loose stitching, stretched corners, or small tears. Check hardware for corrosion, movement, or loosening. After strong winds or storms, look over the entire installation before assuming everything is fine.
Cleaning usually involves mild soap, water, and a soft brush or cloth. Avoid harsh chemicals, bleach, or abrasive cleaning tools that can damage fabric coatings or UV stabilizers. Let the sail dry fully before storing it. If you remove the sail seasonally, fold it clean and dry, then store it away from pests, moisture, and sharp tools. Basically, do not toss it into a damp shed next to a rake and hope for the best.
Best Places to Use Shade Sails
Patios and Decks
A shade sail can turn a sunny patio into a comfortable outdoor living room. Position it over seating, dining, or lounging zones to create a clear purpose for the space.
Pool Areas
Pool decks benefit from shade because swimmers often spend hours in direct sun. A sail can cover lounge chairs, shallow play zones, or poolside dining areas without making the space feel enclosed.
Outdoor Kitchens
Grilling in full sun can feel like cooking inside a volcano. A shade sail above an outdoor kitchen or prep area makes the space more pleasant and helps protect surfaces from direct exposure.
Play Areas
Shade is especially valuable over children’s play spaces. It helps reduce heat on equipment and creates a more comfortable zone for longer outdoor play.
Driveways and Side Yards
Shade sails can also protect cars, bikes, trash storage areas, or narrow side yards. In these spots, function may matter more than drama, but a clean rectangular sail can still look sharp.
Common Shade Sail Mistakes
The first mistake is buying a sail before planning the anchor points. The second is choosing a size that is too large for the available space. The third is installing it too flat. The fourth is underestimating wind. The fifth is assuming every shade sail is waterproof. The sixth is picking a color based only on a tiny online photo and then being shocked when “desert beige” looks like “sad oatmeal” in real life.
To avoid these problems, plan carefully. Study the sun. Measure twice. Leave room for hardware. Use strong supports. Create slope. Choose fabric based on your climate and purpose. Review product specifications before buying. And when structural questions arise, ask a professional instead of asking your cousin who once built a bookshelf and has never stopped mentioning it.
Design Ideas for a More Beautiful Shade Sail Setup
Pair a neutral shade sail with warm wood furniture for a modern organic look. Use charcoal fabric with black metal posts for a sleek contemporary patio. Layer two triangular sails at different heights for a sculptural courtyard effect. Add string lights below the sail, but make sure they do not rub against the fabric. Plant ornamental grasses or climbing vines nearby to soften the geometry.
For a coastal design, choose white or sand-colored fabric with pale decking, teak furniture, and blue-gray cushions. For a desert-modern look, use rust, tan, or warm gray with gravel, succulents, and low-slung lounge chairs. For a family backyard, choose durable HDPE fabric, simple posts, and a layout that shades the places people actually use, not just the photogenic corner where nobody sits.
Budget Considerations
Shade sail costs vary widely. A small ready-made sail can be budget-friendly, while a large custom sail with engineered posts and professional installation can be a significant project. The main cost factors include size, fabric type, hardware quality, post requirements, site conditions, and whether the installation is DIY or professional.
Do not judge the price by fabric alone. Hardware matters. Posts matter. Footings matter. A cheap sail attached to weak supports is not a bargain; it is a suspense story. If your budget is limited, start with a smaller area and upgrade the installation quality rather than trying to cover the entire yard with bargain fabric and optimism.
Experience Notes: What Living With Shade Sails Actually Feels Like
The first thing people notice after installing a shade sail is not usually the technical performance. It is the feeling. The patio suddenly invites you outside earlier in the day. The chairs are not too hot to touch. The table is not glaring. The dog finds the shaded patch immediately and acts as though the entire project was commissioned for him, which, emotionally, it probably was.
In real backyards, shade sails work best when they are designed around habits. A family that eats dinner outdoors needs coverage in the late afternoon and early evening. A remote worker with a laptop needs morning shade and glare control. Pool owners need shade near lounge chairs and shallow water areas. Gardeners may want partial shade near potting benches or delicate plants. The most successful installations begin with a simple question: “Where do we actually spend time?”
One practical lesson is that shade moves more than people expect. A sail that perfectly covers a dining table at noon may barely touch it by 3 p.m. This is why it helps to observe the space before installation. Put painter’s tape on the patio, move chairs around, and watch the shadow path for a day or two. It may feel excessive, but so does buying the wrong size sail and then pretending you meant to shade only one chair.
Another experience-based tip: tension is everything. A taut shade sail looks polished and lasts longer. A loose one flaps, snaps, and announces every breeze like a theater curtain in a ghost movie. Good hardware makes a noticeable difference. Turnbuckles allow small adjustments over time, and sturdy anchor points keep the whole system feeling secure.
Color also changes the mood more than expected. A white sail can make a patio feel fresh and bright, but it may show dirt sooner. A dark gray sail feels sophisticated and hides marks better, but it can visually lower the space if installed too low. Sand, taupe, and warm gray are forgiving choices because they blend with stone, wood, concrete, and planting beds.
Maintenance is usually simple, but consistency helps. A quick inspection after storms can prevent small issues from becoming expensive ones. If leaves collect on top, remove them. If hardware loosens, tighten it. If fabric gets stained, clean it gently before the stain becomes part of the family. Seasonal removal is smart in areas with snow, hurricanes, or strong winter winds.
The biggest surprise is how much a shade sail can change the identity of a space. Before, the patio may feel like an exposed slab attached to the house. After, it feels like a destination. Add a rug, a table, a few planters, and warm lighting, and the space becomes an outdoor room. The shade sail is not just sun protection; it is the ceiling that tells everyone, “Yes, this area has a purpose, and that purpose is iced tea.”
For homeowners who enjoy DIY projects, a small shade sail can be satisfying. For larger or permanent installations, professional help is often worth it. The difference between “pretty good” and “beautifully tensioned” is visible. More importantly, proper installation improves safety. Shade sails deal with real forces from wind, rain, and tension. They may look soft, but the structure behind them needs to be serious.
The best experience comes from treating shade sails as part of the landscape, not an afterthought. Coordinate them with furniture, plants, exterior paint, and hardscape materials. Think about the view from inside the house as well as from the patio. A well-placed sail can frame a garden, soften a harsh wall, or make a pool area look like a boutique hotel where nobody charges $19 for sparkling water.
Conclusion: A Smart Shade Sail Is Design and Comfort in One Move
Shade sails are one of the most effective ways to upgrade an outdoor space without building a full roof. They provide sun protection, reduce heat, define outdoor rooms, and add a clean architectural element to patios, decks, pools, gardens, and play areas. But the best shade sail is not simply the prettiest triangle you find online. It is the one that fits your sun exposure, climate, anchor points, design style, and daily routine.
Choose breathable HDPE fabric for airflow and everyday sun protection. Consider waterproof fabric only when rain coverage matters and you can create proper slope. Use strong posts and corrosion-resistant hardware. Tension the sail correctly. Plan for the moving sun. And above all, remember that shade is not just a luxury. It is what makes outdoor living actually livable when summer decides to be dramatic.
Editorial note: This article is intended as general design guidance. For large, permanent, elevated, or high-wind shade sail installations, consult local building codes and a qualified professional installer.