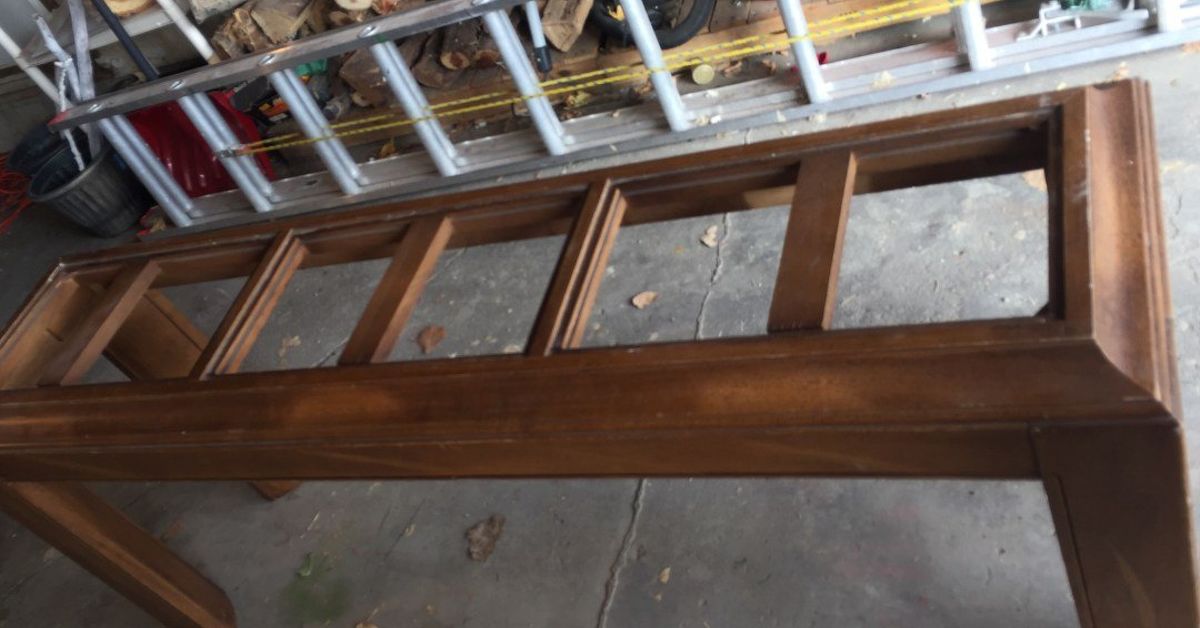
There are two kinds of thrift store tables: the ones that look like they survived three decades of awkward holiday dinners, and the ones that are secretly waiting for their second career as luxury pet furniture. With a little sanding, a smart paint choice, and a cushion that does not resemble a sad pancake, an inexpensive table can become an upscale dog bed worthy of your dog’s very serious lounging schedule.
This project is part furniture makeover, part pet-parent flex, and part proof that your dog probably has better interior-design opportunities than you do. The goal is not to create a tiny human bed with decorative pillows your dog will launch across the room. The goal is to build a sturdy, washable, comfortable DIY dog bed furniture piece that looks intentional in your home.
Repurposing furniture for pets is hardly a wild idea: design publications regularly highlight old suitcases, tables, and other forgotten pieces transformed into cozy pet spaces. The trick is to combine that creative spirit with real-world details such as stability, washable materials, smooth finishes, and enough room for your dog to stretch like a furry yoga instructor.
Why a Thrift Store Table Makes a Great Dog Bed Base
A thrifted table already brings something store-bought dog beds often lack: personality. It may have curved legs, solid wood construction, a graceful apron, charming wear, or just enough weirdness to become cool again once it is painted. You are not simply buying a bed. You are giving a neglected piece of furniture a job with excellent benefits: quiet naps, occasional drool, and unlimited pet hair.
A table also gives you a strong platform for a custom cushion. Instead of hoping a generic round bed fits your dog and your living room, you can make the dimensions work for both. A small side table can become a compact dog lounge for a Chihuahua, Yorkie, or curled-up terrier. A wider coffee table can become a low-profile daybed for a beagle, spaniel, or medium-size rescue who believes every room should include a personal suite.
The final effect can feel surprisingly high-end. A clean painted base, low wooden rails, tailored cushion, and brass-toned feet or trim can resemble boutique pet furniture rather than a weekend experiment involving sawdust and a suspicious amount of coffee.
Choose the Right Thrift Store Table
Look for sturdy bones, not perfect looks
Ignore chipped paint, dated stain, and the questionable floral decal someone applied in 1998. Focus on structure. The best thrift store table for a dog bed is sturdy, relatively low, and wide enough for your dog’s preferred sleeping style. Wiggle it gently. Check that the legs feel secure, the tabletop is not warped, and there are no sharp splinters, loose screws, or dramatic wobbling worthy of a reality-TV reveal.
Solid wood is ideal, but a well-built veneer table can work too if the surface is intact. Avoid pieces with severe water damage, crumbling particleboard, moldy odors, or veneer lifting like old wallpaper. Also skip furniture that may be valuable or historically significant. Some vintage and antique pieces are better preserved than converted into a place for your dog to store one mysterious sock.
Measure your dog before you buy
Bring a tape measure to the thrift store or measure the table before committing to the makeover. Your dog should be able to turn around, curl up, and stretch comfortably without hanging halfway off the mattress like a dramatic Victorian fainting patient.
For a practical starting point, measure your dog from nose to tail while standing and observe how much space they use while resting. Dogs who sleep curled into a cinnamon-roll shape can use a more compact bed. Dogs who sleep flat on their sides with every leg pointed in a different postal code need a longer platform. Pet-care guidance similarly emphasizes choosing a bed that gives a dog room to lie down, turn around, and stretch comfortably.
Choose a table style that fits the project
- Small end table: Best for small dogs and puppies.
- Low coffee table: Great for medium dogs when the legs are shortened.
- Bench-style table: A strong option for long-bodied dogs that like to sprawl.
- Table with decorative legs: Perfect for a more traditional, cottage, or vintage look.
- Simple square table: Ideal for a modern dog bed with crisp lines and a tailored cushion.
Materials and Tools for an Upscale DIY Dog Bed
| Item | Why You Need It |
|---|---|
| Thrift store table | The structural base for the dog bed |
| Sandpaper or sanding sponge | For smoothing rough spots and preparing the surface |
| Wood filler | To repair dents, old screw holes, or small cracks |
| Primer and furniture paint | For a polished, durable finish |
| Water-based protective topcoat | To help the finish resist routine paw traffic and cleaning |
| 1-by-2 or 1-by-3 boards | Optional rails for a shallow tray-style dog bed |
| Wood screws and wood glue | For securing rails or reinforcing joints |
| Foam cushion or existing dog bed insert | The comfortable part your dog will actually care about |
| Washable upholstery fabric | For a removable, practical cushion cover |
| Non-slip furniture pads | To keep the bed from sliding around on hard floors |
How to Turn a Table Into an Upscale Dog Bed
Step 1: Clean the table like it owes you money
Before sanding or painting, clean the table thoroughly. Remove dust, greasy residue, old stickers, and thrift-store mystery grime. A clean surface helps primer and paint adhere more reliably, while dirt trapped under a finish can create bumps, peeling, or a texture best described as “barnacle chic.”
Furniture-refinishing guidance consistently starts with cleaning, sanding, and appropriate priming before paint is applied. Taking your time here makes the final finish look smoother and helps reduce chipping later.
Step 2: Repair, tighten, and simplify
Fill shallow dents and unused holes with wood filler. Tighten loose screws. Reglue any minor joint that has started to wobble. Remove decorative hardware that might snag a blanket, scratch your dog, or become a chew toy with terrible intentions.
This is also the moment to decide whether the table needs shorter legs. A low dog bed is easier for puppies, small dogs, and many older dogs to enter. Mark each leg carefully before cutting so the bed sits level. If you are unsure about using a saw, skip the leg-cutting step and choose an already-low table instead. There is no medal for turning a simple weekend project into a woodworking documentary.
Step 3: Add low side rails for a polished dog-bed frame
For a more upscale look, add low rails along the back and two sides of the tabletop. The rails create a shallow tray that holds the cushion in place and gives the bed a tailored, built-in appearance. Leave the front open so your dog can step in easily.
Cut the boards to length, dry-fit them first, then attach them using wood glue and short screws from underneath where possible. Keep the rails low enough that they create a cozy boundary without making the bed feel like a tiny fenced-in apartment. Sand the edges until every corner feels smooth under your hand.
Step 4: Sand without overdoing it
You do not always need to strip a table down to bare wood. Light sanding may be enough when the goal is simply to dull a glossy finish and create a better surface for primer. Use a sanding sponge around curves and decorative details. Vacuum or wipe away dust before moving on.
If you are refinishing bare wood, work progressively and sand with the grain. Furniture professionals commonly use rougher grit first for imperfections and finer grit for a smoother final surface. The goal is not to erase the table’s entire past; it is to make the next chapter adhere properly.
Step 5: Prime, paint, and let the finish cure
Apply primer if your paint system calls for it, especially when covering a dark stain, glossy finish, laminate, or uneven surface. Follow with thin, even coats of furniture paint. A small foam roller can give flat surfaces a cleaner look, while a quality brush helps with edges and carved details.
Choose a finish that fits your room. Soft black creates a modern boutique look. Warm white feels cottage-inspired. Sage green works beautifully in relaxed, earthy spaces. Deep navy has the confidence of a dog bed that probably owns a passport.
Allow each coat to dry completely, then apply a protective topcoat if needed. Most importantly, follow the product label for curing time before letting your dog use the bed. Paint that feels dry to your finger may still need time to fully harden.
Step 6: Create a cushion that can survive actual dog life
The cushion is where the project becomes a dog bed instead of a tiny coffee table with delusions of grandeur. Measure the inside of the frame after the rails are attached. Subtract a little room around the edges so the cushion slides in and out easily for cleaning.
You can use a foam insert, an existing dog bed pillow, or a custom cushion made from upholstery foam and batting. Cover it with durable, washable fabric such as canvas, performance fabric, denim, cotton duck, or a removable upholstery cover. Zippers are helpful because they let you wash the cover without wrestling an entire mattress into the washing machine.
Washable bedding matters because dog beds collect fur, dirt, odor, and whatever your dog rolled in during their brief but apparently meaningful outdoor expedition. Pet-care guidance recommends choosing beds with removable or washable covers and cleaning them regularly.
Step 7: Add finishing touches without creating chew hazards
Dress up the bed with a monogrammed cushion, a contrasting piping edge, a plaid lumbar pillow, or a folded blanket. Just avoid tassels, dangling trim, loose buttons, or anything your dog is likely to pull apart and swallow. A stylish dog bed should not double as a scavenger hunt for your veterinarian.
Dogs who enjoy chewing need especially simple bedding and frequent inspections. Keep the bed free of loose parts, offer appropriate chew options elsewhere, and replace damaged fabric or foam before it becomes a hazard.
Design Ideas for an Upscale Dog Bed
Modern hotel-lobby style
Paint the frame matte black, add a cream cushion, and use a simple striped lumbar pillow. This look works especially well in modern homes with black hardware, oak floors, or minimalist furniture.
French country comfort
Use a warm white or faded blue finish, lightly distress the edges, and add a linen-look cushion in ticking stripes. The result feels relaxed, charming, and only mildly more elegant than your dog’s daily decision to nap upside down.
Classic tailored pet furniture
Stain the wood instead of painting it, then pair it with a neutral cushion featuring piping around the edge. This style fits traditional homes, leather furniture, and rooms where you want the dog bed to blend in rather than announce itself.
Colorful personality piece
Use a cheerful paint color that complements your dog’s personality. Mustard yellow, forest green, coral, or cobalt can turn a plain thrift store table into a room-brightening accent piece. Add a simple solid cushion so the color remains the star.
Common Mistakes to Avoid
- Choosing a table that is too tall: Your dog should not need to perform parkour to reach bedtime.
- Skipping the stability test: A wobbly bed is annoying for people and unsettling for pets.
- Using a cushion that cannot be cleaned: It will eventually smell like a wet hiking boot with feelings.
- Painting before cleaning: Paint adheres best to properly prepared surfaces, not dust and old furniture polish.
- Leaving sharp corners or exposed staples: Every surface should be smooth and pet-friendly.
- Adding decorative trim a dog can chew: Style is wonderful; swallowing a tassel is not.
- Forgetting non-slip pads: A bed that slides across hardwood can turn every nap into a low-budget action scene.
Conclusion: A Dog Bed With More Personality Than the Pet Store Aisle
Creating an upscale dog bed out of a thrift store table is one of those DIY projects that feels much more impressive than it is complicated. Start with a sturdy piece, make it low and stable, smooth every edge, use a durable finish, and add a cushion that can be washed without causing a laundry-room crisis.
The best part is that your finished dog bed does not look mass-produced. It reflects your home, your creativity, and your dog’s undeniable ability to claim the nicest spot in every room. One thrifted table, one comfortable cushion, and suddenly your dog has a custom lounge that looks like it belongs in a design magazineassuming the design magazine is willing to photograph a tennis ball collection.
Experience Notes: What You Learn After Building a Thrift Store Table Dog Bed
The real experience of making a thrift store table dog bed is that the project changes the way you look at furniture. Before the makeover, you see a scratched side table with outdated stain and one suspicious ring mark. Halfway through sanding, you see a potential dog lounge. By the time the cushion goes in, you are standing back like a furniture designer who has just reinvented the chaise longue for a client who pays in tail wags.
The first lesson is that preparation takes longer than painting. It is easy to imagine the project as a quick coat of trendy green paint and a cute pillow. In reality, the cleaning, tightening, filling, sanding, measuring, and dry-fitting make the largest difference. The paint is the glamorous part. Prep is the quiet employee who actually keeps the business running. A perfectly painted dog bed with a crooked rail still looks homemade in the wrong way. A carefully prepared bed with a simple finish looks thoughtful and expensive.
The second lesson is that your dog’s sleeping style matters more than your mood board. A curled-up dog may love a compact, cocoon-like cushion with raised edges. A sprawler may look personally offended by side rails that steal even two inches of leg room. Dogs do not care whether your bed frame has elegant trim, but they care very deeply about whether they can sink into the cushion, turn around easily, and rest without a hard edge pressing into a shoulder.
The third lesson is that washable details are not optional. A decorative cream cushion can look incredible for approximately eleven minutes if your dog has muddy paws, sheds heavily, or treats the backyard as a full-contact sport. Removable covers, darker fabrics, and extra blankets make the dog bed easier to live with. It is far better to spend a few extra minutes making a cover with a zipper than to discover later that the entire cushion must be hand-washed in the bathtub like a reluctant sea creature.
Another practical discovery is that low height usually wins. A raised platform may look elegant, but a dog bed should be easy to enter when your dog is sleepy, excited, recovering from a long walk, or carrying a toy the size of a submarine. Shortened legs or a naturally low table create a more welcoming setup. Non-slip pads also matter more than expected. Once a bed starts skating across hardwood floors, even the most confident dog may decide the couch is a more trustworthy investment.
The final lesson is that the dog will tell you whether the project worked. Not with a written review, of course. That would be too efficient. Your review will arrive in the form of a slow sniff, one paw placed cautiously on the cushion, and eventually a nap so dramatic it suggests they have spent years waiting for custom furniture. If the dog returns to the bed repeatedly, curls up without hesitation, and leaves behind a neat little crater in the cushion, you have succeeded. The thrift store table is no longer old furniture. It is now your dog’s favorite address.