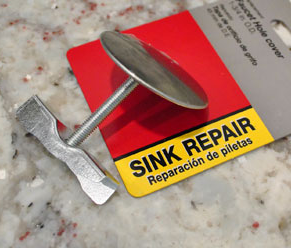
Unused sink holes are the kitchen equivalent of mystery buttons on a remote control: small, oddly noticeable, and capable of making an otherwise tidy space look unfinished. Maybe you switched from a three-hole faucet to a sleek single-handle model. Maybe the old side sprayer retired dramatically. Maybe a soap dispenser once lived there and left behind a tiny countertop crater as its final farewell. Whatever the reason, covering unused sink holes in your counter is one of those easy home fixes that delivers instant visual relief.
The good news? You do not need to replace the whole sink, call a contractor, or explain to guests that the hole is “part of the design.” With the right sink hole cover, faucet deck plate, escutcheon plate, or smart accessory, you can hide the gap, help prevent water from sneaking below the counter, and give your kitchen or bathroom a more polished look. This guide walks through the best options, how to choose the right cover, installation tips, common mistakes, and real-world experience from the kind of DIY project that starts with “This will take five minutes” and somehow involves a flashlight under the sink.
Why Unused Sink Holes Happen
Most kitchen and bathroom sinks are manufactured with one, two, three, or four faucet holes. These openings allow room for a faucet, separate hot and cold handles, a sprayer, a soap dispenser, an air gap, a filtered-water faucet, or other accessories. The problem appears when your new setup uses fewer holes than the old one. A modern single-hole faucet, for example, can look fantastic on a countertop, but it may leave two empty holes staring at you like tiny judgmental eyes.
Unused sink holes are especially common after faucet upgrades. Many homeowners replace older two-handle or three-hole faucets with single-handle pull-down models. The new faucet may include an optional deck plate, but not always. Sometimes the deck plate does not match the finish well. Sometimes it covers more area than you want. And sometimes the faucet looks better without it, except for that one lonely hole where the side sprayer used to be.
The Best Ways to Cover Unused Sink Holes
1. Use a Standard Sink Hole Cover
A sink hole cover, also called a faucet hole cover or sink hole cap, is the simplest solution. It is usually a small round metal or plastic piece that drops or snaps into the unused hole. Many models have a top cap, a rubber washer or gasket, a threaded shank, and a nut underneath. Once tightened, the cover sits flush or nearly flush on the sink deck or countertop.
This option works well when you only need to cover one or two separate holes. Stainless steel, chrome, brushed nickel, matte black, oil-rubbed bronze, and brass finishes are widely available, so matching your faucet is usually possible. A good sink hole cover should be slightly wider than the hole itself, secure enough not to spin, and fitted with a gasket or sealant to reduce water seepage.
2. Install a Faucet Deck Plate
A faucet deck plate, also known as an escutcheon plate, is a longer plate that sits beneath the faucet and covers multiple unused holes at once. This is the classic fix when switching from a three-hole sink to a single-hole faucet. Instead of placing individual caps over each extra opening, the deck plate creates one continuous base around the faucet.
Deck plates are especially useful when the extra holes are close together in a standard four-inch or eight-inch spread. They create a clean, intentional look and can make a faucet installation seem more “factory finished.” Many faucet brands offer matching escutcheon plates in the same finish as their faucets, which is ideal if you want the faucet and cover to look like they came as a set.
3. Add a Soap Dispenser
If you have an extra sink hole and actually want to use it, a built-in soap dispenser is a practical upgrade. It turns an annoying opening into a tidy convenience. Instead of keeping a plastic bottle near the sink, you get a pump mounted directly through the hole, with a refill bottle hidden below the counter.
This option is great for kitchens where counter clutter multiplies overnight like socks in a dryer. A soap dispenser can be used for dish soap, hand soap, or lotion, depending on the location. Just make sure there is enough room under the sink for the bottle and that you can refill it without performing advanced yoga inside the cabinet.
4. Use the Hole for a Filtered-Water Faucet
An unused sink hole can become the perfect place for a filtered-water faucet. Under-sink filtration systems often include a separate small faucet for drinking water. If you already have an open hole, installation may be easier because you can avoid drilling through stainless steel, stone, laminate, or solid surface material.
This choice makes sense if your household buys bottled water, dislikes the taste of tap water, or wants a dedicated drinking-water spout. It is more expensive than a simple sink cap, but it adds real function. In other words, the hole stops being a problem and starts acting like it has been promoted.
5. Install an Air Switch for the Garbage Disposal
For kitchens with a garbage disposal, an air switch can be installed through an unused sink hole. Instead of using a wall switch, you press a small countertop button. The button sends a burst of air through tubing to activate the disposal safely. This can be convenient when the wall switch is awkwardly placed or when you want a cleaner backsplash area.
Air switches come in different finishes, so they can blend with faucets and cabinet hardware. Before choosing this route, confirm that your disposal setup is compatible and that there is enough room below the sink for the air switch power module.
How to Choose the Right Sink Hole Cover
Measure the Hole Diameter
Before buying anything, measure the diameter of the unused hole. Many sink holes are around 1 3/8 inches, but covers come in different sizes such as 1 1/4 inches, 1 1/2 inches, 1 3/4 inches, and 2 inches. The cover must be large enough to overlap the opening while still fitting securely through it.
A measuring tape can work, but a ruler or caliper gives a more accurate reading. Measure across the widest part of the hole. If the edge is irregular, choose a cover with enough top diameter to hide the roughness. The goal is not just to plug the hole; it is to make the counter look like nothing embarrassing ever happened there.
Check the Countertop or Sink Thickness
Some sink hole covers are designed mainly for thin stainless steel sink decks. Others work on thicker countertops. If your hole is drilled through granite, quartz, butcher block, or laminate, check the threaded shank length and the maximum deck thickness listed by the product. A cover that cannot reach far enough underneath will not tighten properly.
This is one of the most common DIY mistakes. The top looks perfect, but underneath the nut barely catches the thread. That is not installation; that is wishful thinking wearing a chrome hat.
Match the Finish Thoughtfully
Finish matching matters more than most people expect. A shiny chrome cap beside a brushed nickel faucet can look like someone replaced one button on a suit with a coin. For the cleanest look, match the faucet finish as closely as possible. Common choices include polished chrome, stainless steel, brushed nickel, matte black, brass, brushed gold, and oil-rubbed bronze.
If you cannot find an exact match, choose a finish that coordinates with nearby hardware. For example, a matte black hole cover can look intentional if your cabinet pulls or light fixtures are also black. Stainless steel is often forgiving in kitchens with stainless appliances.
Choose Durable Materials
Metal covers usually last longer than cheap plastic covers, especially near kitchen sinks where water, soap, grease, and cleaning products are everyday guests. Stainless steel and brass are popular because they resist corrosion and feel more substantial. Plastic covers can work for temporary fixes, utility sinks, laundry rooms, or budget projects, but they may not age as gracefully in a high-use kitchen.
Step-by-Step: How to Cover an Unused Sink Hole
Tools and Materials
For a basic sink hole cover installation, you may need a sink hole cover, mild cleaner, cloth or paper towel, rubbing alcohol, plumber’s putty or silicone sealant if recommended, and an adjustable wrench or pliers. Some snap-in covers require no tools at all. Threaded covers may only need hand tightening, though a small extra turn from below can help secure the nut.
Step 1: Clean the Area
Clean around the unused hole thoroughly. Remove mineral deposits, soap film, old plumber’s putty, grease, and crumbs from the Great Toast Incident of last Tuesday. A smooth, clean surface helps the gasket or sealant do its job. If the counter is greasy, wipe it with rubbing alcohol and let it dry completely.
Step 2: Test Fit the Cover
Place the cover in the hole before applying any sealant. Confirm that the top cap fully hides the opening and sits flat. Look from several angles. If the cover rocks, catches on a rough edge, or leaves part of the hole visible, choose a different size or style.
Step 3: Add a Seal
Many sink hole covers include a rubber gasket. If the gasket sits neatly and the manufacturer does not require additional sealant, that may be enough. In splash-heavy areas, a thin bead of silicone sealant or plumber’s putty under the cap can add protection. Always follow the product instructions, especially on stone countertops where some putties may stain porous materials.
Step 4: Tighten From Below
For threaded covers, insert the cover from the top, then attach the washer and nut from underneath. Tighten until the cap is snug and does not move. Do not overtighten. Excessive force can crack plastic parts, bend thin metal, squeeze out too much sealant, or stress the sink deck.
Step 5: Wipe Away Excess
If sealant squeezes out around the cover, wipe it away before it cures. A damp cloth works for fresh silicone, while plumber’s putty can usually be rolled away with your fingers. The finished cover should look tidy, not like a tiny volcano of caulk erupted on your countertop.
Step 6: Check for Leaks
After installation, splash water around the area and look underneath the sink with a flashlight. If you see moisture, tighten the nut slightly or reseal the cover. This leak check takes two minutes and can save you from swollen cabinet bottoms, musty smells, and the deeply unpleasant discovery that water has been quietly auditioning for a basement role.
Special Considerations for Different Countertop Materials
Stainless Steel Sinks
Stainless steel sinks are usually the easiest to work with. Most standard snap-in or threaded covers are designed for thin sink decks. Stainless covers blend nicely, but pay attention to finish. A satin stainless cap may look better on a brushed sink than a mirror-bright chrome one.
Granite and Quartz Countertops
Granite and quartz counters are thicker than stainless sink decks. Choose a cover with a long enough shank or use a deck plate designed for countertop mounting. Avoid aggressive tightening, and be careful with sealants or putties that may discolor natural stone. When in doubt, use a neutral-cure silicone approved for stone surfaces.
Laminate Countertops
Laminate counters need good sealing because exposed particleboard or MDF under the surface can swell if water gets in. A well-fitted cover with a gasket and a careful bead of silicone is usually a smart choice. Make sure the cover overlaps the hole enough to protect the cut edge.
Butcher Block
Wood countertops bring warmth, charm, and a special talent for reminding you that water is not their best friend. Use a cover that seals well, and keep the wood around the opening properly finished. If the hole edge is raw, seal it before covering it so moisture cannot creep into the wood.
Design Tips: Making the Cover Look Intentional
The best sink hole cover is the one nobody notices. To achieve that, line up finishes, keep spacing balanced, and avoid mixing too many metal tones in a small area. If you have multiple unused holes, consider whether individual caps or one deck plate will look cleaner. A single deck plate can visually simplify a busy sink deck, while individual covers can preserve the minimalist look of a single-hole faucet.
If the hole sits far from the faucet, a functional accessory may look better than a random cap. A soap dispenser, filtered-water faucet, lotion pump, or disposal air switch gives the opening a purpose. In design, “intentional” often just means “I found a reason for this thing to exist.”
Common Mistakes to Avoid
Buying Before Measuring
The fastest way to make a five-dollar project annoying is to guess the hole size. Measure first. Sink hole covers are inexpensive, but repeated wrong purchases can turn the plumbing aisle into your second home.
Ignoring the Underside
Always check what is beneath the hole. Supply lines, disposal parts, filter systems, sink clips, and cabinet framing can limit access. If you cannot reach the underside, a snap-in cover may be easier than a threaded model.
Using Too Much Sealant
More sealant does not mean more waterproof. It often means more mess. Use a thin, even bead. The cover should sit flat against the surface, not float on a cushion of silicone like a tiny countertop hovercraft.
Forgetting Future Plans
Before permanently sealing a hole, think about whether you might want to add a water filter, soap dispenser, or air switch later. A removable cover keeps your options open. A thick blob of cured adhesive under the sink says, “Future you can suffer.”
When a Deck Plate Is Better Than Individual Covers
A deck plate is usually better when the unused holes are close together and centered around the faucet. It creates one clean visual line and can hide scratches, discoloration, or old marks left by the previous faucet base. It is also helpful when the hole edges are not perfect because the plate covers a wider area.
Individual covers are better when holes are spaced far apart or when you want to keep the faucet base as minimal as possible. They are also easier to replace one at a time. In a modern kitchen with a dramatic faucet, individual low-profile covers may look less bulky than a long plate.
Budget: What Should You Expect to Spend?
Basic sink hole covers are usually inexpensive, often costing only a few dollars to around the price of a casual lunch. Higher-end metal covers, brand-matched finishes, and specialty colors cost more. Deck plates generally cost more than single caps, especially when purchased from the faucet manufacturer in a premium finish.
Functional upgrades cost more but provide more value. A soap dispenser may be moderately priced and simple to install. A filtered-water faucet or disposal air switch can cost significantly more once the full system is included. The right choice depends on whether you want the hole gone, useful, or upgraded into something your guests will pretend not to envy.
Maintenance After Covering the Hole
Once the cover is installed, maintenance is simple. Wipe around it during normal sink cleaning. Avoid harsh abrasives that can scratch the finish. Check underneath the sink occasionally, especially during the first week, to make sure no water is leaking around the cover.
If the cover becomes loose, tighten it gently. If old sealant starts peeling or collecting grime, remove the cover, clean the area, and reseal it. A sink hole cover is small, but it lives in a wet, hardworking zone. Give it a little attention and it will keep doing its quiet job without complaint.
of Real-World Experience: What Actually Happens During This Project
Covering unused sink holes sounds almost too easy, and most of the time it is. But like many tiny home projects, the difference between “done” and “done nicely” is in the details. The first experience many homeowners have is after installing a new single-handle faucet. The faucet looks sleek, the sprayer pulls down beautifully, and then the old side-sprayer hole sits there looking like a missing tooth. At that moment, the temptation is to buy the first shiny cap that appears online. Resist that temptation for five minutes and measure the hole.
In a typical kitchen, the old sprayer hole may not be perfectly clean. Years of water splashes, soap residue, hard-water minerals, and mystery kitchen dust can collect around the edge. Cleaning it well makes a surprising difference. A cover installed over grime may sit slightly crooked or fail to seal properly. A little rubbing alcohol and a cloth can turn a suspicious-looking hole into a clean mounting surface.
The underside of the sink is where the comedy usually begins. You open the cabinet, move the cleaning supplies, discover a sponge you do not remember buying, and then try to fit one hand behind the sink basin while holding a flashlight with your chin. This is where a helper is useful. One person can hold the cap centered from above while the other tightens the nut below. Without a helper, painter’s tape can temporarily hold the cap in place on top while you work underneath.
Another lesson: do not overtighten. It feels natural to tighten until the cover is absolutely immovable, but sink decks and countertop surfaces do not appreciate brute force. Snug is enough. If the cover has a gasket and sits flat, it should seal well with moderate pressure. If you are using silicone, give it time to cure before flooding the area with water. Patience is not glamorous, but neither is redoing a sticky sealant job.
Finish matching can also be trickier than expected. “Stainless steel,” “brushed nickel,” and “spot-resistant stainless” may look similar online but different in your kitchen lighting. If the sink area has mixed finishes already, choose the one closest to the faucet rather than the sink basin. The eye usually reads the faucet and cover together.
Finally, think about whether the empty hole could serve a purpose. Many homeowners cover a hole and later realize they want a soap dispenser or filtered-water faucet. A simple removable cap is great because it keeps future options open. The best outcome is a sink area that looks finished, cleans easily, and does not invite water into the cabinet below. It is a small fix, but it has the satisfying magic of making your kitchen look more intentional in less time than it takes to reorganize the junk drawer.
Conclusion
Covering unused sink holes in your counter is one of the simplest ways to make a kitchen or bathroom look cleaner, newer, and more thoughtfully finished. Whether you choose a small sink hole cover, a matching faucet deck plate, a soap dispenser, a filtered-water faucet, or a disposal air switch, the key is to measure carefully, match the finish, seal the opening properly, and check underneath for leaks.
The project may be small, but the payoff is immediate. No more awkward holes. No more water sneaking into places it should not go. No more pretending the gap is “for ventilation.” Just a neat, polished sink area that looks like it was planned that way all along.
Note: This article is written as original, web-ready content based on practical sink, faucet, deck plate, and home-improvement installation guidance from reputable U.S. plumbing, retail, and DIY references.