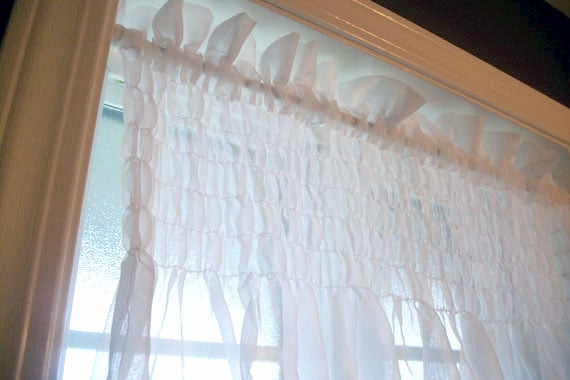
A beautiful window treatment does not have to arrive in a giant box, require a professional installer, or cost enough to make you reconsider the whole concept of daylight. With lightweight fabric, elastic thread, and a basic sewing machine, you can create a shirred curtain that looks soft, custom, and pleasantly more expensive than it actually is.
Shirring consists of parallel rows of stitching made with regular sewing thread in the needle and elastic thread in the bobbin. As the rows accumulate, the elastic gently contracts the fabric, producing flexible gathers and a rippled texture. On curtains, this technique creates a romantic band below the rod pocket while allowing the rest of the panel to hang loosely.
This tutorial explains how to measure your window, calculate fabric yardage, prepare the curtain panel, sew consistent rows of shirring, and troubleshoot the inevitable moment when the elastic thread decides it has artistic ambitions of its own.
What Makes a Shirred Curtain Special?
A standard gathered curtain receives most of its fullness from a rod pocket, pleats, rings, or gathering tape. A shirred curtain adds multiple elasticized rows to the upper portion of the fabric. These rows create more texture than a basic rod pocket and a softer appearance than structured pinch pleats.
Machine shirring is usually sewn with elastic thread in the bobbin and ordinary all-purpose thread in the needle. Lightweight fabric responds most effectively because the elastic must be strong enough to draw the material into gathers. Long straight stitches and evenly spaced rows help produce a smooth result.
This style works especially well for:
- Cottage-style kitchens
- Farmhouse breakfast nooks
- Romantic bedrooms
- Vintage-inspired nurseries
- Relaxed living rooms
- Small bathroom or laundry-room windows
- Café curtains that cover only the lower part of a window
The finished curtain can be airy and informal or neat and tailored, depending on the fabric, number of shirring rows, and fullness you choose.
Supplies and Tools
Gather everything before cutting. This prevents the classic sewing ritual of discovering that the only matching thread in the house is an adventurous shade of traffic-cone orange.
- Lightweight woven fabric
- Elastic shirring thread
- All-purpose polyester sewing thread
- Sewing machine
- Fresh universal or fine-fabric needle
- Empty bobbins
- Fabric scissors or rotary cutter
- Cutting mat, if using a rotary cutter
- Measuring tape
- Clear ruler or yardstick
- Washable fabric marker or tailor’s chalk
- Straight pins or sewing clips
- Iron and ironing board
- Curtain rod and mounting hardware
- Optional walking foot or edge guide
Elastic thread is designed for gathering, smocking, and shirring. Thread and needle choices should still suit the weight and construction of the fabric, and test stitching is essential because machines handle elastic bobbin thread differently.
Choosing the Best Fabric
The ideal fabric is light enough to gather but substantial enough to hang attractively. Cotton voile, lawn, batiste, double gauze, lightweight linen blends, rayon challis, and soft quilting cotton are good candidates.
Light-Filtering Fabrics
Voile, gauze, and semi-sheer cotton create dreamy folds and allow daylight into the room. They are excellent for decorative panels or windows where privacy is not the primary concern. Use a fine needle, press with moderate or low heat, and handle the material gently so the edges do not stretch out of shape.
More Private Options
A closely woven cotton or lightweight linen blend provides better coverage while remaining responsive to shirring. For bedrooms requiring significant light control, pair the shirred curtain with a separate roller shade or blind rather than sewing heavy blackout material directly into the shirred band.
Heavy canvas, upholstery fabric, thick velvet, and densely backed drapery material are poor choices for this project. The elastic thread may struggle to gather them, and the finished band can become bulky instead of softly rippled. Lightweight fabrics such as voile, lawn, double gauze, and rayon generally respond more effectively to elastic shirring.
Should You Prewash the Fabric?
Prewash washable fabric using the same method you expect to use for the finished curtains. Dry it, press it, and then measure. This removes manufacturing finishes and allows predictable shrinkage to occur beforenot afteryou spend an afternoon sewing perfectly measured panels.
Skip machine washing only when the fabric manufacturer recommends dry cleaning or another specialized care method.
How to Measure for a Shirred Curtain
Install or determine the position of the curtain rod before taking final measurements. Measuring from an imaginary rod is possible, but imaginary hardware has a suspicious habit of moving later.
Measure the Finished Length
Measure vertically from the top of the rod to the desired bottom edge. Common options include:
- Sill length: Ends at or slightly above the windowsill.
- Apron length: Ends just below the lower window trim.
- Floor length: Finishes approximately 1/2 inch above the floor or lightly touches it.
- Puddled length: Includes extra fabric that rests on the floor for a dramatic effect.
Floor-length curtains may float above the floor, break gently against it, or puddle. Curtain width is often planned at approximately one-and-a-half to three times the covered span, depending on the desired fullness and fabric.
Measure the Finished Width
Measure the usable width of the curtain rod. For this shirred curtain tutorial, plan a total cut width about two to two-and-a-half times the rod width. Lightweight sheer fabric may look best at the fuller end of that range, while a printed cotton may need only twice the rod width.
Because elastic shirring can reduce fabric width considerably, make a test swatch before cutting expensive material. The exact contraction depends on fabric weight, stitch length, bobbin tension, elastic thread, and the number of rows.
Simple Fabric Formula
For one curtain panel:
Cut width = desired finished width × 2 to 2.5 + 2 inches for side hems
Cut length = desired hanging length + 4 inches for the rod pocket and heading + 4 inches for the bottom hem
For a pair of curtains, divide the total decorative width between two panels and add side-hem allowances to each one.
Example Calculation
Suppose a curtain rod is 48 inches wide and you want two panels with moderate fullness.
- Total decorative fabric width: 48 × 2 = 96 inches
- Width per panel before side allowances: 48 inches
- Add 2 inches per panel for side hems
- Cut two panels, each 50 inches wide
If the desired hanging length is 60 inches:
- Finished length: 60 inches
- Top allowance: 4 inches
- Bottom allowance: 4 inches
- Cut length per panel: 68 inches
Patterned fabric may require additional yardage so motifs can be aligned across adjoining widths or matching panels. Professional curtain construction commonly accounts for pattern repeats, side hems, headings, bottom hems, and lining dimensions before cutting.
Beautiful Shirred Curtain Tutorial: Step by Step
Step 1: Make a Shirring Test Swatch
Cut a sample from the actual curtain fabric. A piece about 12 inches wide and 10 inches tall is large enough to reveal how the material behaves.
Hand-wind an empty bobbin with elastic thread. Wind it smoothly without aggressively stretching it. Some machines perform better with a very slight amount of tension, while others work best when the elastic is wound almost completely relaxed. This is why the test swatch is not optionalit is the polite introduction between your machine and the elastic thread.
Thread the top of the machine with regular matching thread. Pull the elastic bobbin thread through the needle plate and leave several inches of both threads behind the presser foot.
Step 2: Test the Machine Settings
Select a straight stitch with a length of approximately 3 to 4 millimeters. Sew several parallel rows about 1/2 inch apart. Keep the fabric flat while sewing; do not intentionally stretch it during the first row.
After each row, gently flatten the gathered area in front of the presser foot so you can sew the next line without creating folds. As more rows are added, the fabric should contract progressively.
Test stitching is widely recommended because shirring results vary according to machine tension, stitch length, fabric, and bobbin winding. Longer straight stitches generally give the elastic more room to draw the material into gathers.
Step 3: Prepare the Curtain Fabric
Prewash and press the material. Square the cut edges by aligning the grain rather than trusting the fabric-store cut, which may have wandered during its journey from bolt to cutting table.
Cut the required panel or panels. If multiple fabric widths must be joined, place the seams toward the outside edges of each finished curtain rather than directly in the center. Match large stripes, checks, or floral repeats before stitching.
Finish the side edges temporarily with a narrow zigzag stitch or serger if the fabric frays easily. The final side hems will be sewn after shirring so they can enclose the elastic-thread ends.
Step 4: Sew the Bottom Hem
Turn the bottom raw edge 2 inches toward the wrong side and press. Turn it another 2 inches, press again, and pin. Sew close to the upper folded edge.
A deep double-fold hem gives the bottom of the curtain enough weight to hang smoothly. For an extremely light sheer, a narrower double hem may look more balanced. Drapery weights can also be placed near the bottom corners when additional control is needed.
Step 5: Create the Rod Pocket
At the top edge, turn 1/2 inch to the wrong side and press. Fold the edge down another 3 inches and press again.
Sew close to the lower folded edge to form the rod pocket. Check that the pocket is large enough for the rod and its end hardware. A bulky decorative rod may need a deeper pocket.
For a small heading above the rod, sew a second line about 1 inch below the upper folded edge. This leaves a decorative ruffle above the rod and a separate channel beneath it.
Step 6: Mark the Shirring Rows
Turn the curtain wrong side up. Starting about 1/2 inch below the rod-pocket stitching, mark horizontal guidelines across the panel.
Space the lines approximately 1/2 inch apart. Six to ten rows create a noticeable shirred band. Fewer rows produce a subtle detail; more rows create a deeper, more structured section.
A removable fabric marker, quilting ruler, or the width of the presser foot can be used as a spacing guide. Test the marker on a scrap first, especially with pale fabric.
Step 7: Sew the First Row of Shirring
Place the curtain right side up under the presser foot. This keeps the ordinary top thread visible on the finished side and the elastic thread on the back.
Begin just inside the future side-hem allowance. Leave long thread tails or backstitch only one or two stitches. Sew slowly along the first marked line and stop before the opposite side-hem allowance.
Do not pull the fabric from behind the machine. Guide it steadily and let the feed dogs move it. Pulling can distort the stitch length, stretch the fabric, or bend the needle.
Step 8: Add the Remaining Rows
Rotate the panel or return to the starting side and sew the next guideline. As the panel gathers, gently stretch only the already-shirred section enough to keep the current line smooth beneath the presser foot.
Check the bobbin frequently because elastic thread runs out faster than ordinary thread. Winding two or three bobbins before beginning can save repeated interruptions.
Continue until the shirred band reaches the desired depth. The curtain may look only mildly gathered after the first rows. The contraction becomes more obvious as additional rows are added.
Step 9: Activate the Shirring With Steam
Place the curtain on the ironing board with the shirred section flat. Hover a steam iron about an inch above the fabric rather than pressing down hard. Apply steam and watch the rows contract.
Allow the material to cool before judging the result. Avoid direct high heat on elastic thread because excessive heat can weaken elastic fibers. Always follow the fabric’s care instructions.
Step 10: Finish the Side Hems
Turn each side edge 1/2 inch toward the wrong side and press. Turn it another 1/2 inch, enclosing the raw edge and the ends of the shirring stitches.
Pin carefully through the shirred band and sew from top to bottom. Stitch slowly when crossing the thicker elasticized rows. These finished side hems secure the thread ends while giving the panel a neat edge.
Step 11: Hang and Arrange the Curtain
Slide the rod through the pocket, mount it, and distribute the gathers evenly. Step back several feet before adjusting. Curtains have a mysterious ability to look perfectly balanced from six inches away and dramatically lopsided from across the room.
Allow the fabric to hang for a day or two. Natural gravity will relax packing wrinkles and help the lower folds settle. Lightly steam stubborn creases if the fabric permits it.
How to Customize the Design
Add a Contrasting Heading
Use a coordinating solid fabric for the rod pocket and upper heading. This can frame a floral or striped main fabric and make the treatment look intentionally designed rather than assembled from leftoversalthough clever leftovers remain one of sewing’s greatest achievements.
Make Café Curtains
Mount a tension rod halfway down the window and shorten the panel accordingly. Shirred café curtains provide privacy at eye level while leaving the upper glass open for daylight.
Add a Ruffle
Attach a narrow gathered ruffle beneath the bottom hem or above the rod pocket. Keep the trim lightweight so it does not overpower the soft shirred texture.
Use Decorative Topstitching
A contrasting top thread can emphasize the shirring rows. Test it first because uneven lines become much more noticeable when the thread is intentionally visible.
Create Tiebacks
Make simple fabric tiebacks from matching material. Interfacing is usually unnecessary for a relaxed curtain, but a light fusible layer can help if you prefer a crisp band.
Shirring Problems and Easy Fixes
The Fabric Is Not Gathering
Confirm that elastic thread is in the bobbin and regular thread is in the needle. Increase the stitch length, check that the elastic was not wound too tightly, and sew additional rows. Steam may also increase contraction.
The Fabric Gathers Too Aggressively
Use a slightly shorter stitch, reduce bobbin tension if your machine permits safe adjustment, or wind the elastic with less tension. Test every change on a scrap rather than experimenting on the finished curtain.
The Rows Look Uneven
Mark guidelines before sewing. Use a presser-foot edge, seam guide, or walking foot to maintain spacing. Slow down and straighten each gathered section before it reaches the needle.
The Thread Bunches Under the Fabric
Pull both thread tails behind the presser foot before starting. Rethread the upper thread with the presser foot raised, verify that the bobbin is inserted correctly, and replace a bent or dull needle. Improper threading, incompatible needles, and unsuitable tension can contribute to skipped stitches or thread bunching.
The Side Hems Are Bulky
Reduce the number of shirring rows near the side edges or trim unnecessary fabric from the upper corners before making the final double-fold hems. Sew across bulky intersections slowly and use the handwheel when necessary.
Care and Maintenance
Wash the curtain according to the fabric and elastic-thread instructions. A gentle cycle with cool or warm water is usually kinder to lightweight material and elasticized stitching than high heat and aggressive agitation.
Air-dry when possible or use a low dryer setting. Avoid pressing a hot iron directly onto the elastic thread. To refresh the gathers, use gentle steam from a short distance.
Dust curtains regularly with a vacuum upholstery attachment on low suction. Periodic dust removal reduces the need for frequent washing and helps pale fabrics remain fresh.
Practical Experiences and Lessons From Making Shirred Curtains
The most important experience associated with a shirred curtain project is discovering that the test swatch is not wasted fabric. It is a small, inexpensive rehearsal that prevents a much larger performance from collapsing in the second act. Two machines can react differently to the same elastic thread, and two fabrics that appear equally light can gather at noticeably different rates.
A common early mistake is cutting the curtain to an exact theoretical formula before testing the shirring. Elastic contraction is not mathematically obedient. One cotton voile may shrink to almost half its original width, while a firmer cotton may contract far less. The safer approach is to shirr a measured sample, steam it, let it cool, and compare its original width with its gathered width. That ratio provides a more realistic guide for the full panel.
Another practical lesson is that additional rows often solve a disappointing start. After two rows, the material may look barely rippled, causing the maker to suspect a tension problem. By the sixth row, the same panel can develop a rich, even texture. Shirring is cumulative, so judging it too early is like tasting a cake while it is still flour.
Bobbin preparation also affects the rhythm of the project. Elastic thread disappears quickly, especially across a wide curtain panel. Winding several bobbins before sewing keeps the work moving and makes it easier to maintain consistent tension. When a replacement bobbin is needed midway across a row, the thread ends should be securely knotted on the wrong side rather than merely overlapped and trusted to behave forever.
Fabric handling becomes increasingly important as the shirred section grows. The gathered portion must be gently stretched flat before it reaches the presser foot, but the entire panel should not be yanked from behind the machine. Pulling changes stitch length and can produce crooked rows. Supporting the weight of a long curtain on a nearby table or chair also prevents gravity from dragging the fabric sideways.
Steam usually provides the project’s most satisfying moment. The rows tighten, the texture becomes more pronounced, and a slightly underwhelming panel begins to look deliberate. However, pressing the iron directly onto the elastic can flatten the texture or damage the thread. Hovering with steam and allowing the panel to cool produces a safer, softer result.
The finished length may also change slightly after shirring and hanging. Although the elastic runs horizontally, the gathered band can alter how the lower fabric settles. For that reason, some makers prefer to leave the bottom hem until after the curtain has hung overnight. This is particularly useful with loosely woven linen, rayon, or fabric cut from multiple joined widths.
Finally, handmade curtains rarely look factory-perfect, and that is not a defect. Tiny variations in the rows disappear once the panel is hanging and viewed from a normal distance. What remains visible is the texture, custom fit, and fabric chosen specifically for the room. The best experience is often realizing that a window previously dressed in “whatever was on sale” now has a treatment that belongs there.
Conclusion
A beautiful shirred curtain combines simple construction with an unusually decorative result. The project requires no complicated pattern, specialized industrial machine, or advanced tailoring skills. Accurate measurements, lightweight fabric, patient test stitching, and several evenly spaced rows of elastic shirring do most of the work.
Start with a swatch, allow generous fullness, and resist the urge to judge the gathers after only one or two rows. Once steamed, hemmed, and arranged on the rod, the finished curtain adds softness and movement to the window without making the room feel fussy. It is practical home décor with just enough dramaand no interior-design invoice hiding in the mailbox.
Note: Sewing-machine tension and elastic-thread performance vary by model, so test the complete shirring processincluding steamingon a scrap of the chosen curtain fabric before cutting or sewing the final panels.