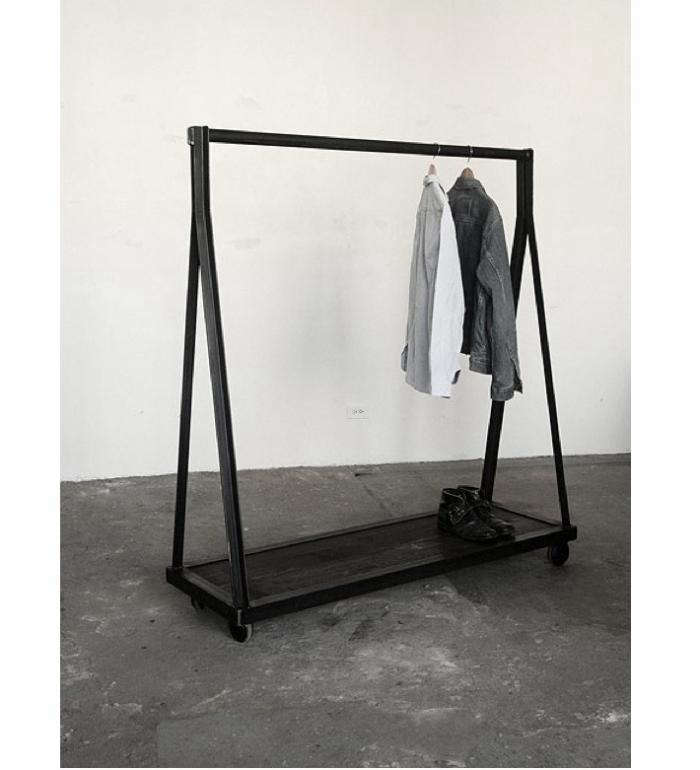
An “A” frame clothing rack is what happens when practical storage borrows a little confidence from modern furniture design. With angled legs, an open hanging rail, and a footprint that stands on its own, this freestanding garment rack can turn an empty bedroom corner into a compact wardrobe, an entryway into a useful drop zone, or a retail booth into a polished display.
Unlike a built-in closet, an A-frame clothes rack requires no permanent installation. Unlike many lightweight rolling racks, it does not need to look as though it escaped from a department-store stockroom. Build it from attractive lumber, give it a smooth finish, and it becomes part storage system, part furniture, and part gentle reminder that the chair was never supposed to hold twelve shirts.
What Is an A-Frame Clothing Rack?
An A-frame clothing rack is a freestanding structure with two pairs of angled legs connected by a horizontal hanging rail. Viewed from the side, each pair of legs resembles the capital letter A. The broad stance distributes the rack’s weight across four contact points, while the upper rail holds clothes hangers, bags, scarves, or lightweight accessories.
Some designs are permanently joined with screws, dowels, or mortise-and-tenon joints. Others use bolts at the top so the legs can pivot and the rack can fold for transportation. Lower stretchers, shelves, or crossbars keep the legs from spreading too far and create space for shoes, baskets, folded clothing, or storage boxes.
Home organization guides frequently recommend freestanding garment racks as flexible storage for bedrooms without closets, entryways, laundry rooms, rental homes, and temporary wardrobe areas. When choosing or building one, overall dimensions, stability, hanging capacity, adjustability, and added shelves are among the most important considerations.
Why the A-Frame Design Works So Well
It Has a Naturally Stable Shape
The outward-leaning legs create a wider base than a straight-sided frame. That geometry helps the rack resist ordinary side-to-side movement, especially when the two end frames are tied together with lower stretchers or a shelf. Commercial A-frame displays often use a fixed bottom shelf specifically to improve stability while adding useful storage.
It Looks Like Furniture
A plain metal rail can be practical, but a carefully finished wood clothing rack adds warmth and texture. Pine produces an affordable Scandinavian or farmhouse look. Poplar paints smoothly. Oak, maple, or ash can create a more refined rack that deserves to be seen instead of hidden behind a curtain.
It Is Easy to Customize
The same basic design can become a child-size dress-up rack, a minimalist open closet, a garment display for a craft fair, or a laundry-room drying station. Add a shelf for shoes, pegs for bags, casters for mobility, or locking bolts for a collapsible market rack.
It Encourages a More Intentional Wardrobe
Open storage keeps clothing visible. That can make outfit planning easier and discourage the mysterious accumulation of forgotten garments at the back of a closet. Of course, it also means the rack cannot hide chaos behind a door. Consider that free organizational motivation.
Recommended Dimensions
There is no universal size for an A-frame garment rack, but the following dimensions create a versatile adult-size model:
| Component | Suggested Measurement | Purpose |
|---|---|---|
| Overall height | 60 to 68 inches | Accommodates shirts, jackets, pants, and many dresses |
| Hanging rail length | 36 to 48 inches | Provides useful storage without dominating a small room |
| Base depth | 20 to 24 inches | Allows hanger clearance and creates a stable stance |
| Lower shelf height | 8 to 12 inches above the floor | Leaves room for shoes, baskets, or folded items |
| Rail diameter | 1 to 1 1/4 inches | Offers a comfortable surface for standard hangers |
Measure the intended location before cutting anything. Allow enough depth for hangers and enough walking space around the rack. For comparison, manufactured clothing racks commonly have a depth close to 19 inches, though larger garments and angled frames may require additional clearance.
For a child’s clothing rack, reduce the height to approximately 40 to 48 inches and shorten the rail. The lower scale lets children reach costumes or everyday outfits independently. Keep the base broad, round every exposed corner, and avoid adding small removable hardware within a young child’s reach.
Materials and Tools
Suggested Materials
- Four straight 1-by-3 or 1-by-4 boards for the angled legs
- One hardwood dowel or metal pipe for the hanging rail
- Two lower side stretchers
- One solid board or several slats for an optional shoe shelf
- Wood screws, structural screws, or carriage bolts with washers
- Wood glue for permanent joints
- Wood filler, if needed
- Sandpaper in medium and fine grits
- Paint, stain, clear finish, or furniture oil
- Felt pads or nonslip feet
Suggested Tools
- Tape measure and pencil
- Speed square or combination square
- Miter saw, circular saw, or handsaw
- Drill and drill bits
- Clamps
- Random-orbit sander or sanding block
- Socket wrench if using carriage bolts
- Level and straightedge
- Safety glasses, hearing protection, and dust protection
Wood dust and chemicals used in some finishing products can irritate the eyes, skin, and respiratory system. Work in a ventilated area, control dust near the source, follow every tool guard and manufacturer instruction, and wear suitable personal protective equipment.
How to Build an A-Frame Clothing Rack
1. Select Straight, Dry Lumber
Lay each board on a flat surface and inspect it from both ends. Avoid pieces with severe bows, twists, loose knots, or splits near the planned fastener locations. Straighter stock produces matching end frames and reduces the amount of persuasion required during assembly.
Wood responds to environmental moisture and may shrink, swell, or change shape as humidity changes. Store the lumber in the room or workshop where it will be built for a reasonable acclimation period, particularly when moving it from a damp outdoor area into a conditioned home.
2. Cut Four Matching Legs
Choose the finished height and cut four legs to identical lengths. A length of approximately 65 inches works well for a general-purpose rack, although the final vertical height will be slightly shorter because the legs lean outward.
Make a stop block or use the first completed leg as a marking template. Tiny differences at this stage can become surprisingly dramatic once the rack stands uprightwoodworking’s way of turning one casual pencil mark into a philosophical lesson.
3. Lay Out the First End Frame
Place two legs on a flat floor or workbench. Cross or overlap them near the top and spread the lower ends until the base is approximately 20 to 24 inches deep. Check the overall height and decide where the hanging rail will pass through or connect to the frame.
Mark the pivot bolt, screw, or rail-hole location on both legs. Then transfer those marks to the second pair of legs so the two end frames match.
4. Drill Carefully
If the hanging rail passes through the legs, use a brad-point or Forstner bit that closely matches the rail diameter. Clamp the workpiece securely and drill from a stable position. A drill press is ideal, but a doweling jig or shop-made guide block can help a handheld drill produce straighter, more centered holes.
Test the fit on scrap lumber before drilling the finished parts. The rail should fit snugly without requiring a hammering session worthy of a medieval blacksmith.
5. Assemble the Two A-Shaped Ends
For a folding rack, connect each pair of legs with a carriage bolt, washers, and a locking nut. Tighten the nut enough to remove wobble while still allowing controlled movement.
For a permanent rack, use a reinforced joint rather than depending on a small glued dowel alone. Traditional dowel joints can help with alignment, but their strength depends on accurate drilling, good fit, adequate glue surface, and the direction of the wood grain. Screws, bolts, half-lap joints, or mortise-and-tenon construction may offer more dependable reinforcement for a rack that will be moved or heavily used.
6. Install the Hanging Rail
Slide the dowel or pipe through the end frames, or mount it between them using appropriate sockets and fasteners. Keep an equal amount of rail extending beyond each side if you want convenient places for hats, belts, or tote bags.
Check that the rail is level before permanently fastening it. Predrill screw holes near the ends of wooden rails to reduce splitting, and do not place fasteners so close to an edge that the wood has no room to resist the load.
7. Add Lower Stretchers
Connect the two A-shaped ends near the bottom with one or two horizontal stretchers. These pieces prevent racking, maintain the distance between the end frames, and give the rack a more furniture-like structure.
If the design folds, use removable bolts, threaded knobs, folding braces, or straps that limit how far the legs can spread. A folding rack without a positive spread-control system may eventually attempt an unwanted split.
8. Build the Optional Shelf
A lower shelf improves storage and can strengthen the entire frame. Use a solid board for a clean appearance or spaced slats for a lighter design. Mount the shelf on the lower stretchers and leave enough clearance beneath it for easy sweeping.
Use the shelf for shoes, lightweight baskets, folded jeans, or small storage bins. Avoid stacking heavy objects high on the rack, where they could make the structure top-heavy.
9. Test Before Finishing
Set the rack on a level floor and push gently from several directions. Tighten loose hardware, correct uneven feet, and verify that the legs cannot spread unexpectedly. Hang a few lightweight garments first, observe the rail and joints, and add items gradually.
Do not copy the advertised load rating of a commercially engineered rack and apply it to a homemade design. Capacity depends on the species and grade of lumber, rail material, span, fasteners, joinery, workmanship, and condition of every component.
Sanding and Finishing
Disassemble removable components before finishing whenever possible. Sand along the grain, beginning with a medium grit to remove machining marks and moving to a finer grit for a smooth surface. Ease sharp edges by hand, paying special attention to the rail and any area that may touch fabric.
Remove all sanding dust before applying stain or a protective coating. Finishing guidance commonly recommends light sanding in the direction of the grain, followed by careful dust removal. Some soft or porous woods also benefit from a compatible pre-stain conditioner to reduce uneven color.
Popular Finish Options
- Clear water-based finish: Preserves a light, natural appearance and dries relatively quickly.
- Oil or furniture wax: Creates a warm, hand-rubbed look but may require occasional maintenance.
- Wood stain and clear topcoat: Coordinates inexpensive lumber with darker furniture.
- Paint: Hides mixed wood species and allows bold color blocking.
- Two-tone finish: Combines natural wood legs with a black, white, or metallic rail.
Follow the product label for preparation, drying, recoating, and disposal. Paints, varnishes, stains, waxes, and related hobby products may release volatile organic compounds, so maximize ventilation while applying and curing the finish.
Ways to Style and Organize the Rack
Create a Weekly Capsule Wardrobe
Hang five to ten coordinated outfits for the coming week. Use the shelf for shoes and a small basket for belts or jewelry. This approach turns the rack into a practical dressing station instead of an open-air monument to every garment you have owned since college.
Build an Entryway Drop Zone
Use the rack for frequently worn jackets, umbrellas, hats, and reusable shopping bags. Add wooden pegs to the outer legs and place a boot tray beneath the shelf.
Use It in a Guest Room
A compact garment rack gives visitors somewhere to hang clothing without requiring an empty built-in closet. Include a few matching hangers and leave most of the rail open.
Adapt It for Retail or Craft Fairs
A folding A-frame rack can display shirts, dresses, textiles, or handmade accessories. A lower shelf can hold folded inventory while rail extensions display signs or bags. Keep the presentation edited; open racks look best when garments have breathing room. HGTV and The Spruce Crafts both highlight A-frame racks as attractive, customizable alternatives to ordinary closet storage.
Common Building Mistakes
- Making the base too narrow: A slim footprint looks elegant until the rack becomes easy to tip.
- Skipping lower braces: The hanging rail alone does not adequately prevent the end frames from twisting.
- Using an undersized rail: A long, thin wooden dowel can visibly sag under concentrated weight.
- Drilling without a guide: Misaligned holes can make the end frames sit at different angles.
- Ignoring hanger clearance: Clothes should not rub against the wall or angled legs.
- Overloading one side: Distribute garments across the rail instead of hanging every winter coat at one end.
- Finishing after final assembly: Reaching every interior surface with a brush becomes unnecessarily awkward.
- Using rough lumber: Splinters and delicate fabrics are not natural allies.
Real-World Experiences With an A-Frame Clothing Rack
The first practical lesson people often learn is that the project looks simpler on paper than it does during layout. Four legs and one rail sound almost suspiciously easy. The challenge is making both end frames identical. A difference of only a small fraction of an inch at the top can change the stance at the floor, causing one leg to hover or the entire rack to rock. Making a full-size template, stacking matching legs during drilling, and marking every piece from the same reference edge prevents many of these problems.
The second lesson arrives when the rack is loaded. Empty, almost any frame feels solid. Clothing introduces downward force, side-to-side movement, and uneven loading. People naturally grab the rack while removing a stubborn hanger, children may pull on the lower rail, and heavy coats tend to migrate together. A lower shelf or stretcher frequently makes the biggest difference between a decorative display and a rack that feels like dependable furniture.
Another common experience is discovering that more hanging space is not always better. A very long rail encourages overloading and may sag in the center. It can also make a small bedroom feel crowded. A moderately sized rail holding carefully selected clothing is usually more useful than a giant rack packed shoulder to shoulder. Open storage works best when it has a little negative space.
Builders also learn that the finish affects daily use. A rustic board may look charming in the lumber aisle, but rough grain can snag knits and delicate linings. Rounded rail ends, softened corners, and a smooth topcoat make the rack more pleasant to touch and safer for clothing. Spending an extra half hour sanding often produces a more noticeable improvement than spending considerably more money on exotic lumber.
Portability creates its own set of lessons. A permanently glued rack may be extremely rigid, but it can become difficult to move through narrow doors. A folding rack is easier to transport, yet it needs locking hardware or spread-limiting straps. Removable lower braces should be clearly labeled so reassembly does not become a small puzzle performed ten minutes before a market opens.
In everyday use, the rack tends to develop a personality based on its location. In an entryway, it becomes a landing strip for jackets and bags. In a bedroom, it often holds the week’s favorite outfits rather than an entire wardrobe. In a guest room, it provides hospitality without requiring much space. At a craft fair, it becomes part of the brand presentation, especially when its color and materials match the merchandise.
Maintenance is usually simple. Hardware may need occasional tightening as the rack is moved and the wood responds to seasonal humidity. Felt pads can wear out, painted surfaces can collect hanger marks, and the rail may need a fresh protective coat after years of use. These are minor chores, and the rack’s open construction makes every component easy to inspect.
Perhaps the most satisfying experience is realizing how much function can come from such a small number of parts. The finished rack is easy to understand at a glance: legs provide support, braces control movement, a rail carries clothing, and a shelf turns unused floor-level space into storage. There are no complicated mechanisms and no dark corner where one missing sock can establish a new civilization.
Final Thoughts
An “A” frame clothing rack is an approachable woodworking project with genuine everyday value. Its angled profile offers a stable starting point, its open design suits modern interiors, and its simple structure leaves plenty of room for customization.
The best version is not necessarily the largest or most complicated. It is the one sized correctly for its room, reinforced against spreading and twisting, sanded smoothly, and used within the limits of its materials. Add a shelf, a few well-placed pegs, and a finish that complements the surrounding furniture, and a basic garment rail becomes a purposeful piece of home organization.