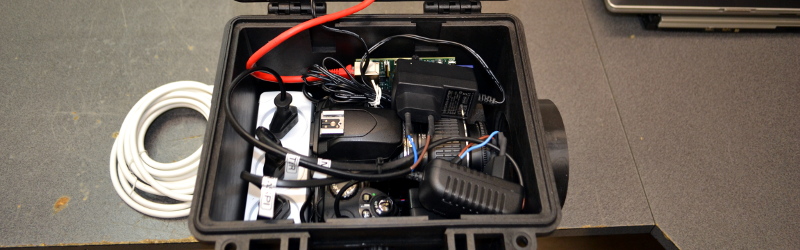
An automated weatherproof timelapse system with DSLR and Raspberry Pi is the kind of project that sounds wildly complicated until you break it into friendly little pieces: a camera, a tiny computer, a schedule, a waterproof box, and enough patience to let clouds, construction crews, plants, shadows, stars, or suspiciously dramatic sunsets do their thing. The goal is simple: set up a DSLR outside, let a Raspberry Pi trigger and manage the shots, protect everything from rain and dust, and come back later to a beautiful sequence instead of a soggy pile of electronics.
This setup is especially useful for construction monitoring, garden growth videos, landscape photography, weather studies, art installations, wildlife observation, and long-term documentation projects. A DSLR gives you image quality, lens flexibility, manual exposure control, and strong low-light performance. A Raspberry Pi gives you automation, file management, remote access, and the power to turn a basic timelapse into a smart outdoor capture station. Together, they are a small but mighty teamlike a photographer and a robot assistant, except the robot does not complain about standing in the rain.
What Is an Automated DSLR Raspberry Pi Timelapse System?
An automated DSLR Raspberry Pi timelapse system uses a Raspberry Pi to control a DSLR or mirrorless camera through USB, usually with software such as gPhoto2. Instead of manually pressing the shutter every few minutes like a very dedicated statue, the Pi sends capture commands at scheduled intervals. The camera takes the photo, and depending on your configuration, the image can stay on the camera card, download to the Raspberry Pi, upload to a server, or sync to cloud storage.
The “weatherproof” part matters because most long-term timelapse projects happen outdoors. Sun, rain, wind, dust, condensation, insects, and curious humans can all ruin a shoot. A good system protects the camera and Pi inside a rated enclosure, allows the lens to see clearly through a window or port, manages heat and moisture, routes cables safely, and keeps power stable.
Why Use a DSLR Instead of a Simple Action Camera?
Action cameras and dedicated timelapse cameras are convenient, but a DSLR still wins when image quality is the priority. A DSLR or mirrorless body offers larger sensors, interchangeable lenses, manual focus, RAW capture, better dynamic range, and more control over shutter speed, aperture, ISO, and white balance. For a quick backyard flower video, a small camera may be enough. For a year-long construction project, dramatic weather footage, or a polished commercial video, a DSLR gives the final timelapse a more professional look.
Best Use Cases for DSLR Timelapse
This kind of build works beautifully for projects where quality and consistency matter. Common examples include documenting a home build from foundation to finish, capturing seasonal changes in a landscape, monitoring a farm field, recording a mural or sculpture project, tracking traffic patterns, or creating a sky timelapse over several days. The Raspberry Pi makes it possible to automate capture, organize files, and check the system remotely without opening the enclosure every time something needs attention.
Core Components You Need
A reliable automated weatherproof timelapse system starts with choosing the right parts. You do not need the most expensive gear, but you do need components that behave well together. Outdoor timelapse is not the place for mystery cables, bargain-bin memory cards, or power supplies that look like they came free with a haunted printer.
1. DSLR or Mirrorless Camera
Choose a camera that supports USB tethering and remote capture. Many Canon and Nikon models work well with gPhoto2, but compatibility varies by model and firmware. Before building the enclosure, test the camera indoors. Connect it to the Raspberry Pi, run a detection command, and confirm that the Pi can trigger a shot. A camera with manual exposure, manual focus, and the option to disable auto power-off is ideal.
2. Raspberry Pi
A Raspberry Pi 3, 4, 5, or Zero 2 W can be used depending on the project. For simple capture and local storage, a Pi Zero 2 W may be enough. For remote access, uploads, image previews, and heavier file handling, a Raspberry Pi 4 or 5 is more comfortable. The key is stable power. Raspberry Pi models have specific power requirements, and underpowered boards can crash, disconnect USB devices, or corrupt files at exactly the worst possible moment.
3. Weatherproof Enclosure
Use a sturdy outdoor-rated enclosure. Look for IP65, IP66, IP67, NEMA 4, or NEMA 4X ratings depending on the environment. For most outdoor timelapse setups, the enclosure should protect against rain, dust, splashing water, and wind-driven debris. A transparent front window can work, but a dedicated optical glass or acrylic lens port is usually better because it reduces glare, distortion, and water streaks.
4. Lens Port and Sun Hood
The lens needs a clean view. A flat glass or acrylic window should be positioned close to the lens without touching it. Add a small sun hood or rain shield above the port to reduce flare and keep droplets off the viewing area. Even a simple angled cover can save hours of footage from the “one giant raindrop in the middle of the frame” tragedy.
5. Power System
Power is the heart of the build. Options include AC power with a weatherproof adapter, Power over Ethernet, a 12V battery with a 5V buck converter, or a solar-charged battery system. For long-term installations, consider a UPS HAT or safe-shutdown solution so the Raspberry Pi can shut down cleanly during power loss. The camera may need a dummy battery adapter if the project runs for days or months.
6. Storage and Connectivity
Use a high-quality microSD card for the Raspberry Pi and a reliable SD card in the camera. For serious projects, store images on an external SSD or sync them to another computer using rsync, SCP, or cloud tools. If the system is remote, Wi-Fi, Ethernet, or LTE can make maintenance easier. Remote access through SSH lets you check logs, storage space, and recent captures without climbing a ladder with a laptop and a look of regret.
Software Setup: Raspberry Pi, gPhoto2, and Scheduling
The most common software stack is Raspberry Pi OS plus gPhoto2. gPhoto2 is a command-line tool that can detect supported cameras, change camera settings, trigger captures, and download files. After installing it, connect the DSLR by USB and test detection with a command such as:
If the camera appears, test capture:
This command tells the camera to take a photo and download it to the Raspberry Pi. For a cleaner workflow, create a project folder such as /home/pi/timelapse and save files with timestamps. A basic capture script may look like this:
Once the script works, schedule it. Cron is simple and familiar, while systemd timers are often more robust for long-running Linux projects. For example, a cron job can trigger the script every five minutes. A systemd service and timer can add better logging, restart behavior, and control. The best choice depends on how mission-critical the project is. For a weekend backyard test, cron is fine. For a six-month construction timelapse, systemd deserves a serious look.
Choosing the Right Timelapse Interval
The interval determines how often the camera takes a photo. A short interval creates smoother motion but uses more storage and shutter actuations. A long interval saves space but can make fast changes look jumpy. The right interval depends on the subject.
Suggested Intervals
For clouds, shadows, and sunsets, try 5 to 15 seconds. For construction, use 1 to 10 minutes. For plant growth, 5 to 30 minutes often works well. For seasonal landscapes, one photo every hour may be enough. For star movement, intervals depend on exposure time, but consistency matters more than speed. Always calculate storage before deployment. Thousands of RAW files can fill a card faster than expected, and the camera will not politely warn the clouds to pause while you make room.
Camera Settings for Clean, Flicker-Free Results
Automatic settings can create exposure flicker, color shifts, and inconsistent frames. For professional-looking timelapse, lock down as many settings as possible. Use manual focus, manual exposure when lighting is stable, fixed white balance, and a consistent aperture. Turn off image stabilization when the camera is mounted on a tripod or fixed bracket. Use a lens hood to reduce flare and protect the glass.
For day-to-night transitions, aperture priority or carefully managed exposure ramping may be useful, but it can introduce brightness changes. Advanced workflows may use RAW capture and post-processing tools to smooth exposure. For a simpler setup, shoot JPEG plus RAW if storage allows. JPEG files are quick to preview and process, while RAW files preserve flexibility for color correction later.
Weatherproofing: The Difference Between “Outdoor” and “Oops”
Weatherproofing is not just putting gear in a plastic box and hoping the sky is feeling generous. A proper outdoor enclosure needs cable glands, sealed ports, a gasketed lid, corrosion-resistant hardware, and a drainage-conscious mounting angle. Water should not pool around the lens window. Cables should enter from below when possible, with drip loops so rain runs off before reaching the enclosure.
Moisture and Condensation Control
Condensation is sneaky. It can appear inside a sealed box because temperature changes cause moisture in the air to collect on cool surfaces. Add silica gel desiccant packs, avoid sealing wet air inside the enclosure, and consider a small vent with a waterproof breathable membrane. In hot climates, add shade or a reflective enclosure color. In cold climates, batteries and LCD screens may behave differently, so test the system under realistic conditions.
Heat Management
A Raspberry Pi, camera, voltage converter, and sunlit enclosure can become a tiny greenhouse with software. Heat can cause shutdowns, noise in images, battery stress, and general electronics grumpiness. Use passive ventilation where safe, leave air space around components, avoid direct afternoon sun, and mount the enclosure where it gets airflow. If fans are used, they must not pull rain or dust directly into the box.
Mounting the System Securely
The best timelapse system is useless if it shifts between frames. Even a tiny movement can ruin a long sequence. Use a strong tripod, pole mount, wall bracket, or custom frame. Lock every adjustable joint. Mark the position of the camera and enclosure so you can realign it after maintenance. For long-term public installations, add security screws, a lockable enclosure, and a cable lock. People are curious. Some are too curious. Build accordingly.
Remote Monitoring and File Backups
Remote monitoring turns a nervous project into a manageable one. Enable SSH on the Raspberry Pi, use key-based authentication, and check the system from another computer. A simple health-check script can report disk usage, last captured file, internal temperature, and network status. If internet access is available, schedule uploads to a server or cloud folder. Keep local copies too, because networks fail, routers sulk, and remote storage sometimes acts like it needs a vacation.
A practical workflow is to capture images locally, create low-resolution preview copies, upload previews frequently, and back up full-resolution files daily. That gives you quick visual confirmation without burning through bandwidth. For critical commercial work, use redundant storage and test recovery before deployment.
Turning Images Into a Finished Timelapse Video
After capture, sort and rename files consistently. Remove bad frames caused by rain droplets, maintenance visits, birds sitting in front of the lens, or the occasional spider auditioning for a horror movie. Then use video tools such as FFmpeg, Adobe Premiere Pro, DaVinci Resolve, or other editing software to assemble the sequence.
A common output is 24 or 30 frames per second. If you have 3,000 photos and export at 30 fps, the final clip will be about 100 seconds long. Color correction, stabilization, deflickering, and gentle cropping can make the final video look polished. Add titles, dates, or progress markers if the timelapse documents construction or scientific observation.
Common Problems and How to Fix Them
The Raspberry Pi Cannot Detect the Camera
Try a different USB cable, turn the camera off and on, disable camera auto power-off, and confirm that the camera is supported by your capture software. Some cameras enter USB storage mode instead of remote-control mode, which can block capture commands.
The Camera Stops Shooting Overnight
Check battery settings, sleep mode, power adapters, and USB stability. A dummy battery adapter may solve long-term camera power issues. Also review logs to see whether the Raspberry Pi continued running after the camera stopped responding.
Images Are Foggy or Blurry
Inspect the lens window for condensation, dust, water droplets, or scratches. Make sure the camera is focused manually and taped or locked in position. If the enclosure window is too close, too dirty, or angled poorly, image quality can suffer.
The Sequence Flickers
Use manual exposure and fixed white balance whenever possible. Avoid auto ISO unless the lighting changes dramatically. In post-production, use deflicker tools to smooth brightness variations.
Estimated Budget
A basic build can cost very little if you already own a camera and Raspberry Pi. A more reliable outdoor system may include a weatherproof enclosure, lens port, cable glands, mount, power adapter, dummy battery, desiccant, high-quality cards, and optional remote connectivity. Hobby setups may land under a few hundred dollars. Professional long-term systems can cost more, especially when solar power, LTE, high-end enclosures, or installation hardware are included.
Practical Experience: Lessons From Building an Automated Weatherproof DSLR Raspberry Pi Timelapse System
The first thing you learn from building an automated weatherproof timelapse system with DSLR and Raspberry Pi is that the camera is rarely the difficult part. The real challenge is making everything boring. Boring is good. Boring means the Pi boots, the camera wakes, the script runs, the files save, the enclosure stays dry, and nothing needs heroic troubleshooting during a thunderstorm.
One useful habit is to test the full system indoors for several days before taking it outside. Do not just test one photo and declare victory. Let the script run on the actual interval. Fill the folders. Reboot the Pi. Disconnect and reconnect power. Check whether the camera returns to the correct mode. Confirm that filenames do not overwrite each other. Watch for USB disconnects. A problem that appears once every 300 captures is still a problem, especially when the final project needs 30,000 captures.
Another lesson is that weatherproofing should be designed around maintenance. A sealed box is great until you need to change a card, clean the lens window, or reset a camera. Arrange the camera so you can reach controls without dismantling the entire enclosure. Use labeled cables. Leave enough slack to open the lid safely, but not so much that wires block the lens or fan. Mount the Raspberry Pi where you can see its status LEDs during testing. Future you will appreciate this. Future you may even forgive present you for drilling one hole slightly crooked.
Power deserves extra respect. Many mysterious timelapse failures are actually power failures wearing a fake mustache. The camera may draw more current during capture. The Pi may behave differently when Wi-Fi is active. A voltage converter may work on the bench but struggle inside a hot enclosure. Use a power system with headroom, not one that barely survives. If the installation is remote, consider automatic restart after outage and safe shutdown protection. It is much easier to prevent file corruption than to recover a damaged card from a box mounted twenty feet in the air.
Lens cleanliness is another underrated detail. Rain, pollen, dust, salt spray, and insects all love lens windows. A small hood above the port helps. So does angling the window slightly downward, as long as it does not distort the shot. For long projects, schedule cleaning days and capture a test frame after every visit. Keep the framing consistent. Even bumping the enclosure a little can create a visible jump in the final video.
Finally, think like an editor before you start shooting. Decide the final video length, frame rate, subject movement, and interval in advance. A construction project shot every 30 seconds may produce too many files. A sunset shot every five minutes may miss the magic. The best timelapse systems are technical, but the best timelapse videos are intentional. Build the machine carefully, then let time do the storytelling.
Conclusion
An automated weatherproof timelapse system with DSLR and Raspberry Pi is one of the most rewarding DIY camera projects because it blends photography, electronics, Linux automation, outdoor problem-solving, and a little bit of engineering mischief. The DSLR delivers image quality. The Raspberry Pi handles scheduling and remote control. The enclosure keeps nature from turning your project into modern art. With thoughtful planning, stable power, good weatherproofing, and careful camera settings, you can create a reliable system for construction progress, landscapes, gardens, weather, research, and creative storytelling.
The secret is not making the build complicated. The secret is making it dependable. Test everything, protect everything, back up everything, and resist the urge to say “good enough” right before the rain starts. When the final sequence plays back and months of change unfold in seconds, the effort feels absolutely worth it.