Some people buy a standing desk. Some people buy a desk mat. And some people look at a jar of spare change and think, “What if I turned all of this into furniture?” That, my friend, is how a DIY penny desk is born: part home office upgrade, part art project, part extremely shiny excuse to say “my desk is literally made of money.”
This guide walks you through building a penny tabletop (pennies + epoxy resin) and turning it into a durable, glassy desk surfacewithout turning your workspace into a sticky science experiment. We’ll cover the “penny math,” the “epoxy logic,” the “why is this bubbling like a haunted latte,” and the little details that separate showpiece from sad sticky slab.
Why a Penny Desk Works (and Why It’s Not Just a Gimmick)
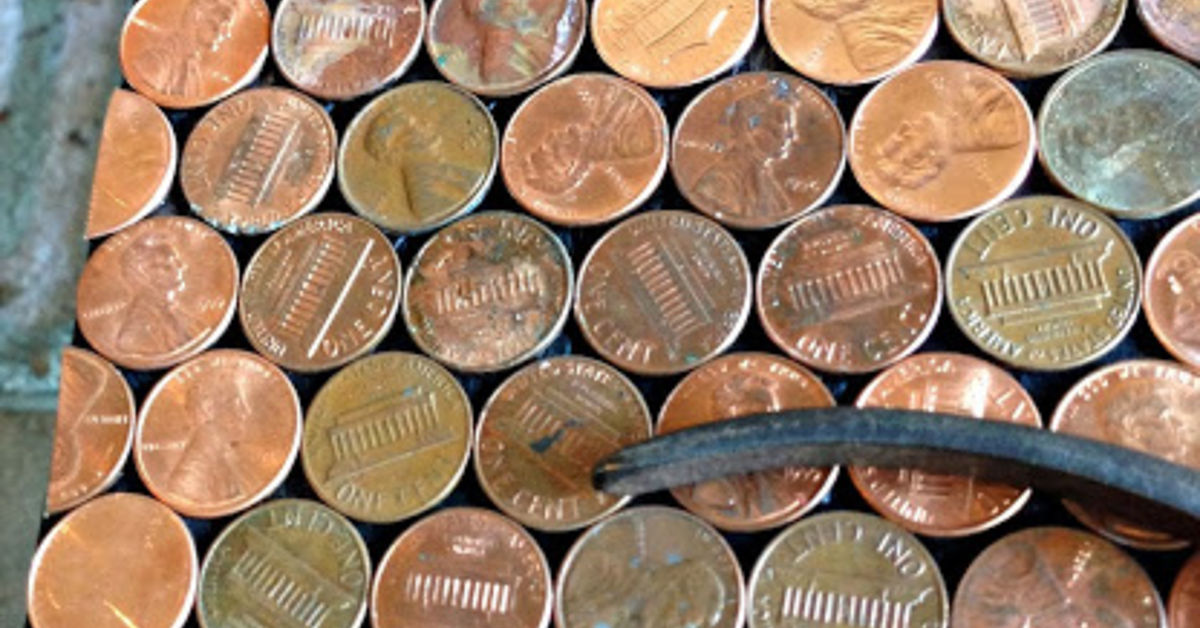
A penny desk is basically a “penny tabletop” idea adapted for furniture: you glue pennies onto a flat surface, then encase them in a clear self-leveling epoxy resin. The result is a smooth, glossy top that protects the coins, handles everyday desk life, and looks like you commissioned it from a boutique design studio that charges in “mortgage payments.”
What makes it worth doing?
- It’s durable: Epoxy creates a hard, protective surface that resists everyday wear better than most basic paint or stain jobs (when mixed and cured correctly).
- It’s customizable: You can sort pennies by tone, build gradients, make patterns, spell initials, hide “Easter egg” coins, or use years that matter to you.
- It’s a conversation starter: People will ask about it. Constantly. Prepare a short speech.
The one thing a penny desk absolutely requires is patience. You’re placing hundreds (or thousands) of coins. Think of it as “mindfulness,” but with glue and the occasional muttered apology to your lower back.
Design Decisions That Save Your Sanity
1) New build or makeover?
You can do a penny desk two ways:
- Makeover: Use an existing desk top (laminate, MDF, wood) and convert it into a penny-and-epoxy showpiece. Fastest path if the desk is sturdy and flat.
- New build: Build a simple wood desk base and use a plywood top as your penny canvas. Great if you want a specific size (like a long wall desk) or a particular style (hairpin legs, trestle base, etc.).
2) Decide your edge strategy (before epoxy makes that decision for you)
Edges are where epoxy projects go to cause chaos. Pick one approach:
- Raised frame (“dam”): Add a border around the tabletop to contain epoxy for a thick, glass-like pour. This is the most forgiving for beginners.
- Live edge / drip edge: Let epoxy roll over the sides for a waterfall look. Gorgeousalso messier.
- Inset top: Recess pennies into a shallow routed tray, then pour epoxy flush. Clean and premium-looking, but more woodworking upfront.
3) Pick the look of your pennies
- Shiny new-copper look: Clean and brighten pennies for a uniform, bright surface.
- Mixed tones: Keep natural variation for a warm, mosaic vibe.
- Organized chaos: Sort into light/medium/dark piles and create patterns or gradients.
Pro tip: a dark painted base (like black) makes the coin pattern pop and visually hides tiny gaps between pennies.
Materials & Tools Checklist
Materials
- Desk top: solid wood, MDF, or plywood (a stable, flat surface matters most)
- Pennies: enough to cover your surface (we’ll do the math below)
- Adhesive: CA glue (super glue), clear construction adhesive, or strong craft adhesive
- Paint (optional): black or dark color for the base layer
- Epoxy resin kit: a tabletop/bar-top epoxy resin (follow the manufacturer’s mix ratio)
- Painter’s tape / plastic sheeting: to protect everything you value
- Optional UV topcoat: a clear UV-stable varnish/urethane if your desk gets strong sunlight
Tools
- Orbital sander + sandpaper (common grits: 80/120/220)
- Level (a real one, not “eyeballing it”)
- Mixing buckets + mixing sticks (or a mixing paddle)
- Notched spreader or plastic squeegee
- Foam brush for seal coat
- Heat tool for bubbles (propane torch or heat gun, used carefully)
- Nitrile gloves, eye protection, and (ideally) a respirator rated for organic vapors
Penny Math & Epoxy Math (with Real Examples)
How many pennies do you need?
A U.S. penny is about 0.75 inches in diameter. Since circles don’t tile perfectly, you need a little extra. A good planning estimate is:
- 60″ × 30″ desk: plan roughly 3,700–4,200 pennies (that’s $37–$42… plus the epoxy, which is the part that actually costs money).
- 48″ × 24″ desk: roughly 2,300–2,700 pennies.
Always add a buffer for edges, pattern mistakes, and the handful that will inevitably vanish into an alternate dimension behind your workbench.
How much epoxy resin do you need?
Epoxy is bought by volume. For a rectangular surface, the classic formula is:
(Length × Width × Thickness) ÷ 231 = Gallons
(231 is the number of cubic inches in a U.S. gallon.)
Example: A 60″ × 30″ top with a 1/8″ (0.125″) flood coat:
- 60 × 30 × 0.125 = 225 cubic inches
- 225 ÷ 231 ≈ 0.97 gallons (about 125 fl oz)
Practical reality: you’ll also do a thin seal coat, plus you’ll lose a little to mixing buckets and edge work, so plan extra. For that same 60″ × 30″ desk, many DIYers feel comfortable buying about 1.25–1.5 gallons total depending on edge style and how thick they want the “glass” look.
Step-by-Step: Build the Penny Top
Step 1: Prep your workspace like you’re about to commit to a life choice
Epoxy drips are forever. Cover the floor. Cover nearby furniture. Cover anything you don’t want to become “artisan-coated.” Make sure the room is well-ventilated and the surface is level.
Step 2: Prep the tabletop
- Sand to scuff the surface so paint/epoxy can grip.
- Clean dust thoroughly (vacuum + wipe).
- Paint (optional): dark base colors make gaps disappear and coins stand out.
Step 3: Sort and clean pennies (optional but satisfying)
If you want a bright copper look, clean pennies before gluing them down. If you like mixed tones, skip deep cleaning and just wipe off grime. For extra design control, sort pennies into shades and plan a pattern.
Step 4: Dry layout (aka “the rehearsal dinner”)
Before you glue anything, do a dry layout in one corner and decide:
- Are you doing straight rows, a honeycomb offset pattern, or a deliberate gradient?
- How will you handle edges and cornersfull pennies, cut edges, or a border trim?
Step 5: Glue down the pennies
Work in small sections. Use small dots of glue so it doesn’t ooze up between coins. Press each penny flat. If you’re doing a pattern, mark guide lines lightly in pencil first so you don’t drift into “abstract art” territory.
Step 6: Build your edge dam (if using a contained pour)
A raised border around the tabletop helps contain epoxy for a thicker, more consistent finish. Seal gaps so epoxy can’t leak out. (If epoxy finds a hole, it will treat that hole like a career opportunity.)
Step 7: Mix a thin seal coat
A seal coat is a thin layer of epoxy brushed across the surface first. It reduces bubbles caused by air escaping from porous materials and tiny gaps. Mix carefully, scraping sides and bottom, and apply a thin, even coat with a foam brush.
Step 8: Pour the flood coat
Mix your epoxy according to the label. Mix slowly to avoid whipping in air. Many DIYers use a “mix, transfer, mix again” method: mix in one bucket, then pour into a clean bucket and mix again to reduce unmixed streaks that can leave sticky spots.
Pour in an S-pattern across the surface, then spread gently with a notched spreader or squeegee. Let it self-level. Use a gloved finger or tool to guide resin over edges if you want a rounded edge.
Step 9: Bubble patrol
For the first 20–30 minutes, bubbles will rise. Use a torch or heat gun in quick passeshovering, never lingering to pop surface bubbles. Keep the tool moving like you’re waving at someone you don’t want to talk to for too long.
Step 10: Cure like a professional
Keep the room stable (temperature swings can cause problems), and keep dust away. Depending on product and conditions, you may see “tack-free” in hours, “sandable” in about a day, and “full cure” over several days. Avoid heavy use until fully cured.
Step 11: Optional second coat (for extra depth)
If you want a thicker, glassy finish, add another flood coat. Timing matters: pour the next coat during the recommended recoat window, or scuff sand lightly if the previous layer has cured past that window so the new layer can bond well.
Troubleshooting: Bubbles, Sticky Spots, Waves, and Other Drama
Bubbles everywhere
- Cause: outgassing from porous materials, aggressive mixing, or cold epoxy.
- Fix: use a seal coat; mix slowly; warm the room (not the epoxy with a flamethrower); pop bubbles early with gentle heat.
Sticky or soft patches
- Cause: incorrect ratio, incomplete mixing, or resin/hardener left unmixed on bucket sides.
- Fix: scrape off uncured areas (following product guidance), then recoat properly. Prevention is easier than rescue.
Wavy surface or thin spots
- Cause: your table wasn’t level, or the pour was too thin.
- Fix: level the base, then recoat. Epoxy is a great self-leveleron a level surface.
Dust nibs (tiny specks trapped in the finish)
- Fix: once cured, lightly sand and add a final thin coat for a cleaner gloss.
- Prevention: reduce airflow after the initial bubble-popping window; keep pets, fans, and “helpful” people away.
Finishing, Aftercare, and Long-Term Durability
Daily use tips
- Use coasters: Epoxy can discolor or distort under heat. Treat hot mugs like tiny lava lakes.
- Clean gently: mild soap + water is your friend; avoid harsh solvents.
- Protect from UV: if your desk sits in strong sunlight, consider a UV-stable clear topcoat to reduce yellowing over time.
Cost & time reality check
The pennies are the funniest part (because $40 worth of pennies sounds cheap), but epoxy and prep materials are the real budget items. Time-wise, the penny layout can take hours, and the cure time adds days. The payoff is a desk top that looks custom and stays protected.
Real-World Experiences (500+ Words): What DIYers Usually Learn the Hard Way
Let’s talk about the part nobody puts on the pretty “after” photo: the in-between. The penny desk journey has a predictable emotional arc. It starts with confidence (“This is going to be so easy”), hits a mid-project slump (“I have placed 700 pennies and I’m only… one corner in?”), then rebounds into obsession (“Wait, this gradient is actually gorgeous”), and finally lands at deep satisfaction (“I made this. Also I never want to see a penny again.”).
The most common surprise is how long the layout takes. Even with a simple offset pattern, you’re doing repetitive, tiny placements and making micro-decisions the whole time: rotate this penny, swap that one, adjust this gap, re-check the border. DIYers who enjoy puzzles, paint-by-number, or reorganizing their spice rack alphabetically tend to thrive here. Everyone else learns the power of breaks. A smart move is to set “checkpoint goals” (finish one quadrant, finish a 12-inch strip, finish around the cable grommet) instead of aiming for the whole desk in one marathon session.
The second surprise is that pennies have personalities. Some are bright, some are chocolate-brown, some look like they survived a pirate ship fire. If you clean them for a uniform copper glow, you’ll get a bold, almost metallic sheet effectbut it can also feel a little “too perfect” depending on your style. If you keep mixed tones, the desk becomes warmer and more textured. A lot of DIYers end up doing a hybrid: wipe off grime, keep the natural variation, and then “curate” the top by placing darker pennies intentionally in a subtle pattern. It’s like interior design, but with coins.
Next comes epoxythe phase where people realize this isn’t just glue; it’s chemistry that demands respect. The “mix, then transfer to a clean bucket, then mix again” habit is one of the biggest quality upgrades DIYers report. It feels fussy until you’ve seen what a poorly mixed batch can do: one sticky corner that refuses to cure and ruins your whole mood. Mixing slowly also matters more than you think. If you whip epoxy like cake batter, you’re basically baking bubbles into your desk. (And unfortunately, bubbles do not taste like frosting.)
Bubble removal is where beginners get nervousespecially with a torch. The trick is quick passes and calm confidence. You’re not trying to “cook” the epoxy. You’re briefly warming the surface so bubbles pop. People who hover too long can scorch, ripple, or overheat the resin, so the best mental model is “waving hello,” not “campfire roasting.” Also: bubbles love edges and corners. Having a toothpick handy for stubborn edge bubbles is a tiny move that feels weirdly heroic in the moment.
Another classic lesson: your room is dustier than you think. Even clean homes have floating dust that will land in curing epoxy like it’s booking a luxury resort. DIYers often do their best finish by controlling airflow after the initial bubble windowenough ventilation for safety, but not a tornado aimed at the tabletop. If you do get dust nibs, don’t panic. That’s what light sanding and a final thin coat are for. Epoxy is forgiving when you treat it like a system: prep → seal → flood → fix → recoat.
Finally, the payoff: a DIY penny desk tends to become a “signature piece.” People take photos. Visitors run their hands over it (which is flattering and also mildly alarming). And the builder usually walks by it for a week thinking, “I actually did that.” The best part is that the desk doesn’t just look coolit’s practical. The smooth epoxy top cleans easily, holds up to daily use, and gives you that satisfying feeling of working on something you built yourself. And yes, you’re allowed to say “my desk cost me a few cents” and watch people do math in their heads.
Wrap-Up
A DIY penny desk is the sweet spot between functional furniture and art project: approachable materials, huge visual payoff, and enough customization to make it genuinely yours. If you take your time with layout, respect the epoxy process, and plan your pour like you plan your weekend errands (meaning: you accept it will take longer than you think), you’ll end up with a glossy, durable desk that looks high-end and tells a story.
And if anyone asks why you did it, you can tell them the truth: because you wanted a desk with a little more… cents.