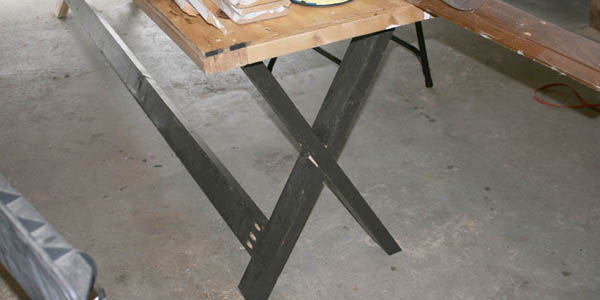
A serious craft room deserves more than a folding card table that trembles whenever the rotary cutter approaches. It deserves an executive-level workstation: broad enough for fabric, sturdy enough for power tools, and attractive enough that you do not have to hide it whenever company visits.
The original “Crafting Executive” concept centered on creating a generously sized craft table from leftover plywood, reclaimed lumber, trim, paint, and a clear protective top. Its memorable feature was a pair of bold X-shaped legs rather than ordinary sawhorse supports. That resourceful approach remains an excellent starting point for today’s DIY craft table: use what you have, spend money where durability matters, and give the finished piece enough personality to become part of the room.
This guide expands that idea into a practical plan for building a large crafting table with an X-leg base, a reinforced work surface, optional storage, and a finish capable of surviving glue, paint, paper scraps, coffee cups, and the occasional “I’ll clean that tomorrow” incident.
Start With the Work, Not the Lumber
Before buying boards, decide what the table must do. A sewing station, scrapbook desk, cutting table, jewelry bench, and general-purpose maker table all require different heights, surfaces, and storage arrangements.
Choose a Comfortable Height
A seated craft or office table is commonly built near standard desk height, around 29 to 30 inches. A standing cutting and assembly table may feel better at approximately 34 to 38 inches, depending on the user’s height and the type of work.
Do not select a height simply because a plan says so. Stack boxes beneath a temporary work surface and test it. Your shoulders should remain relaxed, and you should not have to bend sharply over the project. Ten minutes spent testing height can prevent years of crafting with the posture of a question mark.
Pick Useful Dimensions
A top measuring approximately 72 inches long by 36 inches wide provides plenty of room for fabric, paper cutters, laptops, and small machines without becoming impossible to reach across. Smaller rooms may be better served by a 60-by-30-inch top.
Leave at least 30 to 36 inches of open walking space around the sides you use regularly. Make a full-size outline on the floor with painter’s tape before committing. Furniture drawn on paper has a curious habit of becoming much larger after it enters a real room.
Selecting the Table Design
A craft table needs three things: a flat top, a rigid base, and connections that do not loosen under sideways pressure. Decorative details are welcome, but they cannot compensate for a base that performs an interpretive dance every time you erase a pencil mark.
Why X-Shaped Legs Work
X-shaped end frames offer a strong visual identity and can resist side-to-side movement when properly joined. The crossed members should be connected with a half-lap joint, bolts, structural screws, or another suitable furniture connection. Each X assembly also needs a horizontal top support, while a long stretcher between the two ends helps prevent racking.
Tapered and angled legs can make a heavy table appear lighter without sacrificing the thicker material needed around important joints. Traditional furniture makers frequently use this visual trick to balance strength and proportion.
Choosing a Top
For a practical craft table, cabinet-grade plywood is economical, stable, and easy to clean once sealed. A 3/4-inch sheet supported by a perimeter frame and cross braces works well for many projects. Laminating two layers creates a thicker, stiffer top, although it also adds weight.
A solid-wood top offers warmth and character but requires more careful construction. Solid wood expands and contracts mainly across its grain as humidity changes. It should be connected to the base with tabletop clips, buttons, figure-eight fasteners, or elongated screw holes that permit seasonal movement. Locking a wide solid-wood panel rigidly to its base can eventually cause splitting or distortion.
An optional acrylic sheet can protect the working surface from wet paint, knife marks, glue, and ink. It also allows measurements, reference charts, or inspirational images to be placed underneath. Choose a thickness appropriate for the span and support it evenly so it does not flex.
Materials and Tools
Suggested Materials
- One cabinet-grade plywood panel for the tabletop
- Construction lumber or hardwood for two X-shaped leg assemblies
- Boards for top rails, a center stretcher, and cross supports
- Wood glue
- Structural screws, bolts, washers, or approved pocket-hole screws
- Tabletop fasteners if using solid wood
- Wood filler or paintable caulk
- Primer, paint, stain, and a protective clear finish
- Optional trim, shelf boards, levelers, casters, or acrylic
Reclaimed wood can reduce the cost and give the table character, but inspect every piece carefully. Remove hidden nails and screws, reject boards with serious rot, and verify that painted salvaged material is safe to cut or sand. Old lumber is charming; an old nail meeting a saw blade at several thousand revolutions per minute is less charming.
Recommended Tools
- Tape measure, pencil, square, and straightedge
- Circular saw with a guide, miter saw, or table saw
- Drill and impact driver
- Pocket-hole jig or suitable joinery tools
- Clamps
- Random-orbit sander
- Router for softened edges, if available
- Eye protection, hearing protection, and effective dust control
Wood dust can irritate the eyes, skin, nose, and respiratory system, and certain wood species present more serious hazards with repeated exposure. Use dust collection or extraction, work in a ventilated area, wear appropriate eye protection, and follow the instructions for every tool and finishing product.
How to Build the Craft Table
1. Draw the Table and Create a Cut List
Sketch the tabletop, end frames, rails, stretcher, and any shelves. Record the finished dimensions of every component. Determine whether rails will sit flush with the legs or be slightly inset to create a shadow line.
Label similar components before cutting. Left and right parts often look identical until holes or angled cuts are added. Professional-looking furniture depends less on heroic last-minute adjustments and more on refusing to lose track of which leg faces inward.
2. Cut and Prepare the Lumber
Cut the X-leg components slightly long at first if their final angles depend on the tabletop height. Lay two boards across each other on a flat surface and adjust them until the end assembly reaches the desired width and height.
Mark the crossing point, then create a half-lap by removing half the thickness from each board. When fitted together, the faces should sit flush. Test the joint before adding glue. A tight joint should close with firm hand pressure or light clamping; it should not require a hammer and a motivational speech.
Sand the inside faces before assembly because they will be difficult to reach later. Begin with a grit appropriate for the surface condition and progress to a finer grit suitable for the selected finish.
3. Assemble the Two X Frames
Glue and fasten each half-lap according to the chosen hardware system. Add a horizontal upper rail across the top of each X. This rail distributes the tabletop load and creates a reliable attachment surface.
If the legs touch the floor at narrow points, install horizontal feet beneath them. Feet improve stability and provide space for adjustable levelers. Check both assemblies against the same template so the completed table does not lean like it is trying to hear a conversation in the next room.
4. Connect the End Frames
Stand the two X assemblies upright and connect them with long apron rails or a central stretcher. A lower stretcher is especially useful on a wide table because it reduces racking and can support a shelf.
Pocket-hole joinery is an accessible option for many DIY builders. Correct screw length and jig settings matter, and the holes should be placed where they will remain concealed. More traditional tables may use mortise-and-tenon or loose-tenon joints for additional glue area and mechanical strength.
Dry-fit the entire base before applying glue. Measure diagonally from corner to corner. When both diagonal measurements match, the assembly is square. Clamp it securely and recheck while tightening the fasteners.
5. Reinforce the Top Structure
Install cross supports between the long rails. These supports help prevent a broad plywood top from sagging and provide additional attachment points. Position them so they do not interfere with planned drawers, bins, electrical outlets, or knee space.
For an exceptionally thick appearance without excessive solid lumber, furniture makers sometimes construct lightweight torsion-box tops or add carefully joined edge returns. These techniques create visual mass while limiting weight.
6. Build and Attach the Work Surface
Cut the plywood top using a straightedge guide and a fine-finish blade. Add solid-wood edging or molding to conceal the plywood layers. Mitered corners offer a polished appearance, while simple butt joints are easier to repair.
Ease sharp edges with sandpaper or a router. A small round-over is usually more comfortable against wrists and forearms than a crisp square edge.
A plywood top may be screwed to the supporting frame through pilot holes. For a solid-wood panel, use movement-friendly fasteners. Metal clips that engage grooves in the apron are designed to hold the top securely while allowing it to expand and contract.
7. Add Craft-Friendly Storage
A lower shelf can hold boxes, cutting machines, fabric baskets, or paper organizers. Keep heavy equipment low to improve stability. Frequently used tools can be stored in shallow drawers or mounted on removable side panels.
Consider adding a power strip beneath the top, but route cords away from moving legs, cutting tools, and storage bins. Removable hooks can hold rulers and cutting mats without permanently cluttering the working surface.
8. Paint, Stain, and Protect the Table
Preparation determines whether the finished table looks like custom furniture or a weekend argument with a paintbrush. Fill visible defects, sand evenly, remove dust, and test the complete finish system on scrap wood.
Paint is ideal for mismatched or reclaimed lumber. Stain highlights attractive grain but can absorb unevenly in soft or porous species, making a compatible wood conditioner useful. Clear topcoats should be applied in the direction of the grain, allowed to dry as directed, and lightly sanded between coats when the manufacturer recommends it.
A craft surface receives more abuse than a decorative side table, so use a finish rated for furniture and repeated handling. Water-based products generally preserve a lighter appearance, while many oil-based finishes add warmth or amber color. Follow label directions for coat thickness, ventilation, drying time, and full cure time rather than assuming “dry to the touch” means “ready for a sewing machine.”
Common Problems and Practical Fixes
The Table Rocks
Confirm that the base is square and that all four contact points sit on the same plane. Adjustable furniture levelers are the easiest solution for uneven flooring. If the base itself twists, loosen removable connections, square the frame, and retighten it.
The Base Wobbles Sideways
Add or strengthen the long stretcher, install corner blocks, or reinforce weak leg-to-rail joints. A tabletop can add rigidity, but it should not be expected to rescue an underbuilt frame.
The Top Is No Longer Flat
Check whether solid wood was attached without room for seasonal movement. Finishes can slow moisture exchange, but they cannot stop wood from moving. Movement must be accommodated through sound construction.
The Finish Feels Rough
Raised grain, trapped dust, or an excessively heavy coat may be responsible. Allow the finish to dry, sand lightly with the recommended fine abrasive, remove the dust, and apply another controlled coat. Do not sand the final coat unless the product instructions specify a rubbing or polishing process.
Experience Notes From a First Large Table Build
A representative first-time build usually begins with an ambitious sketch and a dangerous level of confidence. The tabletop looks simple: one rectangle. The legs look simple: two X shapes. By lunchtime, however, the builder has discovered that identical-looking boards can be oriented in at least six incorrect ways.
The first useful lesson is to label everything. Mark the top, bottom, inside, and outside faces of each leg component before cutting joints or drilling holes. This feels unnecessary for approximately four minutes. Then one pocket hole appears on the visible side of a rail, and labeling suddenly seems like humanity’s greatest invention.
The second lesson is that dry-fitting is not optional. Assemble the base without glue and measure both diagonals. Place a level across the upper rails. Set the unfinished top in position and push gently from several directions. This trial assembly exposes small errors while they are still fixable. Once glue enters the conversation, the table becomes considerably less interested in negotiation.
Building the X frames is often the most satisfying stage. The design looks complicated, yet a carefully fitted half-lap creates an impressively strong intersection. Cutting the recesses in several shallow passes provides more control than trying to remove all the waste at once. The final adjustment can be made with a chisel, router plane, or sanding block until both faces meet evenly.
The tabletop tends to reveal another surprise: large surfaces magnify tiny imperfections. A ridge that is barely noticeable on a narrow board can catch fabric or paper when it runs across a six-foot workspace. Spending extra time flattening joints, easing edges, and sanding under strong side lighting produces a much more professional result.
The finish also rewards patience. Applying another coat before the previous one is ready can create softness, cloudiness, or drag marks. A better experience comes from finishing the base and top separately, keeping the area clean, and allowing each coat to dry according to its actual instructions. The project may look complete before it is fully cured, but placing heavy equipment on it too soon can leave permanent impressions.
Perhaps the biggest lesson is that a useful craft table does not need flawless lumber or museum-grade joinery. It needs thoughtful proportions, reliable connections, a flat working surface, and details that match the owner’s routine. Reclaimed boards, leftover trim, and mismatched materials can look intentional when the structure is consistent and the finish ties everything together.
After the table enters service, additional improvements become obvious. A hook appears for the cutting ruler. A shelf gains labeled bins. A power strip moves to the side that is actually convenient. These changes are not evidence that the original plan failed. They are the table becoming personalized through usethe woodworking equivalent of breaking in a good pair of boots, only with considerably more sawdust.
Conclusion
Building a large craft table is an approachable furniture project with an unusually generous payoff. The X-leg design creates a distinctive focal point, the broad surface turns scattered supplies into a workable studio, and reclaimed materials can keep the budget under control.
The strongest version begins with real measurements, uses a rigid stretcher-supported base, accommodates natural wood movement, and receives a finish selected for frequent use. Build carefully, test every assembly before gluing, and remember that the objective is not merely to own another table. It is to create a workspace that makes starting the next project easier.