If you have ever tried to print from a Chromebook and felt like the machine was politely saying, “That sounds like a you problem,” you are not alone. Printing on ChromeOS used to confuse plenty of people, partly because older advice on the internet still talks about outdated methods and long-gone tools. The good news is that adding a printer to a Chromebook is much easier now than it used to be. In many cases, your Chromebook can find a compatible printer automatically, save it in settings, and let you print in a few clicks.
The not-so-good news is that printers are still printers. They remain the world’s most stubborn office appliances, somehow capable of being both “ready” and “not found” at the exact same time. Still, with the right setup, most modern wireless printers, many USB printers, and a growing number of ChromeOS-compatible models work just fine.
In this guide, you will learn exactly how to add a printer to a Google Chromebook, what to do when the printer shows up like a friendly neighbor, what to do when it hides like a raccoon in the attic, and how to troubleshoot the most common problems without losing your mind or your paper.
Why Chromebook Printing Works a Little Differently
Chromebooks do not handle printers exactly like traditional Windows or Mac computers. Instead of relying on bulky printer drivers in the old-school sense, ChromeOS leans heavily on native printing support, network discovery, and standard printing protocols such as IPP. That is why many newer printers work best when they are connected to the same Wi-Fi network as the Chromebook.
This also explains why some ancient printers can be difficult to add. If a printer depends on a highly specific driver, or if it was designed long before ChromeOS became common, it may not play nicely with a Chromebook. In plain English: some printers are team players, and some are divas.
For most users, though, printing falls into one of three categories:
- Adding a wireless printer automatically over the same network
- Adding a printer manually using its IP address and IPP settings
- Connecting directly with USB or using a direct wireless option such as Wi-Fi Direct, depending on the printer model
Before You Add a Printer to Your Chromebook
Before you dive into settings and button-clicking glory, take a minute to do a few simple checks. These save a surprising amount of time.
1. Make Sure the Printer Is Turned On
Yes, this sounds obvious. No, it is not insulting. Printer setup has humbled the best of us.
2. Put the Printer on the Same Network as the Chromebook
If you are setting up a wireless printer, both the Chromebook and the printer usually need to be connected to the same Wi-Fi network. If your house has both 2.4 GHz and 5 GHz bands, some printers may only work on one band, so double-check that the printer is not stranded on one network while your Chromebook is vacationing on another.
3. Check Whether the Printer Is Chromebook-Compatible
Many printers work well with ChromeOS, especially models labeled “Works With Chromebook” or those that support native printing standards. If your printer is older, low-cost, or USB-only, compatibility may be limited. That does not mean it is impossible, but it does mean you may need manual setup or a workaround.
4. Update the Printer Firmware if Needed
If the printer appears but refuses to print, outdated firmware may be the culprit. Manufacturers like HP, Epson, Brother, Canon, and others often recommend checking for firmware updates when ChromeOS devices cannot communicate properly with the printer.
5. Know That Old Google Cloud Print Advice Is Outdated
If you find a tutorial telling you to use Google Cloud Print, close that tab gently and back away. That method is old news. Modern Chromebooks use native printing instead.
Method 1: Add a Wireless Printer Automatically
This is the easiest and most common way to add a printer to a Chromebook. If your printer is on the same network and supports ChromeOS well, the setup can be pleasantly boring.
- Turn on the printer and make sure it is connected to Wi-Fi.
- On your Chromebook, click the time in the bottom-right corner.
- Open Settings.
- Scroll to Device, then open Printers and scanners.
- Select Print.
- Look under Other available printers.
- If your printer appears, click Save.
That is it. Seriously. Sometimes technology does decide to behave.
After you save the printer, it should move into your saved printers list. From there, you can print from Chrome, Google Docs, PDFs, images, and most supported apps.
When Automatic Detection Works Best
This method usually works best with newer wireless printers from major brands such as HP, Epson, Brother, Canon, Xerox, and Lexmark. It is especially smooth when the printer supports IPP, IPP Everywhere, AirPrint-style discovery, or official ChromeOS compatibility.
Method 2: Add a Printer Manually with IPP
If the printer does not show up automatically, do not panic. Your Chromebook may still be able to connect to it manually. This is often the best fix for office printers, shared network printers, or stubborn home printers that act like they have never met Wi-Fi before.
Step 1: Find the Printer’s IP Address
Most network printers have an IP address. You can usually find it on the printer’s display panel, in its network settings, or by printing a network configuration page. The IP address often looks something like 192.168.1.25.
Step 2: Add the Printer Manually
- Open Settings on your Chromebook.
- Go to Device > Printers and scanners > Print.
- Select Other available printers.
- Choose + Add printer manually.
- Enter a printer name you will recognize.
- Enter the printer’s IP address.
- For the protocol, choose IPP in most cases.
- For the queue, use ipp/print if the printer maker recommends the standard default.
- Click Add.
Once ChromeOS connects, it may ask you to choose the manufacturer and model. If it cannot identify the printer automatically, you may need to select the brand and model manually. In some cases, you can also upload a PPD file, which tells the Chromebook how to communicate with that specific printer model.
When Manual Setup Is the Better Choice
Manual setup is especially useful when:
- Your printer is on the network but does not appear automatically
- You are using a shared office printer
- The Chromebook sees the printer but cannot finish setup
- You need a more precise connection method for a specific model
If you are at work or school and the manual add option is restricted, your administrator may control printer access. In that case, the issue is not you. It is policy. Which is much less satisfying, but at least it narrows things down.
Method 3: Use USB or Wi-Fi Direct
Not every printing setup depends on regular Wi-Fi. Some printers can connect directly to a Chromebook by USB, while others support Wi-Fi Direct or a similar direct-connect mode.
Using a USB Printer with a Chromebook
If your printer supports ChromeOS printing over USB, connect the cable to your Chromebook and give the system a moment to detect it. Then:
- Open Settings.
- Go to Printers and scanners.
- Look for the connected printer.
- Save or add it if prompted.
This can work surprisingly well with some newer printers. However, some older USB printers are not Chromebook-friendly, especially models that rely on Windows-only drivers. In other words, if your printer came from the era of flip phones and ringtone downloads, manage your expectations.
Using Wi-Fi Direct
Some HP, Canon, Epson, and other printers support Wi-Fi Direct or similar direct wireless modes. This lets your Chromebook connect straight to the printer without going through a traditional router. It is handy in small spaces, travel situations, or homes where the printer and Wi-Fi have an ongoing personal feud.
The exact setup varies by brand, but generally you will:
- Enable Wi-Fi Direct on the printer
- Connect the Chromebook to the printer’s direct wireless network
- Add the printer through ChromeOS settings or print dialog
Because manufacturer steps differ, always check your model’s instructions if you use this method.
How to Print After Adding the Printer
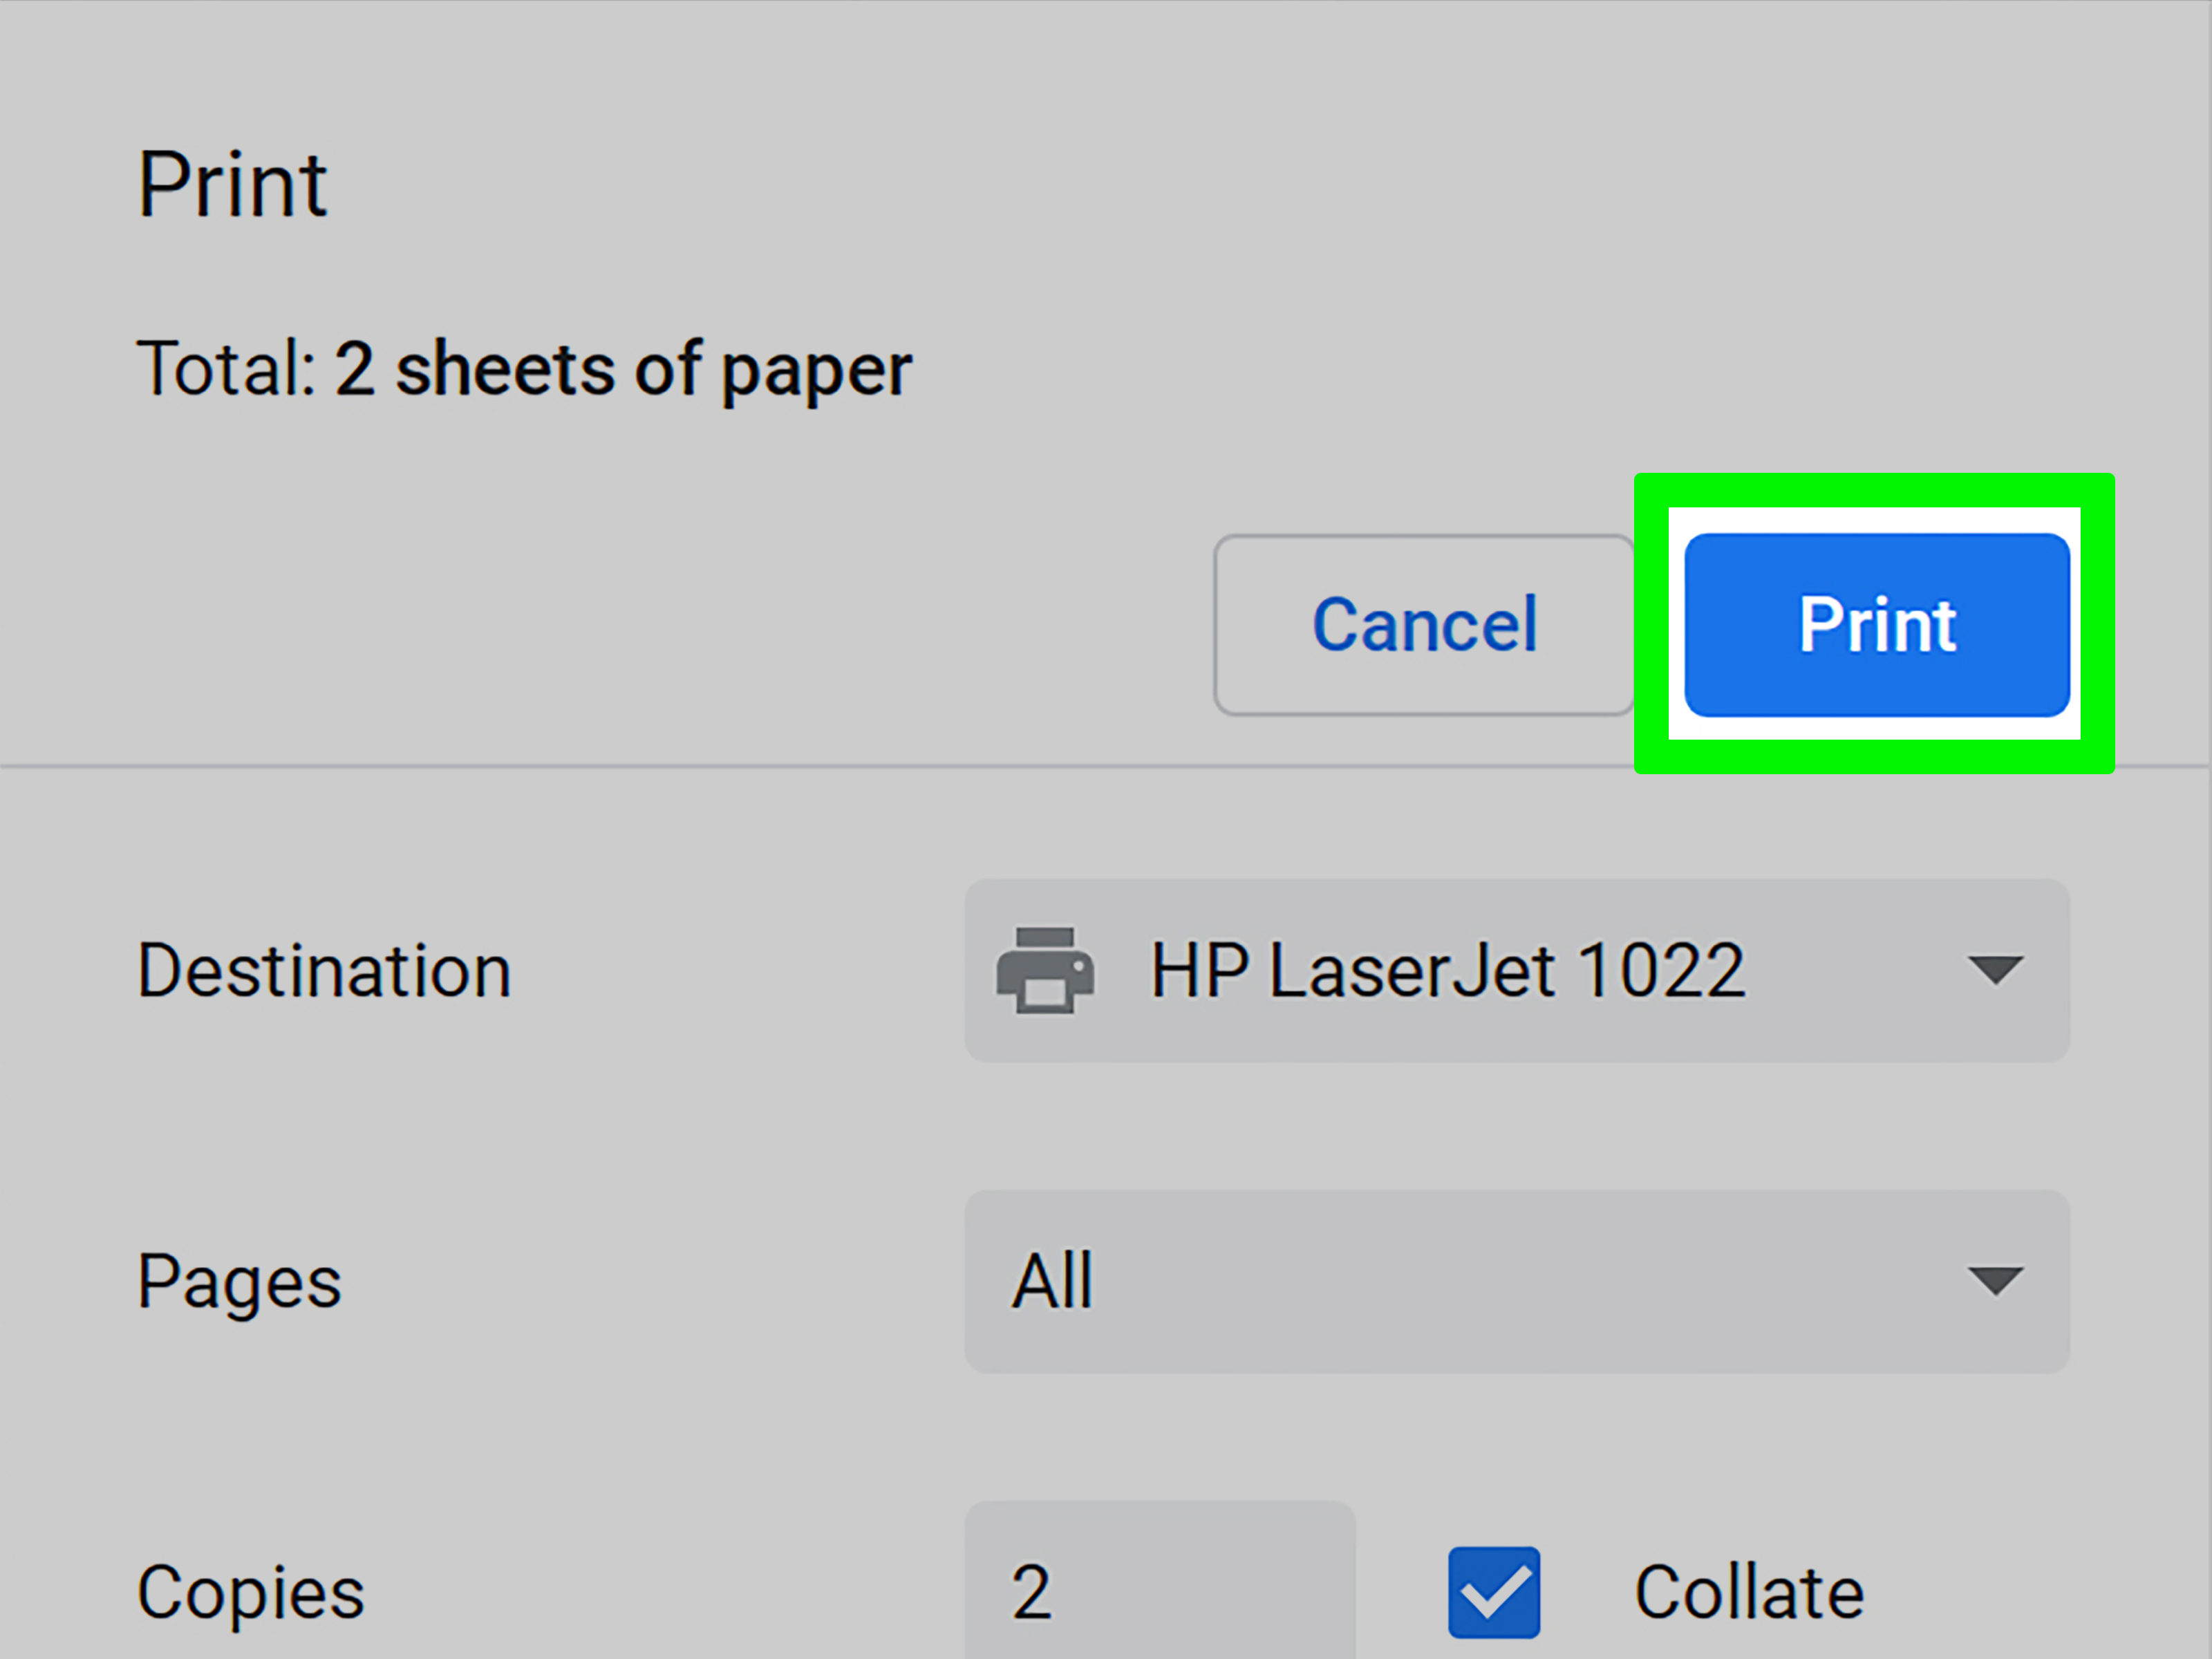
Once the printer is saved, printing is easy:
- Open the page, file, or document you want to print.
- Press Ctrl + P.
- Under Destination, choose your printer.
- Adjust print settings like pages, color, duplex, and paper size.
- Click Print.
If you do not see the printer right away in the print dialog, choose See more and look for it there. Once selected, it should remain easier to access later.
What to Do If Your Chromebook Cannot Find the Printer
This is the part where many people start questioning modern civilization. Thankfully, the fix is often simple.
Restart Both Devices
Restart the Chromebook. Restart the printer. Yes, the old “turn it off and on again” routine still works because the universe has a sense of humor.
Check the Network Again
Make sure both devices are on the same Wi-Fi network. If your router creates separate guest and main networks, avoid mixing them. Also watch for 2.4 GHz versus 5 GHz mismatches.
Remove and Re-Add the Printer
If the printer appears in saved printers but will not print, remove it and add it again. Sometimes the setup information is slightly off, and a fresh start works better than endless optimism.
Verify the IP Address and Queue
If you added the printer manually, double-check the IP address and the queue path. One wrong number can turn your printer into a ghost.
Try Manufacturer and Model Setup
If ChromeOS asks you to choose the manufacturer and model, be precise. Picking the wrong model can lead to weird behavior like missing paper sizes, broken color printing, or features disappearing like socks in a dryer.
Update Firmware
If discovery works but actual printing fails, check for printer firmware updates from the manufacturer.
Consider Compatibility Limits
Some models simply do not support ChromeOS well. If you have an older or driver-dependent printer, especially a bargain-bin model that behaves like it was built during the MySpace era, your best long-term move may be upgrading to a Chromebook-friendly printer.
Tips for Buying a Chromebook-Friendly Printer
If you are shopping for a new printer and want to avoid future drama, look for these features:
- Works With Chromebook certification
- Native ChromeOS or IPP support
- Wi-Fi printing support
- AirPrint or IPP Everywhere compatibility
- A manufacturer support page that clearly mentions Chromebook support
Printers from major brands often support Chromebooks well, but model-by-model differences matter. The brand name on the box is helpful; the exact model number is what saves your weekend.
Common Example: Adding a Home Wi-Fi Printer
Let’s say you have a wireless all-in-one printer in your home office. You connect it to your home Wi-Fi, then open your Chromebook settings and head to Printers and scanners. The printer shows up under available printers. You click Save, open a Google Doc, press Ctrl + P, and choose the printer. Boom. You are done.
Now imagine the less cooperative version. The printer does not appear automatically. You print a network status page, find the IP address, add it manually, use IPP, select the correct manufacturer and model, and then print successfully. Same ending, slightly more character development.
of Real-World Experience with Chromebook Printer Setup
In real life, adding a printer to a Chromebook usually goes one of two ways. The first is wonderfully uneventful. A student opens a new Chromebook, connects to home Wi-Fi, powers on the family printer, and the printer appears in settings almost immediately. They save it, print a worksheet, and never think about printer setup again. This is the ideal path. It is clean, fast, and boring in the best possible way.
The second path is the one most people remember because it involves a little detective work. A parent tries to print school forms at 10:30 p.m. The Chromebook is online. The printer is online. Everyone appears healthy, yet no printing happens. After ten minutes of muttering, they discover the Chromebook is on the regular home network while the printer somehow connected to a guest network or an older 2.4 GHz-only band. Once both devices are moved to the same network, the printer appears like it had been there the whole time, smug and innocent.
Another common experience happens in small businesses and home offices. Someone has a reliable laser printer that works beautifully from a Windows laptop but refuses to appear on a Chromebook. At first, it looks like a compatibility problem. In many cases, though, the printer can still be added manually with its IP address. That single step changes the whole experience. Instead of depending on automatic discovery, the Chromebook is told exactly where the printer lives. It is less magical, but much more effective.
Teachers and remote workers often run into a related issue with shared printers. The printer exists, but it is managed by a school or office network. The Chromebook user may see the printer but not have permission to add or modify it. That can feel frustrating, especially when the printer is physically five feet away and emotionally one thousand miles away. In those situations, the problem is usually administrative rather than technical. Once the correct permissions are applied, printing becomes straightforward.
There is also the experience of trying to keep an older printer alive. Plenty of people have a perfectly good printer that still prints beautifully from one device, so they naturally expect it to work with a Chromebook too. Sometimes it does. Sometimes it does not. The difference often comes down to whether that printer supports modern network printing standards. If it does, setup is possible. If it depends on special drivers, the Chromebook may simply not speak its language. That realization can be annoying, but it also saves hours of unproductive trial and error.
What most Chromebook users learn over time is that printing is easiest when the setup is simple: a modern printer, the same Wi-Fi network, and native support. Once those pieces are in place, ChromeOS printing feels refreshingly low-maintenance. And when those pieces are not in place, the best move is usually not random clicking. It is checking the network, confirming compatibility, and using manual IPP setup when automatic discovery fails. In other words, success usually comes from calm, boring troubleshooting, which is a lot less exciting than yelling at the printer but far more effective.
Final Thoughts
Learning how to add a printer to a Google Chromebook is much less intimidating once you know the logic behind it. Start with the easiest route: connect both devices to the same network and let ChromeOS detect the printer automatically. If that fails, use manual IPP setup with the printer’s IP address. If your printer supports USB or Wi-Fi Direct, those can also work well depending on the model.
The biggest takeaway is simple: modern Chromebook printing is usually easy, but the setup depends on compatibility, network connection, and using the right method. Once your printer is saved properly, your Chromebook can handle everyday printing without much drama. And that, in the printer world, is basically a miracle.