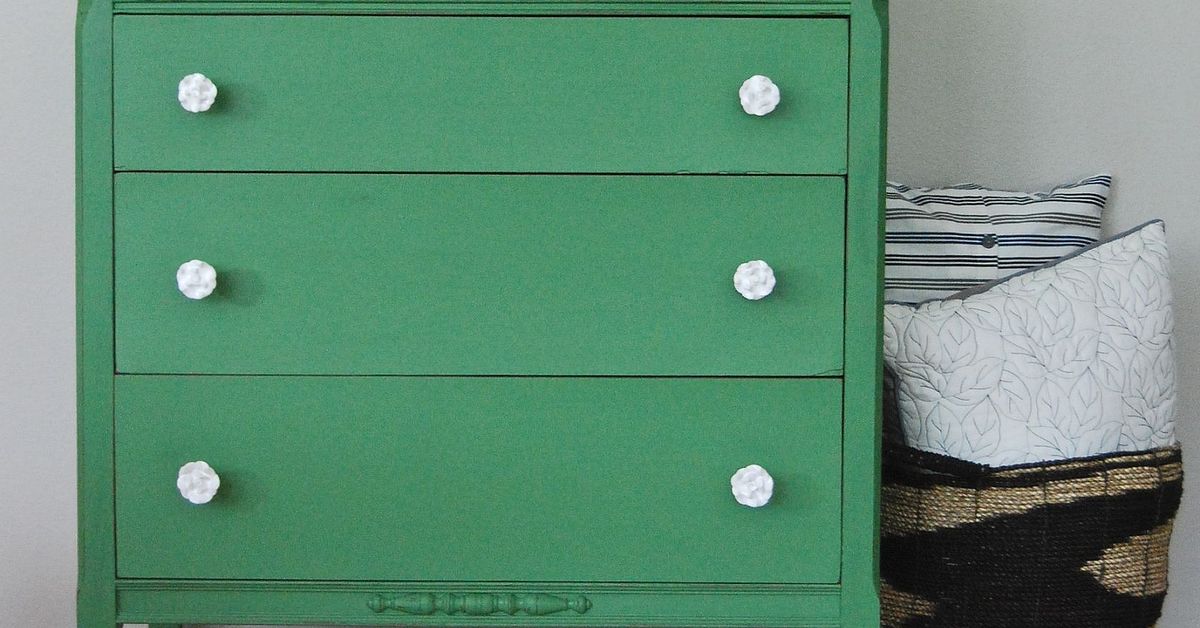
If furniture could have a glow-up montage set to pop music, a mossy green dresser with white rose knobs would be the part where everyone gasps and the camera does that dramatic slow zoom. It’s equal parts woodland-cottage charm and “I have my life together” energywithout requiring you to actually have your life together. (The dresser doesn’t need to know.)
This piece is a sweet spot: mossy green reads grounded and grown-up, while white rose knobs add a little romance and whimsylike your dresser is wearing a vintage brooch. Done right, it can look boutique-level, not “I painted this in a panic on Sunday night.” Let’s talk about how to make it durable, smooth, and genuinely beautiful.
Why Mossy Green Works So Well
Mossy green is basically nature’s neutral. It can lean sage, olive, or deep pine depending on lighting and undertones, which is exactly why it plays so nicely with different stylestraditional, modern farmhouse, cottagecore, even minimalist (yes, really). In bright rooms, mossy green can feel fresh and airy; in dimmer rooms, it goes moody and cozy, like a well-read library that smells faintly of cedar and good decisions.
Undertone talk (without making it weird)
When you’re choosing a “mossy green,” pay attention to whether it has more yellow/olive (warmer) or more blue/gray (cooler). Warm mossy greens pair beautifully with creamy whites, rattan, oak, and brass. Cooler mossy greens love crisp whites, black accents, chrome, and pale woods. If you can, grab a sample and paint a large swatch on poster boardthen move it around the room throughout the day. Mossy greens are notorious for shape-shifting like they’re auditioning for a spy movie.
Picking the Right Dresser to Make Over
The best candidates are sturdy, functional, and just a little ugly. You want good bones: drawers that open, a frame that doesn’t wobble, and surfaces that aren’t crumbling. Solid wood is dreamy, but you can also paint veneer or laminate if you prep correctly.
- Check the structure: Push on the corners. If it rocks, tighten joints or add wood glue and clamps where needed.
- Inspect drawers: If drawers stick, look for swollen wood, warped runners, or missing glide hardware.
- Look for water damage: Minor rings are fine; soft, crumbling fiberboard is a heartbreak waiting to happen.
- Smell test: If it smells like a basement with opinions, you may need extra cleaning and sealing.
Before You Start: Safety and Lead Paint Reality Check
If your dresser is olderespecially if it may have lived through the “we put lead in paint because we didn’t know better” eratake precautions. In the U.S., lead-based paint was banned for residential use in 1978, and disturbing old paint can create hazardous dust. If you suspect lead paint, consider using a lead test kit, avoid aggressive sanding, keep kids and pregnant people away from the workspace, and follow lead-safe practices. If you’re unsure, hiring a certified pro is the safest move.
Tools and Materials (Your “Don’t Make Six Trips” List)
Here’s what typically delivers a smooth, long-lasting finish:
- Degreasing cleaner (or a dedicated pre-paint cleaner/deglosser)
- Sandpaper: 120 grit, 220 grit (and optionally 320 for between coats)
- Tack cloth or lint-free rags
- Wood filler (for dents and old hardware holes)
- Bonding primer (especially for glossy finishes or tricky surfaces)
- Paint: furniture/cabinet enamel, hybrid-alkyd enamel, or quality acrylic
- Brushes (angled synthetic) + small foam roller (for flatter areas)
- Topcoat (optional, but helpful for heavy-use surfaces)
- New knobs: white rose knobs + screws of the correct length
- Screwdriver, drill, measuring tape, and a simple hardware template
- Drop cloth, painter’s tape, and good ventilation
Prep Like You Mean It (Because Paint Has Standards)
Painting furniture is 30% painting and 70% “I can’t believe I’m cleaning this much.” Prep is what makes the finish look professional and keeps it from chipping the first time someone puts a water glass on it like a villain.
Step 1: Remove hardware and label everything
Take off knobs, pulls, and drawer plates. Put screws in labeled bags. Remove drawers and set them aside. If you’re reusing any hardware, keep it together so nothing disappears into the mysterious dimension where single socks live.
Step 2: Clean until you’re slightly offended
Dressers collect years of hand oils, furniture polish, and random kitchen-adjacent grime (even when the dresser never entered a kitchendon’t ask). Use a degreaser or a pre-paint cleaner. Rinse/wipe down well and let it fully dry.
Step 3: Sand or degloss (or both)
If the surface is glossy, scuff sanding helps primer and paint grip. For many pieces, a light sand with 120 grit is enough; you’re not trying to erase the dresser’s history, just dull the shine and level rough spots. Then smooth with 220 grit where needed. Wipe away dust thoroughly.
Step 4: Patch dents and old holes
If you’re switching from pulls to knobs (or changing the placement), fill old holes with wood filler. Apply slightly proud of the surface, let it dry, sand smooth, and repeat if it shrinks. For larger holes, a wood dowel plus filler can create a stronger patch. The goal is a seamless face so your new mossy green doesn’t spotlight every old hardware choice like a neon sign.
Choosing Paint: What Actually Holds Up on a Dresser
Dressers get touched constantly: drawers, top surface, corners, the occasional dramatic toss of a sweater. That’s why “wall paint I had leftover” can be… emotionally optimistic. Better options are formulated for durability and leveling.
Great paint options for furniture
- Hybrid-alkyd or cabinet/furniture enamel: Tough, smooth, and often self-leveling for fewer brush marks. Great for a dresser that gets daily use.
- Quality acrylic paint: Easier cleanup, good durability when paired with proper prep and (optionally) a topcoat.
- Chalk paint or milk paint: Very beginner-friendly, often less prep, but usually needs a protective finish for heavy wear.
- All-in-one furniture paint: Convenient, often includes built-in primer/topcoat qualities, but still benefits from careful prep.
If you want a sleek, modern finish: lean enamel + foam roller + light sanding between coats. If you want soft, vintage character: chalk-style paint with a gentle waxed or matte topcoat can look lovelyespecially with rose knobs.
Step-by-Step: Creating That Mossy Green Finish
1) Prime (when it’s worth it)
If your dresser is glossy, stained wood, knotty wood, or you’re covering a dark finish with a lighter mossy green, primer is your best friend. A bonding primer improves adhesion and helps prevent bleed-through. Apply a thin, even coat. Once dry, lightly sand with 220 grit to knock down texture and wipe clean.
2) Paint in thin, patient coats
Thin coats beat thick coats every time. Use a high-quality synthetic brush for edges and details, then a small foam roller for flat surfaces. Work in sections: frame, sides, drawer fronts, then the top. Keep a “wet edge” so you’re not dragging half-dry paint into streaks.
Pro move: After the first coat dries, lightly sand with 220–320 grit to remove dust nibs. Wipe clean. This is the not-so-secret secret behind smooth furniture finishes.
3) Don’t rush dry time (dry ≠ cured)
Paint may feel dry to the touch quickly, but curing takes longeroften days to weeks depending on the paint type and conditions. During the cure window, be gentle: avoid dragging items across the top, and try not to slam drawers like you’re in a soap opera argument scene.
4) Add a protective topcoat (optional, but often smart)
If the dresser top will hold lamps, cups, plants, or anything that sweats condensation like it’s nervous, consider a durable topcoat. Water-based polyurethane is popular because it dries clear and doesn’t yellow much. Apply thin coats and sand lightly between them for a smooth build. Always follow the manufacturer’s recoat window.
The White Rose Knobs: Tiny Detail, Big Personality
White rose knobs are the jewelry of this makeover. They’re sweet, sculptural, and a little dramaticin a good way. To keep them from feeling too “shabby chic time capsule,” pair them with a mossy green that has depth, and keep the rest of the styling clean and intentional.
How to choose the right rose knobs
- Scale matters: Petite roses feel delicate; oversized roses feel bold and vintage. Match knob size to drawer size.
- Finish details: Some rose knobs have brass or gold accentsthose can look stunning against mossy green.
- Projection: Knobs that stick out too far can catch pockets and sleeves. (Ask any hoodie.)
- Screw length: Screws that are too long can poke into drawers; too short won’t bite. Measure drawer-front thickness.
Placement tips (so it looks “designed,” not “eyeballed”)
If the dresser had knobs before, you can reuse the same holes. If you’re changing hardware:
- Measure the drawer front and mark the center with painter’s tape.
- Use a simple drilling template (even cardboard works) so every knob aligns.
- If you’re switching from two-hole pulls to single knobs, fill old holes carefully and drill a centered new hole.
- Consider adding a backplate if you want extra coverage or a more tailored look.
Styling a Mossy Green Dresser (So It Looks Like It Belongs)
Once it’s painted and cured, you get the fun part: styling. Mossy green and white is a naturally calm combo, which means your decor can go in several directions:
1) Cottage clean
Pair it with creamy walls, a simple framed botanical print, and a ceramic lamp. Add a woven basket nearby for soft texture. Let the rose knobs be the “floral moment” so the rest stays calm.
2) Modern contrast
Balance the romantic knobs with crisp shapes: a black round mirror above, a minimal vase, and a tidy stack of books. Mossy green reads sophisticated when you keep the silhouettes clean.
3) Vintage romance
Lean in: gold picture frames, a small lace runner (tasteful, not doily overload), and an antique trinket dish. This is where the dresser becomes the main character.
Where it works in the house
- Bedroom: As a dresser or a statement storage piece at the foot of the bed.
- Nursery: Mossy green is soothing and gender-neutral; rose knobs add sweetness without screaming “theme.”
- Entryway: A small dresser can catch keys, mail, and your “I’ll deal with it later” pile.
- Dining room: Use it as a sideboard for linens and serving piecesvery charming for entertaining.
Common Problems (and How to Fix Them Without Crying)
Problem: Brush marks
Fix: Use thinner coats, don’t overwork the paint, and consider a foam roller for flat areas. Light sanding between coats levels things out. If you’re using a paint that’s thick, check whether it can be slightly thinned per manufacturer guidance.
Problem: Sticky drawers after painting
Fix: Paint adds thickness. Sand paint buildup on drawer edges and runners, then wax the runners lightly (a simple furniture wax can help). Also check that you didn’t seal drawers shut with enthusiasm.
Problem: Yellow or brown stains bleeding through
Fix: Use a stain-blocking primer, especially on older wood. If bleed-through appears, stop, prime that area, and repaint.
Problem: Chips on corners
Fix: Corners take the most abuse. Ensure thorough prep, consider a more durable paint type, and let it cure fully. Touch-ups are easier if you save a small labeled jar of paint.
Living With It: 500+ Words of Real-World Experience and What to Expect
The first week with a mossy green dresser is a little like adopting a very photogenic pet: you keep walking by just to admire it. In the morning light, it looks fresh and calmlike eucalyptus, but furniture. At night, it deepens into something moodier and richer, which is when you realize you didn’t just paint a dresser; you accidentally gave your room a personality upgrade.
Then come the compliments. Someone will touch the drawer front (because apparently we’re all tactile museum visitors now) and ask, “Where did you get this?” If you say, “I made it,” there’s a solid chance they’ll look at you differentlylike you’re secretly capable of baking bread and owning matching food-storage containers. It’s the kind of DIY that upgrades your reputation without requiring you to become a full-time craft person.
The rose knobs do most of the emotional heavy lifting. They’re small, but they’re a mood: gentle, a little romantic, and slightly old-world. The funniest part is how they change what you put on top of the dresser. Before, you might’ve tossed your keys, a random candle, and a hair tie graveyard up there. After the makeover, you start curating like the dresser has feelings. Suddenly you want one pretty tray, one vase, and one object that says “I read design blogs.” (Even if you don’t. The dresser won’t snitch.)
Functionally, you’ll notice the finish most when life happens: a water ring from a cold drink, a scratch from a belt buckle, a plant pot that drips exactly once and chooses chaos. A durable paint and a properly applied topcoat help, but the biggest difference is cure time. If you baby the dresser for the first couple of weeksgentle use, no harsh cleaners, no dragging heavy objectsyou’ll be rewarded with a finish that feels harder, smoother, and far less “tender.” Think of it like nail polish: it’s fine… until you put on jeans too soon and regret everything.
Daily maintenance is simple. A soft cloth, a little mild soap, and zero need to attack it with strong chemicals. The mossy green is forgiving with dust (a true gift), but it can show oily fingerprints if you have shiny drawer fronts. The good news: a quick wipe restores the vibe instantly. It’s basically the furniture version of drinking water and applying lip balm.
Over time, you may develop a surprising attachment to the piece. That’s normal. You rescued something overlooked, gave it style, and made it useful again. And on days when everything else feels messy, you still have that mossy green dresser with its white rose knobs standing there quietly, looking composedlike a friend who always remembers appointments and never loses their keys. Inspirational, really.