A portable video looper sounds like the kind of gadget that should require a rack of expensive AV gear, three adapters nobody can find, and one mysterious cable labeled “DO NOT TOUCH.” Thankfully, the Raspberry Pi has a talent for turning overcomplicated ideas into weekend projects. With a small board, a USB drive, a screen, and the right playback setup, you can build a compact loop video player that boots up, finds your files, and plays them again and again like a tiny, obedient movie theater.
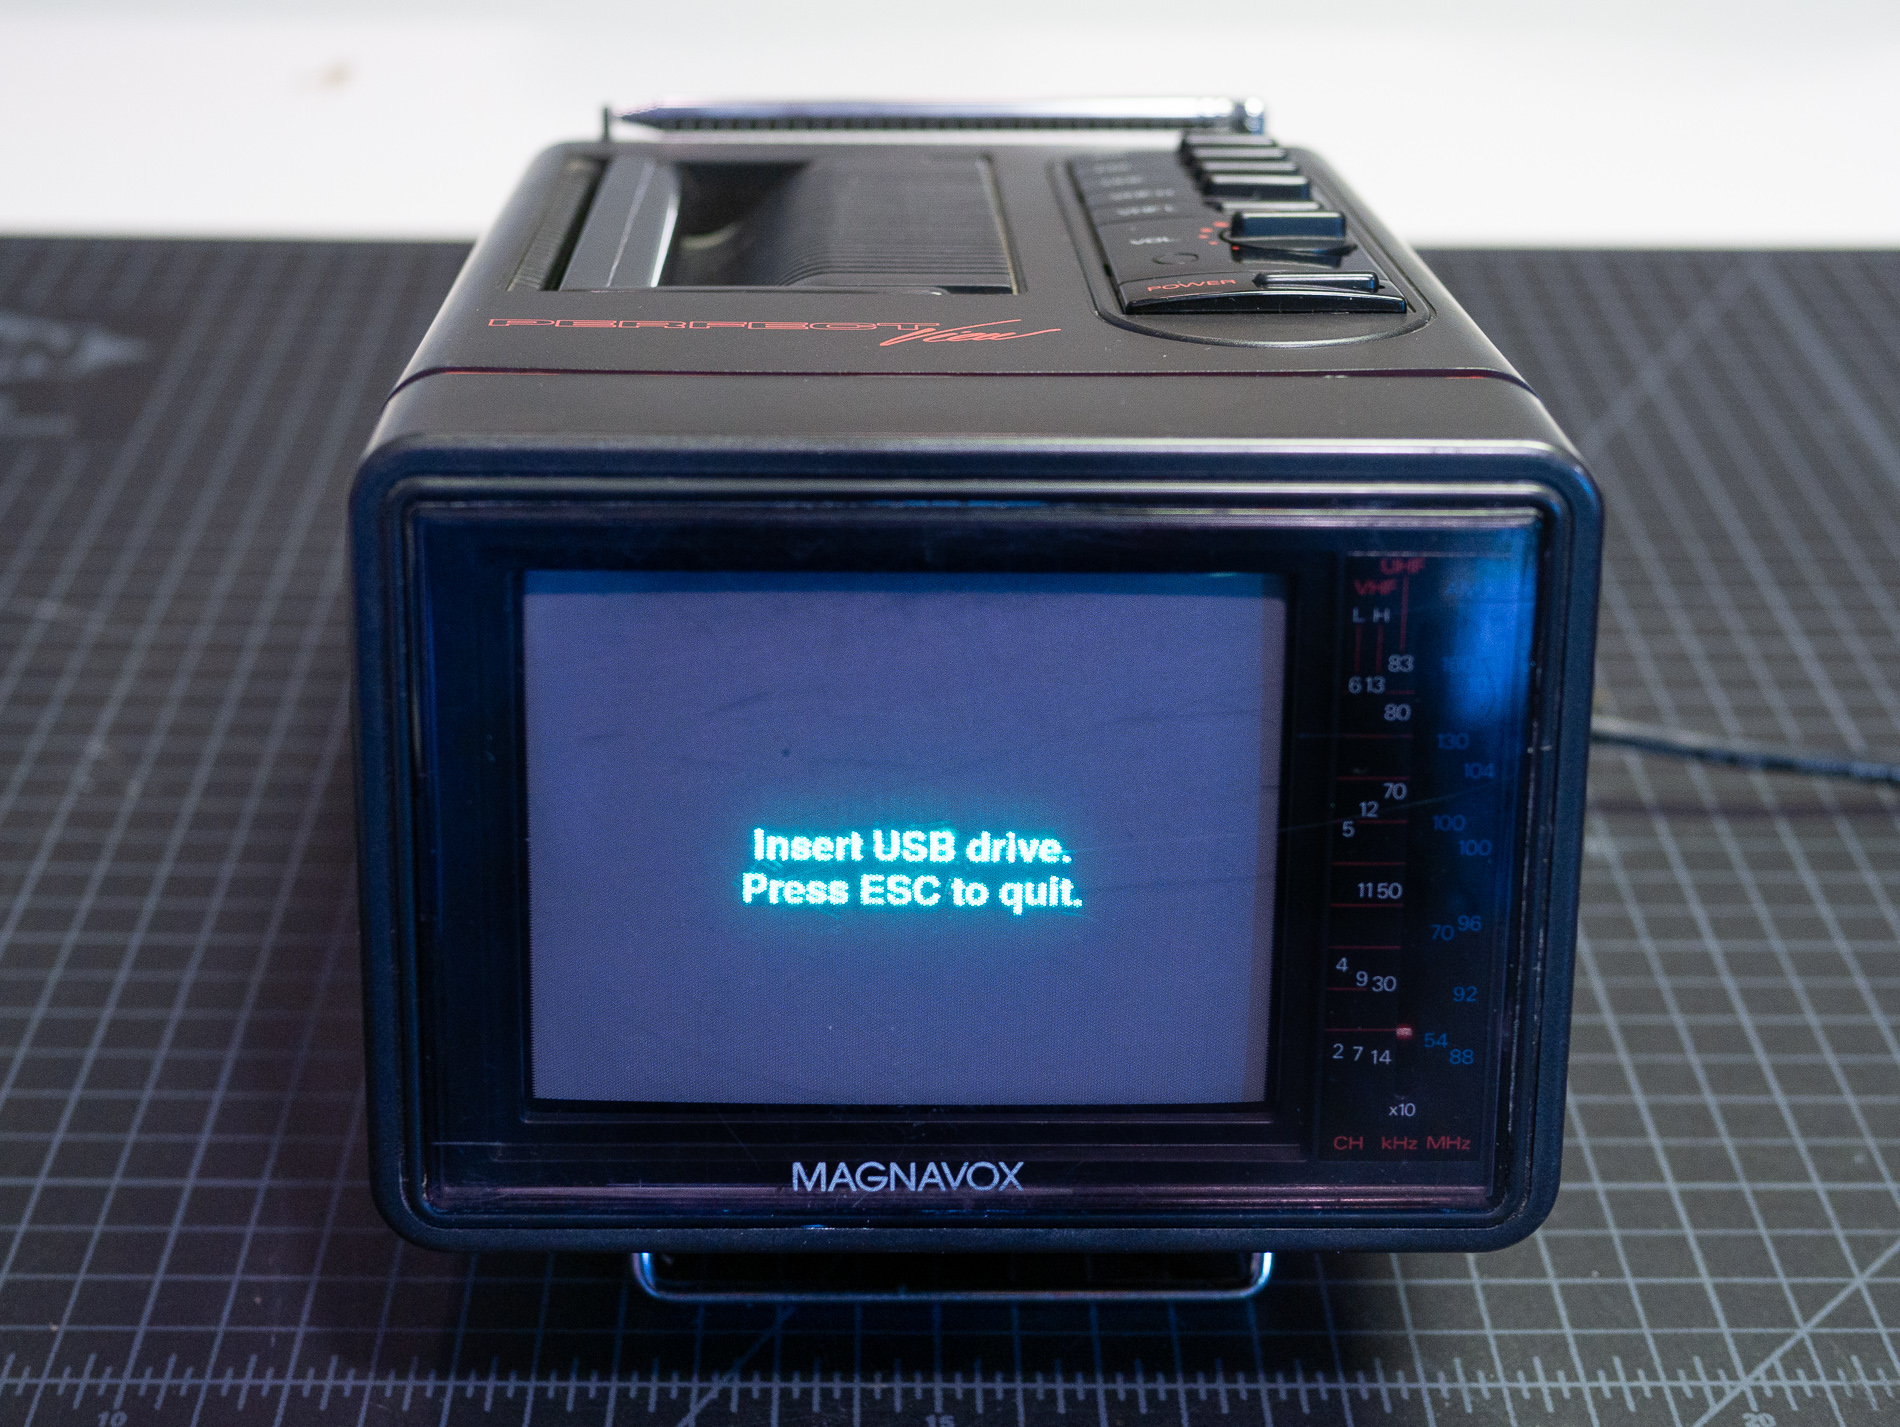
The charm of the project titled “Portable Video Looper Is Easy As Pi” is not only that it works, but that it feels wonderfully hackable. The classic version used a Raspberry Pi Zero W tucked inside a small CRT television, waiting for a thumb drive full of videos. When the drive was inserted, the system counted the video files, displayed a short message, and began looping them endlessly. That is the kind of project that makes makers grin: practical, nostalgic, slightly ridiculous, and surprisingly useful.
Whether you want a looping display for an art installation, a trade show table, a museum exhibit, a retail counter, a haunted house prop, or a tiny retro TV playing fake space transmissions, a Raspberry Pi video looper is one of the most approachable digital signage projects you can build. It is also a great lesson in hardware selection, video formatting, power management, kiosk mode, and the eternal maker truth: the smallest cable is always the one you forgot to buy.
What Is a Portable Video Looper?
A portable video looper is a dedicated device that plays one or more video files continuously without needing a laptop, keyboard, mouse, or human babysitter. In its simplest form, you load MP4 files onto a USB flash drive, plug the drive into the Raspberry Pi, connect the Pi to a display, and let the system automatically play the videos in a loop.
The “portable” part matters. A normal media player may live under a television forever, but a portable video looper can be carried from one display to another. It can run inside a tiny enclosure, hide behind a monitor, or live inside an old television shell. For makers and artists, that flexibility is gold. You can take the same video playback system to a gallery, school event, pop-up booth, maker faire, or classroom demo without bringing a full computer setup.
In practical terms, a Raspberry Pi looper usually has five core parts: a Raspberry Pi board, a microSD card with Raspberry Pi OS or a specialized image, a power source, a display connection, and storage for video files. Add a case, a power button, a speaker, or a battery pack, and the project quickly becomes more polished.
Why Raspberry Pi Is Perfect for a Video Looper
The Raspberry Pi works so well for this project because it is small, affordable, widely documented, and powerful enough for common video playback tasks. Modern Raspberry Pi boards support HDMI output, USB storage, Wi-Fi, and remote access. Newer models such as the Raspberry Pi 4 and Raspberry Pi 5 are strong choices for 1080p and many 4K playback setups, while smaller boards such as the Pi Zero family can work beautifully when the video requirements are modest.
For a tiny CRT television project, the Pi Zero W makes sense because it is small enough to hide inside cramped vintage hardware. For a museum display or commercial digital signage screen, a Raspberry Pi 4 or Pi 5 is often the safer choice because it has more processing power, better USB performance, and stronger display support. The best board is not always the newest one; it is the one that matches the screen, the video resolution, the available space, and the power budget.
The other advantage is software. Raspberry Pi OS includes tools that make kiosk-style use possible, and VLC media player remains a common choice for reliable fullscreen looping. VLC can play many formats, run from the command line, hide its interface, loop files, mute audio, and behave like a proper appliance instead of a desktop app demanding attention. In other words, it can do the job without asking if you want to update sixteen plugins right before your exhibit opens.
The Retro CRT Version: Tiny TV, Big Personality
The most delightful version of this idea is the portable Raspberry Pi video looper built into a miniature CRT television. Instead of using a modern HDMI display, the maker placed a Pi Zero W inside a small Magnavox-style portable TV. The result looked like a gadget from an alternate timeline where 1980s electronics quietly discovered USB media playback and decided not to brag about it.
The build worked because the television had a video input, which allowed the Raspberry Pi’s video signal to be connected to the screen. In a similar project, the hardest part may not be the software at all. It may be finding a tiny CRT with the right input, enough internal space, and a case you are willing to open. Vintage electronics can be charming, but they are not always friendly. Some are dusty, some are brittle, and some seem held together by old optimism.
A well-designed retro looper keeps the user experience simple. Power on the unit, wait for a prompt, plug in a USB drive, and watch the videos play. A flush-mounted shutdown button is a smart touch because Raspberry Pi boards do not love having power yanked without warning. A clean USB port mounted where old TV controls used to live makes the device feel intentional rather than improvised. That difference matters. A good maker project should look like it belongs in its own universe.
Modern Version: HDMI Display and VLC Playback
If you are not trying to squeeze a computer into a baby CRT, the modern version is even easier. Use a Raspberry Pi 4 or Pi 5, connect it to a monitor or TV with HDMI, install or configure a video looper application, and point it at a USB drive or local folder. Many current Raspberry Pi video looper setups rely on VLC because it handles fullscreen playback and repeated playlists cleanly.
A basic playback command might use VLC in fullscreen mode with looping enabled. In a polished installation, that command is usually launched by a system service or kiosk session so the video starts automatically after boot. The viewer never sees the operating system, desktop icons, terminal windows, or the embarrassing file named “final_final_REAL_final.mp4.” They only see the content.
For digital signage, that is the whole point. The device should behave like an appliance. If the power goes out, it should recover. If the display is turned on in the morning, the loop should resume. If the USB drive is swapped, the content should update with minimal fuss. Good video loopers are boring in the best possible way: they quietly do their job while everyone else takes credit for the presentation.
Choosing the Right Raspberry Pi Board
Pi Zero W or Pi Zero 2 W
A Pi Zero W is attractive for compact builds because it is tiny and low-power. It is great for lightweight playback, retro displays, and projects where physical size matters more than raw performance. However, it is not the best choice for demanding 1080p or 4K video. The Pi Zero 2 W offers more performance while staying small, making it a better option for portable builds that need a little more breathing room.
Raspberry Pi 4
The Raspberry Pi 4 is a strong all-around choice for a portable video looper. It supports modern display output, has USB 3.0 ports, handles many 1080p loops smoothly, and can support 4K output in the right conditions. It is small enough to mount behind a screen but powerful enough for serious digital signage and gallery playback.
Raspberry Pi 5
The Raspberry Pi 5 gives the project extra headroom. It is better suited for newer displays, heavier interfaces, and higher-resolution content. For simple 1080p playback it may be more power than you need, but for a long-term installation where reliability and performance matter, the extra capability can be comforting. Think of it as bringing a truck to move a couch: maybe excessive, but nobody complains when the couch arrives.
Video Format Matters More Than People Expect
A video looper is only as reliable as the files you feed it. The most common safe choice is an MP4 container using H.264 video and AAC audio. For 1080p displays, this format is widely supported and usually plays smoothly. For newer 4K workflows, HEVC or H.265 may be useful, especially on boards with hardware decoding support, but compatibility should be tested before the device goes public.
Do not assume that a file plays well just because it opens on your laptop. Laptops are often much more forgiving than small single-board computers. A video with an odd frame rate, oversized bitrate, unusual audio codec, or strange encoding settings can cause stutters, black screens, or loops with awkward gaps. Before using the looper in front of an audience, test the exact file on the exact Raspberry Pi and display you plan to use.
For smooth looping, keep files consistent. Use the same resolution, frame rate, and codec across the playlist. Avoid giant bitrates unless you actually need them. A 30-second looping clip for a small display does not need to be encoded like a blockbuster movie escaping from Hollywood. Smaller, cleaner files load faster, loop better, and generate fewer surprises.
USB Playback: The Sneaker-Net Superpower
One of the best features of a portable video looper is USB media playback. Instead of logging into the Pi every time you want to update content, you can copy videos to a thumb drive and plug it in. The software can scan the drive, find supported files, build a playlist, and begin looping. This is especially useful for galleries, classrooms, and events where the person updating the video may not be comfortable using SSH or command-line tools.
There are a few practical rules. First, format the USB drive in a file system the Raspberry Pi can read reliably. Second, use simple filenames with letters, numbers, hyphens, and underscores. Third, avoid dumping unrelated files onto the same drive. A looper that must sort through vacation photos, spreadsheets, and a mysterious file called “do_not_delete_old_old.zip” is not living its best life.
If the project will be used by nontechnical people, create a clear folder structure. For example, name one folder “videos” and tell users to place MP4 files there. The easier the workflow, the less likely someone is to panic five minutes before showtime.
Kiosk Mode and Autostart: Making It Feel Like a Real Device
The difference between a fun demo and a dependable portable video looper is autostart. When the Raspberry Pi boots, the video player should launch automatically. It should fill the screen, hide the mouse pointer, suppress desktop notifications, and start playback without requiring anyone to click anything.
Kiosk mode is the general idea of locking a device into one purpose. On a Raspberry Pi, that can mean launching a fullscreen web page, a fullscreen app, or a video player. For a looper, the same principle applies: boot directly into the content experience. This makes the system easier for public spaces because people cannot accidentally browse menus, close the video, or discover the settings panel and begin an unscheduled career in chaos engineering.
Many builders use a systemd service, desktop autostart entry, or custom Python script to manage playback. A script can do extra work, such as waiting for a USB drive, counting video files, showing a status message, sorting the playlist, and restarting playback if VLC exits. That is what makes the project feel polished. The viewer does not need to know there is a tiny Linux computer inside. They only see the magic trick.
Power, Shutdown, and Portability
Portable electronics live and die by power management. A Raspberry Pi needs a stable power supply, especially if it is playing video and powering USB accessories. Undervoltage can cause strange behavior: stuttering playback, random crashes, corrupted storage, or the kind of glitch that only appears when your audience arrives.
Use a quality power supply matched to your Pi model. For battery-powered builds, choose a battery pack that can provide enough current continuously. Some power banks shut off when they think the device is drawing too little power, so test the entire setup before relying on it. A project that works on your desk for two minutes is not automatically ready for a six-hour event.
A safe shutdown button is also worth adding. Raspberry Pi boards use microSD cards, and repeatedly cutting power without shutdown can increase the risk of corruption. A simple physical button connected to a shutdown script makes the device friendlier and safer. It also gives the build a satisfyingly official feel. Everyone loves a button, especially one that does not launch a printer driver.
Where a Portable Video Looper Shines
A Raspberry Pi video looper is useful in more places than people expect. Artists use them for gallery loops, video sculptures, and interactive installations. Retailers use them for product demos and promotional screens. Teachers use them for classroom stations. Makers use them inside props, arcade cabinets, retro televisions, and convention displays.
Because the system is small, it can disappear into the environment. Hide it behind a monitor, inside a display box, under a counter, or inside a vintage case. The audience sees the content, not the computer. That invisibility is part of the appeal. The best technology often gets out of the way.
For events, portability is a major advantage. You can pack the Pi, a power supply, HDMI cable, USB drive, and compact display into a small bag. Compared with carrying a laptop and hoping nobody touches the trackpad, a dedicated looper feels almost luxurious. It does one thing, and it does not get distracted by email.
Common Problems and How to Avoid Them
The Video Stutters
Stuttering usually comes from files that are too demanding, storage that is too slow, weak power, or a player configuration that is not using hardware acceleration effectively. Re-encode the video at a more reasonable bitrate, test a different USB drive, and verify the power supply before blaming the Raspberry Pi. The tiny board is innocent until proven underpowered.
The Screen Shows the Desktop
If viewers can see the desktop, the looper is not truly in kiosk mode. Make sure the player launches fullscreen and starts after the display system is ready. Hide the cursor, disable screen blanking, and remove visible notifications. A digital sign should not suddenly reveal a recycling bin icon like a stage magician dropping the rabbit.
The Loop Has a Gap
Some video players pause briefly between files. Using VLC-based playback or a dedicated looper app can reduce or eliminate visible gaps. For a perfectly seamless single loop, edit the video so the first and last frames match naturally, then test playback on the target device. Seamlessness is partly software and partly editing craft.
The USB Drive Is Not Detected
Check the file system, folder path, and supported extensions. Use a simple directory structure and avoid unusual characters in filenames. If the looper depends on automatic USB detection, build in a waiting screen or countdown so users know the system is alive and looking for media.
Experience: Building and Using a Portable Video Looper in the Real World
The first thing you learn from a portable video looper project is that “simple” does not mean “careless.” The idea is simple: play videos forever. The experience is full of tiny decisions. Where does the USB port go? How does the user shut it down? Should the video start immediately, or should the screen show a waiting message first? Does the display wake up quickly enough? Will the file loop smoothly after one hour, not just once while you are proudly standing beside it?
In a real setup, the best workflow is to build the looper like it will be used by someone who has never met a Raspberry Pi. That means obvious controls, predictable startup behavior, and forgiving media handling. A USB drive should be enough. The device should not require a keyboard. The screen should not expose the operating system. If something goes wrong, the error should be understandable. “No videos found” is helpful. A blinking cursor in a black void is not; that is how horror movies begin.
Another useful lesson is that displays have personalities. A modern HDMI monitor may behave perfectly, while a television may overscan the image, crop the edges, or take several seconds to wake after receiving a signal. A vintage CRT adds even more character. Composite video can look warm and nostalgic, but text may be fuzzy and colors may bloom. That can be a flaw for signage and a feature for art. A fake security feed, retro game attract screen, or looping sci-fi message looks fantastic on a tiny CRT. A spreadsheet does not. Please do not put spreadsheets on a tiny CRT unless the goal is comedy.
Testing becomes a ritual. You test the boot time. You test the first loop. You test the tenth loop. You unplug the power, plug it back in, and see if the device recovers. You swap the USB drive. You try a bad filename. You try a video with audio. You try the display after it has been off all night. This may sound excessive, but unattended playback devices are judged by what they do when nobody is there to rescue them.
One of the most satisfying experiences is watching the project become invisible. At first, you see every component: the Pi, the cable, the power supply, the script, the case. After it works, the hardware fades away and the loop becomes the object. People stop asking about Linux and start asking about the video. That is when the build succeeds. The technology has become a frame, not the painting.
For beginners, this project is an ideal confidence builder. It touches hardware, software, media encoding, and design, but none of those pieces has to be overwhelming. You can start with a plain Raspberry Pi connected to a monitor, then improve the setup step by step. Add autostart. Add USB scanning. Add a shutdown button. Add a case. Add a retro screen if you are brave and have a healthy respect for old electronics. Each improvement teaches something useful.
The biggest takeaway is that a portable video looper is not just a gadget. It is a tiny storytelling machine. Load it with a product demo, an animation reel, an ambient loop, a gallery piece, or a weird little fake broadcast from Mars, and it turns any screen into a dedicated experience. And because it is powered by Raspberry Pi, the whole thing feels approachable. Not effortless, not magic, but absolutely within reach. Easy as Pi? With a bit of testing and a good USB drive, yes. Easy as pie? Only if the pie has HDMI.
Final Thoughts
“Portable Video Looper Is Easy As Pi” is more than a clever title. It captures why Raspberry Pi projects remain so popular: they make specialized devices feel buildable. A video looper can be a polished digital signage player, a pocket-sized gallery tool, a classroom display, or a retro CRT oddity that looks like it escaped from a very stylish garage sale.
The core recipe is straightforward. Choose the right Raspberry Pi, prepare reliable video files, use VLC or dedicated looper software, configure autostart, provide stable power, and test the system like it will be used in public. Do that, and you get a device that plays your message on repeat without needing a laptop, Wi-Fi dashboard, or nervous human hovering nearby.
Note: This article is based on real Raspberry Pi video looper builds, current Raspberry Pi kiosk practices, VLC playback behavior, and practical maker experience. Always use a proper power supply, shut the Pi down safely, and be careful when modifying vintage electronics.