Bluetooth Low Energy, usually shortened to BLE, is one of those technologies that seems simple until you actually start building with it. At first, it looks like magic: a tiny sensor wakes up, whispers a few bytes into the air, and your phone politely notices. Then you open the documentation and meet terms like GAP, GATT, ATT, UUID, characteristics, descriptors, advertising intervals, connection parameters, pairing, bonding, notifications, indications, and suddenly the tiny sensor is no longer whispering. It is filing taxes in three languages.
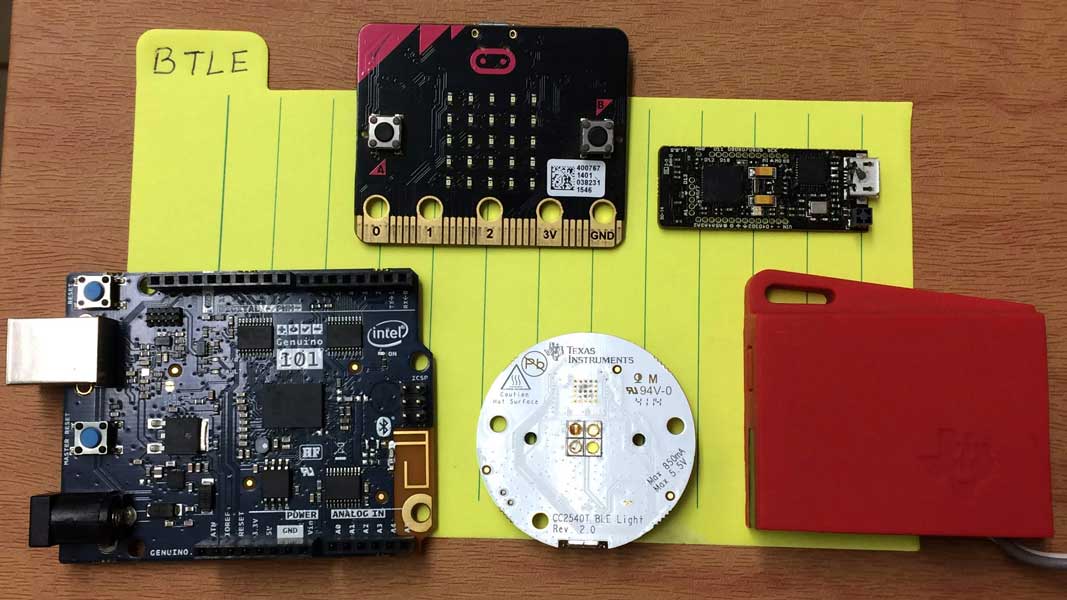
But here is the good news: beginning BLE experiments does not require a laboratory, a PhD, or a soldering iron collection large enough to frighten airport security. You can start with an ESP32, Nordic nRF52 board, Arduino Nano 33 BLE, Adafruit Bluefruit device, or almost any modern development board with Bluetooth Low Energy support. Add a smartphone app such as nRF Connect or LightBlue, and you can begin exploring how nearby devices advertise, connect, exchange data, and occasionally refuse to cooperate in ways that build character.
This guide explains how to begin BLE experiments in a practical, maker-friendly way. We will cover what BLE actually does, how advertising and GATT work, what beginner projects are worth trying, and how to make everything better: better range, better battery life, better reliability, better debugging habits, and better project design.
What Is BLE, Really?
Bluetooth Low Energy is a wireless communication technology designed for short-range, low-power data exchange. Unlike classic Bluetooth, which was built for continuous streams such as audio, BLE is optimized for small bursts of information. That makes it perfect for fitness trackers, smart locks, temperature sensors, beacons, medical accessories, smart home gadgets, keyboards, tags, and tiny embedded devices that would rather sip power than chug it like a gaming laptop on espresso.
The key idea behind BLE is efficiency. A device can spend most of its life asleep, wake briefly to advertise or exchange data, then go back to sleep. This is why BLE is common in battery-powered devices. A coin-cell sensor cannot afford to behave like a Wi-Fi router. It needs to be more like a cat: awake only when necessary, mysterious at all times, and deeply committed to energy conservation.
The Two Big Ideas: Advertising and GATT
For beginners, BLE becomes much easier once you separate it into two major ideas: advertising and GATT.
Advertising: “Hello, I Exist”
Advertising is how a BLE device announces itself. A peripheral device, such as a sensor or beacon, sends small packets on advertising channels. A central device, such as a phone, tablet, computer, or gateway, scans for those packets. If the central is interested, it may connect.
An advertising packet can include a device name, service UUIDs, manufacturer data, transmit power, or service data. Beacons often use advertising alone without forming a connection. For example, a museum exhibit can broadcast an identifier that a phone app recognizes. A warehouse tag can advertise its presence. A temperature sensor can send periodic readings without forcing every nearby device to connect and shake hands like they are at a networking event.
GATT: “Here Is My Data Menu”
GATT stands for Generic Attribute Profile. It defines how BLE devices organize and exchange data after a connection is established. Think of GATT as a tiny restaurant menu for your device. A service is a category, such as “battery service” or “heart rate service.” A characteristic is an item inside that category, such as “battery level” or “current heart rate.”
Characteristics can usually be read, written, notified, or indicated. A read is like asking, “What is the temperature right now?” A write is like saying, “Turn the LED on.” A notification lets the device push updates automatically, such as sending a new sensor value every second. An indication is similar but includes confirmation from the receiver, which is useful when reliability matters more than speed.
Start With the Right Beginner BLE Experiment
The best first BLE project is not a smart refrigerator, a wearable medical device, or a robot dog that judges your posture. Start smaller. Your goal is to understand the workflow: advertise, scan, connect, discover services, read data, write data, and subscribe to notifications.
Experiment 1: Scan the World Around You
Install a BLE scanner app on your phone and look at nearby devices. You may see headphones, watches, TVs, tags, laptops, fitness devices, or anonymous BLE advertisements. This is the fastest way to learn that BLE is everywhere. It is also the fastest way to feel like a cyberpunk detective while standing next to a microwave.
Notice the device names, signal strength values, service UUIDs, and advertising data. RSSI, or received signal strength indicator, is especially interesting because it changes as you move closer or farther away. It is not a precise distance measurement, but it can help you understand proximity.
Experiment 2: Build a BLE LED Switch
The classic beginner project is a BLE-controlled LED. Your development board acts as a peripheral. It exposes a custom GATT service with a writable characteristic. Your phone connects and writes a value: 1 for on, 0 for off. The board receives the value and toggles the LED.
This project teaches the core BLE path: define a service, define a characteristic, advertise the service, connect from a central, write data, and trigger hardware. It is simple enough to finish quickly but deep enough to reveal how BLE actually works.
Experiment 3: Send Sensor Data With Notifications
Next, connect a temperature, humidity, light, motion, or accelerometer sensor. Create a characteristic that supports notifications. Instead of making the phone repeatedly ask for the value, let the device push updates when the value changes.
This teaches a more realistic pattern. Many BLE devices do not want constant polling because polling wastes power and clutters the air. Notifications are more elegant. They are the BLE equivalent of saying, “I will call you when something interesting happens,” instead of sending 400 “Are we there yet?” messages per minute.
Choosing Hardware for BLE Experiments
There is no single perfect BLE board, but there are several excellent starting points.
ESP32 Boards
The ESP32 is popular because it is affordable, widely available, and supports Wi-Fi plus Bluetooth Low Energy. It works well for experiments where you want BLE provisioning, local control, or a bridge between BLE sensors and Wi-Fi networks. The tradeoff is that BLE examples in full ESP-IDF can feel complex at first. Beginners often start with Arduino-style ESP32 examples, then move into ESP-IDF when they need deeper control.
Nordic nRF52 Boards
Nordic Semiconductor’s nRF52 family is a favorite in professional BLE development. These chips are efficient, well-documented, and supported by strong tools. Nordic’s learning materials explain services, characteristics, advertising, and data exchange clearly. If battery life and production-quality BLE behavior matter, nRF52 boards are worth serious attention.
Arduino Nano 33 BLE and Compatible Boards
ArduinoBLE is a friendly route into BLE because it lets you create peripherals and centrals with familiar Arduino-style code. It is great for teaching, prototyping, and quickly proving an idea. You give up some low-level control, but you gain speed, readability, and fewer moments of staring at a compiler error like it personally betrayed you.
Adafruit Bluefruit Devices
Adafruit’s Bluefruit ecosystem is beginner-friendly and well-suited for maker projects. Their guides explain BLE concepts in approachable language, and the hardware often includes good examples. For learning, that matters. A clear example can save more time than a faster chip.
Understanding Central and Peripheral Roles
BLE devices usually act as either a peripheral or a central. A peripheral advertises and usually provides data. A central scans, connects, and usually consumes data. A heart rate strap is a peripheral. A phone is a central. A temperature sensor is a peripheral. A Raspberry Pi gateway can be a central.
Some devices can perform both roles, but beginners should keep the roles separate until the basics feel comfortable. Role confusion is a common early mistake. If your phone is scanning and your board is also scanning, nobody is advertising. That is not communication. That is two introverts at a party waiting for someone else to start the conversation.
How to Make BLE Experiments Better
Once your first project works, the next question is how to improve it. BLE projects can usually be made better in five areas: reliability, power consumption, range, user experience, and security.
1. Make Reliability Better
Reliability starts with clean state management. BLE code is event-driven, which means your program reacts to callbacks such as scan result, connection complete, service discovered, write received, and disconnect. Beginners often try to cram too much work into callbacks. That can cause delays, missed events, or confusing behavior. Keep callbacks short. Store the event, update state, and let your main loop or task handle heavier work.
Use clear connection states such as idle, advertising, connected, discovering, ready, and disconnected. Log transitions. When something fails, you want to know whether it failed during scanning, connection, service discovery, subscription, or data transfer. “It does not work” is not a bug report. It is a fog machine.
2. Make Battery Life Better
BLE power consumption depends heavily on advertising interval, connection interval, transmit power, sensor sampling rate, and sleep behavior. A device advertising every 100 milliseconds will be easier to discover but will use more energy than one advertising every second. A sensor sending notifications ten times per second will drain faster than one sending updates only when values change.
For battery-powered devices, choose sane defaults. Advertise quickly for a short setup window, then slow down. Increase connection intervals if your application can tolerate latency. Turn off sensors when not needed. Batch readings when possible. Measure current instead of guessing. Guessing battery life is how prototypes become paperweights with LEDs.
3. Make Range Better
BLE range depends on transmit power, antenna design, board layout, enclosure material, receiver sensitivity, physical obstacles, interference, and the chosen PHY. For beginner experiments, the easiest improvements are practical: keep the antenna area clear, avoid metal enclosures, test in different orientations, move away from crowded Wi-Fi routers, and compare RSSI at known distances.
Do not expect RSSI to behave like a ruler. Human bodies, walls, desks, and even the angle of the board can change signal strength. RSSI is useful for trends, not truth carved into stone. Treat it like a weather forecast: helpful, imperfect, and occasionally dramatic.
4. Make the User Experience Better
A good BLE product should not feel like a science project, even if it began as one. Use a recognizable device name during setup. Expose standard services when possible, such as battery service, because standard services improve compatibility with apps and tools. Use custom services only when your data does not fit an existing pattern.
Think about onboarding. How does a user know the device is in pairing or setup mode? What happens after disconnect? Does the device reconnect automatically? Can the user reset it? Does the app show helpful errors? “Connection failed” is technically honest, but “Move closer and try again” is more useful.
5. Make Security Better
BLE security depends on the application. A blinking LED demo does not need the same protection as a door lock, medical device, payment accessory, or industrial sensor. Still, beginners should learn the basics early: pairing, bonding, encryption, authentication, authorization, and privacy features such as address randomization.
Do not transmit sensitive data in plain text. Do not allow unauthenticated writes to dangerous controls. Do not use predictable identifiers when privacy matters. And please do not build a BLE door lock whose security model is “I hope nobody nearby owns a phone.” That is not a security model. That is a wish wearing a lab coat.
Debugging BLE Without Losing Your Mind
BLE debugging can feel strange because much of the action happens invisibly. You need tools that make the invisible visible.
Use a Phone Scanner App
Before writing your own mobile app, test your peripheral with a proven scanner app. If the scanner cannot see your device, your app will not magically fix it. Check whether the device advertises, whether the expected service UUID appears, whether characteristics have the right permissions, and whether notifications can be enabled.
Log Everything Important
Log advertising start, connection, disconnection, MTU changes, reads, writes, notification subscriptions, and errors. Include status codes. Time-stamped logs help you connect cause and effect. Without logs, debugging becomes interpretive dance.
Change One Parameter at a Time
When experimenting with advertising interval, connection interval, MTU size, notification rate, and transmit power, change one setting at a time. Record results. Otherwise, you may improve the system without knowing why, which sounds nice until the bug returns wearing sunglasses.
Common Beginner BLE Mistakes
Mistake 1: Treating BLE Like Serial
BLE is not just a wireless serial cable. Some modules offer UART-like services, and those are useful, but BLE itself is structured around services and characteristics. Designing around GATT usually produces cleaner projects than shoving random strings through a serial-style pipe.
Mistake 2: Sending Too Much Data
BLE can transfer data, but it is not ideal for large files or constant high-bandwidth streams. Keep payloads compact. Send changes instead of full state when possible. Use efficient data formats. If your project needs video streaming, BLE is the wrong horse. It is a very nice horse, but it is not pulling that wagon.
Mistake 3: Ignoring Permissions
Modern phones require Bluetooth permissions, location-related permissions in some cases, and background execution rules. Android and iOS handle BLE differently, especially around scanning, background behavior, and privacy. Test on real devices early instead of assuming your laptop demo proves everything.
Mistake 4: Forgetting About Reconnection
Connections drop. Phones sleep. Users walk away. Batteries die. A robust BLE design expects disconnection and handles it gracefully. Restart advertising when appropriate. Let centrals reconnect. Store bonded devices when needed. A disconnect should not require a ritual involving rebooting the board, closing the app, and apologizing to the firmware.
Practical BLE Project Ideas for Beginners
Once you understand the basics, try projects that teach one new concept at a time.
BLE Button
Create a small button that sends a notification when pressed. This teaches input handling, notifications, debouncing, and low-power sleep.
BLE Temperature Logger
Send temperature readings to a phone. Add a battery characteristic. Then improve it by sending data only when the temperature changes beyond a threshold.
BLE Proximity Beacon
Build a beacon that advertises a unique ID. Use a scanner app to watch RSSI change as you move. This teaches advertising data and proximity limitations.
BLE Configuration Portal
Use BLE to configure Wi-Fi credentials or device settings on an IoT board. This is a real-world pattern used in many smart products because BLE is convenient for local setup before a device joins a network.
BLE Sensor Dashboard
Connect multiple sensors and expose each as a characteristic. Then build a simple mobile or desktop dashboard. This teaches service design and data organization.
Designing Better GATT Services
A good GATT design is boring in the best possible way. It is predictable, documented, and easy for a central device to understand. Use standard services where they fit. For custom services, create a clear UUID plan. Name characteristics logically. Define units, ranges, update rates, and permissions.
For example, a plant monitor might expose one service called Plant Monitor Service. Inside it, characteristics could include soil moisture, ambient light, temperature, battery level, and device status. Moisture might be a percentage from 0 to 100. Light might be lux. Device status might be a bit field showing sensor error, low battery, or calibration needed.
Document the service as if someone else will use it, because future you is someone else with less patience.
Advanced Improvements Worth Exploring Later
After beginner experiments, you can explore deeper BLE features. MTU negotiation can improve throughput for larger packets. Connection parameter updates can balance latency and power. Bonding can improve repeat connections. Extended advertising can provide more advertising capacity on supported devices. Direction finding, LE Audio, mesh networking, and multi-connection gateways open entire new categories of projects.
You do not need all of that on day one. In fact, trying to learn every BLE feature at once is like trying to drink from a fire hose while assembling IKEA furniture. Start with advertising, GATT, reads, writes, and notifications. Then add complexity only when the project asks for it.
Experience Notes: What Beginning BLE Experiments Teach You
The first thing BLE experiments teach you is humility. The second thing they teach you is that naming matters. When I began experimenting with BLE-style projects, I underestimated how much clarity a simple device name, service name, and characteristic map could provide. A board advertising as “ESP32” among six other ESP32 boards is not a device. It is a guessing game with voltage. Naming it “DeskSensor-01” immediately makes testing easier.
Another lesson is that small experiments beat giant plans. It is tempting to design the final product immediately: a battery-powered smart sensor with a mobile app, cloud sync, encrypted pairing, over-the-air updates, and a dashboard that looks like it was blessed by a Silicon Valley design team. But BLE rewards incremental progress. First make the device advertise. Then connect. Then read one value. Then write one value. Then add notifications. Each successful step becomes a stable ledge on the climb.
Power measurement is another eye-opener. Many beginners assume BLE automatically means long battery life. BLE makes low power possible, but it does not guarantee it. A device that wakes too often, advertises too aggressively, samples sensors constantly, or keeps unnecessary peripherals active can still drain a battery quickly. The best improvement is often not a clever algorithm. It is letting the device sleep. In embedded design, doing nothing is sometimes a premium feature.
Testing in real environments also changes your expectations. On a desk, the connection looks perfect. Across a room, RSSI becomes moody. Near a laptop, router, metal shelf, or human body, signal behavior changes again. This is not failure; it is radio being radio. BLE experiments make you respect antennas, placement, and enclosures. A beautiful 3D-printed case that smothers the antenna is not a case. It is a tiny plastic bunker.
Debugging habits improve quickly when working with BLE. Because the system involves at least two devices, and often an app, it forces you to separate problems. Is the peripheral advertising? Is the central scanning? Is the service discoverable? Are characteristic permissions correct? Did the phone deny permissions? Did the device disconnect because of supervision timeout, range, or a firmware crash? BLE teaches disciplined troubleshooting because random guessing becomes exhausting almost immediately.
Perhaps the most satisfying part of beginning BLE experiments is how quickly physical objects become interactive. A button becomes a wireless trigger. A plant sensor becomes a phone-readable dashboard. A light becomes controllable. A temperature reading becomes a notification. BLE sits at a fun intersection between software and the real world. You are not just printing “Hello, world” to a console. You are making the world answer back.
The best advice is to keep a lab notebook, even if it is just a plain text file. Record board type, firmware version, phone model, operating system, advertising interval, connection interval, sensor rate, battery readings, and weird failures. Especially weird failures. Those are the ones that return later wearing a fake mustache.
Beginning BLE experiments make everything better because they sharpen both engineering skill and product thinking. You learn to care about power, timing, data design, user experience, and failure recovery. You learn that “working once” is not the same as “working well.” And you learn that a tiny wireless packet, sent at the right moment, can make a simple object feel surprisingly alive.
Conclusion
Beginning BLE experiments is one of the best ways to enter the world of connected devices. BLE is practical, affordable, widely supported, and deep enough to keep teaching you long after the first LED turns on. Start with scanning. Build a simple peripheral. Learn GATT services and characteristics. Use notifications wisely. Measure power. Improve reliability. Respect security. Most importantly, build small projects that give you fast feedback.
BLE can be frustrating, but it is also wonderfully rewarding. It turns sensors, buttons, tags, lights, and everyday objects into wireless participants in your projects. Once you understand advertising, GATT, roles, permissions, and power tradeoffs, BLE stops feeling like a mysterious acronym and starts feeling like a toolbox. A slightly opinionated toolbox, yes, but a useful one.
Make the first experiment work. Then make it cleaner. Then make it lower power. Then make it easier to use. That is how BLE experiments make everything better.