Adding a pergola, patio cover, deck, or outdoor structure to an existing concrete patio sounds simple until someone asks the important question: “What will hold up the posts?” The patio itself may look sturdy enough to park a rhinoceros on, but appearances can be misleading. Most residential patio slabs are designed as flatwork, not as foundations for concentrated structural loads.
Fortunately, you do not always have to demolish the entire patio. Proper concrete footings can often be installed through carefully planned openings in the slab. The process involves identifying the structural loads, cutting access holes, excavating to suitable bearing soil, forming and reinforcing the footings when required, placing concrete, and installing approved post anchors.
Why the Existing Patio Is Usually Not a Footing
A typical concrete patio is a relatively thin slab placed over compacted soil or aggregate. It spreads ordinary surface loads such as patio furniture, grills, planters, and people across a broad area. A roof-supporting post is different. It transfers a concentrated load into one small spot while also resisting wind uplift, sideways movement, snow loads, and sometimes seismic forces.
Placing a heavy post directly on an ordinary patio slab can cause cracking, settlement, or punching failure around the post. Even a slab that has remained crack-free for 20 years may not contain enough reinforcement or thickness to function as a structural foundation.
The correct approach is generally to create an independent footing that passes through the patio and bears on undisturbed natural soil or properly prepared engineered fill. The surrounding patio remains flatwork, while the new footing carries the structural load. Think of the patio as a tablecloth and the footing as the table leg. The tablecloth may be attractive, but it should not be asked to hold up dinner.
Choose the Right Installation Method
Core-Drilled Openings
A professional core drill can create a clean circular opening through the slab. This method works well when the specified footing or pier fits within a round opening and there is adequate room to excavate below it. Core drilling produces neat edges and usually causes less vibration than aggressive jackhammering.
Large core-drilling equipment can be heavy and difficult to control. The rig may also need to be anchored or vacuum-mounted to the slab. For large diameters, reinforced slabs, or unknown slab construction, hiring a concrete-cutting contractor is often safer and more economical than renting unfamiliar machinery.
Square or Rectangular Saw-Cut Openings
A wet concrete saw can be used to cut a square or rectangular access panel. The cut section is then broken into manageable pieces and removed. This approach creates more working space for hand excavation, form installation, reinforcement, and inspection.
The corners should be laid out carefully, and the cut should be deep enough to pass through the slab without unnecessarily disturbing the soil below. Avoid uncontrolled hammering near the opening because vibration can create cracks extending beyond the work area.
Excavating From the Patio Edge
In limited situations, a footing near the perimeter may be reached by excavating inward from the patio edge. However, tunneling beneath a slab can remove its support and cause settlement or cracking. It also makes soil inspection, compaction, forming, and concrete placement more difficult.
Unless an engineer has designed an underpinning or tunneling procedure, cutting an access opening directly above the footing location is usually the more controllable method.
Plan the Footings Before Cutting Anything
Determine the Structural Loads
Footing size is not selected by guessing which cardboard form tube looks friendly at the hardware store. The required bearing area depends on the load carried by each post and the allowable bearing capacity of the soil.
A freestanding shade structure may impose relatively modest loads. A roofed patio cover attached to a house can transfer dead load, roof live load, snow load, wind uplift, and lateral forces into its posts and footings. Larger beams, tile roofing, outdoor kitchens, elevated decks, and enclosed walls can substantially increase the demand.
The designer should establish each footing’s diameter or width, thickness, depth, reinforcing detail, concrete strength, and connection requirements. Expansive clay, loose fill, high groundwater, steep slopes, and poor drainage may require specialized foundation solutions.
Confirm the Frost Depth
In freezing climates, exterior footings commonly must extend below the locally established frost line unless a specifically approved alternative applies. This prevents freezing soil from lifting the footing and turning a formerly level patio cover into abstract architecture.
Frost depth can vary dramatically between jurisdictions. Do not rely on a generic national chart or advice from a relative living three states away. Ask the local building department which code edition and amendments apply to the property.
Request a Utility Locate
Contact 811 before excavating so participating utility companies can mark the approximate locations of buried public utilities. Private lines may not be included. Irrigation pipes, landscape-lighting cables, pool equipment lines, propane piping, and privately installed electrical circuits may require a separate private locating service.
Move the footing only with approval from the project designer. Quietly shifting a post six inches to avoid a pipe can alter beam spans, tributary areas, roof geometry, and connection loads.
Investigate the Existing Slab
Determine the slab thickness and identify reinforcement before cutting. A scanner can help locate reinforcing bars, welded-wire reinforcement, conduits, and embedded metal. Never cut a post-tensioning tendon. If the patio is part of a post-tensioned foundation or its construction is uncertain, stop and consult a qualified professional.
Also inspect the patio for major cracks, settlement, hollow areas, drainage problems, and connections to the house foundation. The new work should not trap water against the building or interfere with doors, flashing, weep holes, or drainage paths.
Tools and Materials You May Need
- Approved plans, footing details, permit documents, and inspection schedule
- Tape measure, chalk line, marker, framing square, and layout string
- Concrete scanner or professional scanning service
- Core drill or wet concrete saw with the correct diamond blade
- Rotary hammer, small demolition hammer, pry bar, and sledgehammer
- Post-hole digger, digging bar, narrow shovel, and soil-removal bucket
- Form tube or custom formwork when required
- Reinforcing steel, supports, and tie wire as shown on the plans
- Specified concrete mixture or prepackaged structural concrete
- Mixing equipment, buckets, wheelbarrow, shovel, and concrete vibrator or consolidation rod
- Approved cast-in-place or post-installed post-base anchors
- Curing plastic, wet coverings, or an approved curing compound
- Eye protection, hearing protection, waterproof gloves, protective boots, and dust-control equipment
How To Pour Concrete Footings Under an Existing Patio
Step 1: Lay Out Every Post and Footing
Establish reference lines from the house, property line, or another fixed feature. Mark the center of each post, then verify beam alignment, post spacing, setbacks, and overall squareness.
For a rectangular structure, compare the two diagonal measurements. Equal diagonals indicate a square layout. Also check the familiar 3-4-5 triangle method at key corners. Perform this verification before cutting, because concrete is famously unresponsive to requests for a small relocation.
Mark the full opening, not merely the post center. The access area must accommodate the required footing shape, excavation tools, reinforcement, forms, concrete placement, and inspection.
Step 2: Prepare the Work Area
Remove furniture and protect walls, windows, doors, and landscaping from slurry and debris. Establish a controlled cutting area and keep other people away. Confirm that water from wet cutting cannot enter the house, pool, storm drain, or electrical equipment.
Concrete cutting can release respirable crystalline silica. Use wet-cutting equipment or a compliant dust-collection system, following the tool manufacturer’s instructions and applicable safety requirements. Water and electric tools are an unfriendly combination, so use suitable ground-fault protection and outdoor-rated connections.
Step 3: Cut and Remove the Patio Section
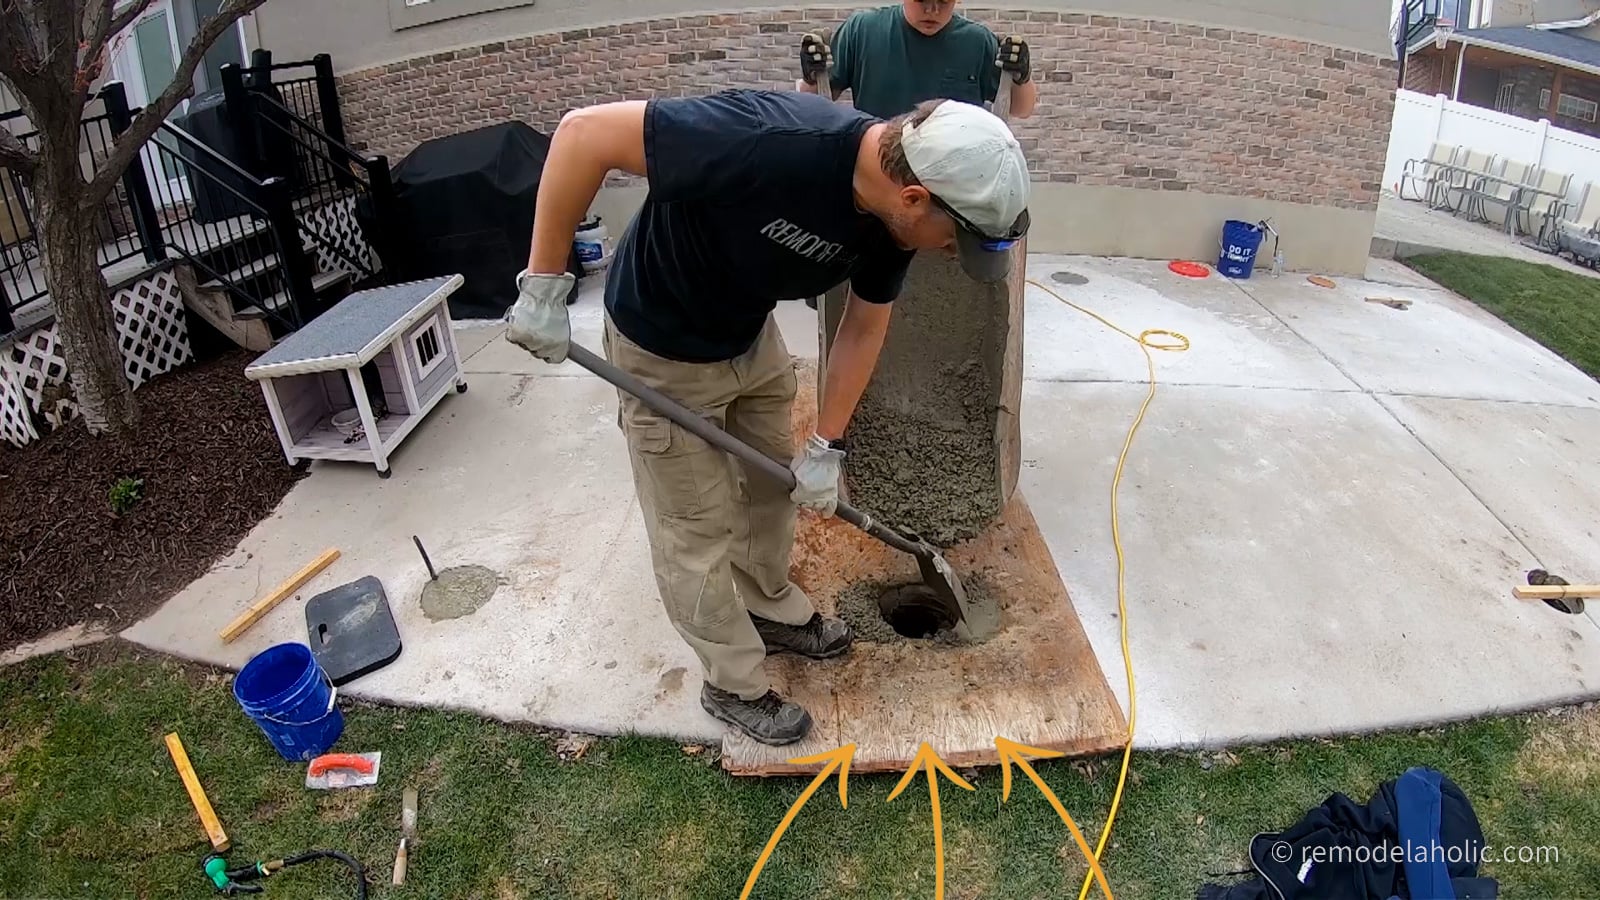
Core drill the opening or make controlled saw cuts along the marked perimeter. Wet cutting reduces airborne dust and helps cool the blade. Do not force the saw or twist the blade inside the cut.
After completing the perimeter cuts, divide a large slab panel into smaller sections when necessary. Use a rotary hammer or small demolition hammer to loosen the pieces without beating enthusiastically on the surrounding patio.
Remove the concrete and inspect the exposed slab edge. Unexpected reinforcing steel, conduit, unusual thickness, voids, or structural connections should be evaluated before excavation continues.
Step 4: Excavate to the Required Depth
Excavate vertically below the opening using a post-hole digger, digging bar, hand auger, or other appropriate equipment. Keep the hole centered and avoid removing soil from beneath the surrounding slab.
The bottom must reach the depth shown on the approved plan and bear on suitable soil. Remove loose material, roots, organic matter, mud, and water. Do not place a footing on frozen soil or casually fill an over-dug hole with loose dirt.
Some designs use a wider base with a narrower pier or stem extending through the patio. Others specify a uniform drilled pier. Create only the shape shown by the approved detail. Widening the bottom from a narrow access hole can be difficult to inspect and pour correctly, so specialized equipment or a larger slab opening may be necessary.
Step 5: Install Forms and Reinforcement
Stable soil may sometimes form the lower portion of a footing, while loose, sandy, wet, or collapsing soil may require a full-depth form. A cardboard form tube can shape the upper pier and keep fresh concrete from bonding unintentionally to the patio opening.
Install reinforcing bars only as specified. Support the steel so it maintains the required concrete cover and does not rest on soil, rocks, or pieces of broken patio. Secure the cage against movement during placement.
The plans may require the pier to remain isolated from the surrounding patio with a compressible joint material or sleeve. Isolation allows the patio slab and structural footing to move somewhat independently. Do not tie the footing into the slab with random pieces of rebar unless that connection has been designed.
Step 6: Pass the Required Inspection
Many jurisdictions require inspection after excavation and reinforcement but before concrete placement. The inspector may verify depth, diameter, bearing soil, reinforcement, setbacks, and formwork.
Do not pour early and hope nobody notices. Concrete is excellent at hiding mistakes and equally excellent at making those mistakes expensive to uncover.
Step 7: Estimate and Prepare the Concrete
For a cylindrical footing, calculate volume with the formula:
Volume = 3.1416 × radius² × depth
Use consistent units, convert the result to cubic feet or cubic yards, and include any enlarged base. Compare the calculated volume with the yield printed on the concrete bag or order information. Adding approximately 10 percent for spillage, irregular excavation, and minor overages can prevent the memorable experience of running out with three inches left to pour.
Use the concrete strength, aggregate size, air-entrainment level, and exposure classification required by the plans and local code. Measure mixing water rather than estimating it with the garden-hose equivalent of jazz improvisation. Excess water can increase shrinkage and reduce strength and durability.
Step 8: Place and Consolidate the Concrete
Lightly dampen absorptive soil or forms when appropriate, but remove standing water. Deposit the concrete as close to its final position as possible. Avoid dropping it through a congested reinforcement cage from excessive height or allowing soil to fall into the mixture.
Place the footing continuously in manageable lifts. Consolidate each lift with an appropriate vibrator or by carefully rodding the concrete so it flows around reinforcement and eliminates large voids. Do not over-vibrate until the mixture segregates.
Finish the top at the specified elevation. A pier supporting a wood post is commonly finished slightly above the patio or detailed with an approved standoff post base to reduce moisture contact. Preserve the patio’s drainage slope and prevent the new pier from creating a small pond around the post.
Step 9: Install the Post Anchor
Some post bases are cast into fresh concrete. Others attach later with an approved adhesive, screw anchor, or mechanical anchor. Use the exact connector and installation method specified for the design.
Check alignment, elevation, edge distance, embedment, and orientation before the concrete stiffens. Cast-in-place anchors must remain plumb and stationary. Post-installed anchors require the prescribed hole diameter, drilling depth, cleaning procedure, installation torque, adhesive conditions, and curing time.
Do not substitute a convenient connector simply because it fits the post. Structural post bases may be required to resist uplift and lateral loads in addition to downward compression.
Step 10: Cure and Protect the Footing
Concrete gains strength through hydration, not by merely “drying out.” Begin curing after the exposed surface has hardened enough to avoid damage. Retain moisture with plastic sheeting, wet coverings, water curing, or an approved curing compound.
Protect the footing from rapid moisture loss, freezing, heavy rain, impact, and premature loading. Hot, dry, sunny, or windy conditions can accelerate evaporation and increase the risk of plastic shrinkage cracking. Cold-weather placement requires protection so fresh concrete does not freeze.
Do not install the full structure merely because the surface feels hard the next morning. Follow the engineer’s requirements, project specifications, anchor instructions, and concrete supplier’s recommendations for form removal, drilling, post installation, and structural loading.
Step 11: Seal and Finish the Opening
After the footing has cured sufficiently, complete the isolation joint or patching detail shown on the plans. Use a compatible exterior sealant where a flexible joint is required. The objective is to keep debris and excessive water out without unintentionally locking the patio slab to the pier.
Restore drainage, clean concrete slurry from permitted containment areas, and dispose of waste properly. Never rinse concrete residue or highly alkaline wash water into a street, storm drain, landscape bed, or natural waterway.
Common Mistakes to Avoid
Using the Patio as the Foundation
Bolting a post base to a thin slab does not magically transform the slab into a footing. The anchor may remain attached while the slab beneath it cracks or settles.
Cutting Before Locating Reinforcement and Utilities
A five-minute scan or utility request can prevent damaged wiring, plumbing, irrigation, or reinforcing. Cutting first and investigating later reverses the preferred order of excitement.
Undermining the Slab
Removing soil sideways beneath the patio can create unsupported edges and future settlement. Keep excavations vertical unless a qualified professional has designed another method.
Ignoring Uplift and Lateral Loads
A patio roof behaves like a large sail during high winds. Footings and connectors must resist more than gravity. Ordinary light-duty post brackets may not provide the required uplift or moment resistance.
Adding Too Much Water
Wet, soupy concrete may be easier to place, but convenience purchased with extra water can reduce quality. Select an appropriate mixture and placement method instead of redesigning the water-cement ratio on site.
Skipping Curing
Fresh concrete left uncovered in hot wind can lose surface moisture quickly. Proper curing is one of the least glamorous steps and one of the most important.
When To Hire a Professional
Professional assistance is strongly recommended when the structure is attached to the house, supports a roof or elevated deck, uses large beams, carries masonry or tile roofing, or must resist substantial wind, snow, or seismic loads.
Call a structural engineer or foundation contractor when the site has expansive clay, uncontrolled fill, poor drainage, slope instability, nearby retaining walls, unusual cracking, or evidence of slab settlement. A concrete-cutting specialist should handle large openings, heavily reinforced concrete, post-tensioned construction, or work near embedded utilities.
DIY labor can reduce costs, but structural design is a poor place to compete for the Backyard Guessing Championship.
Lessons From Real-World Patio Footing Projects
The most consistent lesson from patio-footing projects is that the concrete pour is rarely the hardest part. Layout, cutting, excavation, and logistics usually consume far more time than expected.
On a typical pergola project, homeowners may spend hours establishing post centers only to discover that one location conflicts with a roof downspout, door swing, or buried irrigation line. Moving that footing without checking the framing design can create unequal beam cantilevers or awkward post spacing. Successful projects therefore complete the entire structural layout before the first blade touches the patio.
Cutting method also changes the character of the job. A core-drilled opening looks clean and professional, but the limited diameter can make excavation frustrating. A manual post-hole digger needs room to open its handles, and compacted gravel beneath the slab may be harder than the native soil below. A slightly larger engineered opening can make soil removal, reinforcement placement, and inspection considerably easier.
Square saw-cut openings create more access but also generate heavier concrete pieces. A modest-looking slab panel can weigh enough to surprise anyone attempting to lift it. Dividing the panel into smaller sections and using proper lifting methods is much safer than discovering halfway through the lift that optimism is not an approved rigging device.
Soil conditions provide another reality check. Loamy or cohesive soil may remain open long enough for inspection and pouring. Dry sand, saturated fill, or loose gravel may collapse repeatedly, increasing the hole’s volume and concrete requirement. Keeping form tubes, extra concrete, and a plan for water removal available can prevent a small excavation problem from becoming an all-day argument with the ground.
Concrete quantity deserves conservative planning. Excavated holes are rarely perfect cylinders, particularly when roots, rocks, or old construction debris are encountered. An enlarged base may consume substantially more material than the visible pier suggests. Experienced installers calculate each component separately, verify bag yield, and keep a reasonable reserve nearby.
Anchor placement is another moment when patience pays. A cast-in-place post base can drift or rotate while concrete is consolidated. Temporary templates and braces keep the hardware aligned with the future beam. Measuring from fixed reference lines is more reliable than trying to judge alignment against irregular patio joints.
Finally, drainage details determine whether the finished work remains attractive. A footing or patch finished too high can interrupt runoff, while a low spot can collect water around the post base. Matching the existing patio slope, maintaining a durable isolation joint, and elevating wood above persistent moisture help the new structure age more gracefully.
The practical takeaway is simple: devote most of the planning effort to everything that happens before and immediately after the pour. Concrete placement may last an hour. The footing created during that hour may support the structure for decades.
Conclusion
Pouring concrete footings under an existing concrete patio is entirely possible, but the job is more than cutting a hole and filling it with concrete. A safe installation begins with a verified structural design, local code review, utility locating, and an accurate layout.
The new footings should transfer structural loads to suitable soil without relying on the ordinary patio slab. Controlled cutting, vertical excavation, proper forms, correctly positioned reinforcement, careful concrete placement, approved post connectors, and adequate curing all contribute to a durable result.
When uncertainty involves post-tensioning, soil capacity, frost depth, footing dimensions, uplift resistance, or connections to the house, professional guidance is not an unnecessary expense. It is considerably cheaper than repairing a cracked patio, leaning pergola, or roof that has decided to explore the neighbor’s yard.
Editorial research note: Building-code and footing principles were checked against ICC and ACI residential foundation guidance. Utility, excavation, wet-cement, and silica precautions were informed by 811 and OSHA guidance. Concrete placement, weather protection, finishing, and curing guidance was informed by NRMCA and the American Cement Association. Post-base and load-transfer details were checked against Simpson Strong-Tie and deck-construction guidance. Installation methods, soil, moisture, testing, and cleanup practices were synthesized from Remodelaholic, ASTM, EPA, DOE, and University of Minnesota resources.