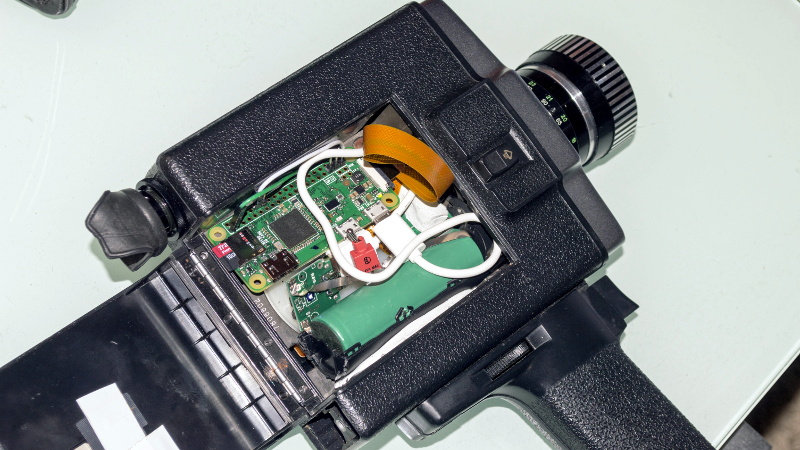
Some cameras are polished jewels. Others look like they were designed during a lunch break in a concrete factory. The latter category has a certain charm, especially when it is a Soviet-era Super 8 camera that has quietly been transformed into a digital movie machine.
That is the appeal of a remarkable Raspberry Pi camera project built around an Avrora Super 8 camera: from the outside, it still looks like a chunky piece of analog filmmaking history. Inside, though, a Raspberry Pi Zero, a compact camera sensor, a battery pack, and a little clever wiring turn the old film camera into a functioning digital video camera.
The result is not a replacement for a modern mirrorless camera, and it does not pretend to be. It is a vintage camera conversion with personality, compromise, and just enough engineering nerve to make every maker reach for a screwdriver. More importantly, it shows why old camera bodies remain such brilliant homes for modern electronics.
How a Soviet Super 8 Camera Became a Digital Camera
The original concept was delightfully direct: take a classic Super 8 camera, remove the film-dependent parts that are no longer useful, position a digital sensor where film would normally sit, and hide the computer hardware inside the empty film compartment.
The donor camera was an Avrora model made for export around the 1980 Moscow Olympics. It was a practical choice because it had the industrial design language many people associate with Soviet consumer gear: sturdy, boxy, mechanical, and not especially precious. In other words, it looked ready to survive a blizzard, a train station, or an argument with a toolbox.
Instead of loading a Super 8 cartridge, the camera’s film bay became a miniature electronics cabinet. The Raspberry Pi Zero and battery pack could live there without dramatically changing the camera’s silhouette. That matters. A vintage camera conversion loses much of its magic when it grows a plastic backpack the size of a sandwich.
The external controls were also part of the fun. Rather than replacing the original trigger with a modern push button, the project wired the camera’s existing trigger into the Raspberry Pi’s GPIO pins. Pull the old trigger, and the computer receives a command to begin or stop recording. It is a small detail, but it turns the camera from a decorative shell into a convincing tool.
Why the Raspberry Pi Zero Fits This Project So Well
The Raspberry Pi Zero is almost tailor-made for hidden-camera projects. Its small board size allows it to fit inside places that would laugh at a full desktop computer. It can run a lightweight operating system, communicate with camera hardware, store video to a microSD card, and respond to physical controls through GPIO pins.
For a project like this, the Pi Zero is less like a traditional computer and more like a quiet stage manager. It waits backstage, listens for the trigger, tells the image sensor what to do, writes footage to storage, and generally avoids demanding a giant fan, a monitor, or a keyboard.
A modern recreation could use a Raspberry Pi Zero W or Raspberry Pi Zero 2 W. Built-in wireless connectivity makes it easier to transfer footage or check the camera remotely. The Zero 2 W also provides more processing headroom, which can help with higher-resolution recording, previews, and better camera software. Still, the original Pi Zero remains a fitting choice because the project is not trying to win a benchmark contest. It is trying to sneak a computer into a film camera without waking the ghosts of analog cinema.
The Important Hardware Ingredients
- A vintage Super 8 camera body with enough internal room for electronics
- A Raspberry Pi Zero, Zero W, or Zero 2 W
- A compatible Raspberry Pi camera module
- A short camera ribbon cable suited to the Pi Zero connector
- A compact battery solution with proper charging and protection hardware
- MicroSD storage for the operating system and recorded clips
- Thin wire, soldering tools, heat-shrink tubing, and strain relief
- A safe mounting method for the sensor, board, and battery pack
The parts list is not especially exotic. The difficult part is not buying the components. The difficult part is persuading optics, electronics, mechanics, heat, power, and human patience to coexist in a camera body that was designed before personal computers became pocket-sized.
The Optical Challenge: Tiny Sensor, Big Vintage Lens
The most important technical challenge is not software. It is optics.
Super 8 cameras were designed to project an image onto a film frame. A Raspberry Pi camera module uses a much smaller digital sensor. When that tiny sensor sits behind a lens designed for a larger film area, it captures only a smaller central portion of the image circle. The practical result is a noticeably tighter field of view.
Think of it as looking through a window and then moving closer until the frame cuts off the edges. The lens has not changed its physical focal length, but the small sensor sees less of the scene. A lens that felt reasonably wide on Super 8 film can suddenly behave more like a telephoto lens after the conversion.
This is not a flaw in the Raspberry Pi. It is simply geometry having a very confident opinion. Sensor size affects angle of view, and vintage camera conversions have to negotiate with that reality.
For the Avrora build, the camera sensor had to be separated from the tiny lens normally attached to the Raspberry Pi camera module. The sensor was then carefully positioned inside the Super 8 body so that the original camera lens could focus light onto it. During alignment, a live image feed made it possible to adjust the sensor before the mounting adhesive fully cured.
That approach is both smart and slightly terrifying. Once adhesive hardens in the wrong place, the camera may become a beautifully engineered monument to one millimeter of regret.
Why Sensor Alignment Matters So Much
Getting the sensor close to the original film plane is critical. If the sensor sits too far forward or too far back, the vintage lens may not focus correctly. If the sensor is tilted, one side of the image can appear sharper than the other. If it is not centered, the captured frame can look uneven, with strange vignetting or off-center cropping.
This is why a live preview is so helpful. It allows the builder to check focus, framing, and alignment in real time. A test chart, a distant object, and a well-lit room can reveal problems before the final mounting process becomes permanent.
For anyone attempting a similar Raspberry Pi camera conversion, this step deserves more time than every other step combined. Measure twice, test five times, and only then introduce glue to the conversation.
Reusing the Original Trigger Makes the Camera Feel Real
Many retro tech projects look convincing until you try to use them. Then the illusion collapses because the original buttons do nothing, the lens is decorative, and a hidden USB cable is doing all the emotional labor.
This Super 8 Raspberry Pi build avoids that problem by using the original camera trigger as an input device. The trigger can be connected to GPIO pins and interpreted by software as a recording command. A short press could start and stop video. A longer press could switch modes. A double press could capture a still image. The hardware is old, but the behavior can be surprisingly flexible.
That is one of the best lessons in vintage electronics restoration: preserve the physical interaction whenever possible. The metal trigger, the spring tension, the mechanical click, and the grip of the camera body all contribute to the experience. A touchscreen menu may be more efficient, but it rarely makes a person feel like they are about to document a moon landing in 1978.
Power, Heat, and Storage: The Unromantic Parts That Matter
Every tiny-camera project eventually reaches the same three practical questions: Where does the power go? Where does the heat go? Where does the video go?
A battery pack must fit safely inside the camera without pressing against moving parts, sharp metal edges, or the Raspberry Pi board. Proper battery protection and charging hardware are essential. A loose lithium battery inside an old metal camera body is not retro cool. It is a very expensive way to invent a cautionary tale.
Heat also matters. The Raspberry Pi Zero is modest compared with larger computers, but recording video for extended periods can still generate warmth. A vintage camera shell may provide some internal volume, yet it was not designed as a computer enclosure. Builders should leave room around major components, avoid wrapping electronics in insulating foam, and test recording duration before sealing the camera completely.
Storage is simpler but still worth planning. Video files can fill a microSD card faster than expected, especially at higher resolutions. A good workflow includes a reliable card, clear file naming, and a way to transfer clips after a shoot. Wireless transfer can be convenient, but removing the card remains a perfectly respectable solution. Analog filmmakers changed reels by hand for decades. A microSD card is hardly a hardship.
What This Build Gets Right About Vintage Camera Conversions
The best part of this Soviet Super 8 camera hack is that it does not try to erase the camera’s past. It uses the vintage lens, original trigger, familiar grip, and physical form factor as strengths rather than obstacles.
That separates it from a generic Raspberry Pi camera in a 3D-printed box. A printed case can be useful, lightweight, and endlessly customizable. But an old Super 8 camera carries visual history before it ever records a frame. It has knobs, glass, wear marks, and proportions designed around human hands rather than product-rendering software.
The image quality may not match a modern smartphone, but perfection is not the point. The cropped view, imperfect sharpness, unusual color response, and film-like post-processing can produce footage with far more character than a technically flawless clip of someone opening a refrigerator.
A Practical Blueprint for Building Your Own
1. Choose the Right Donor Camera
Look for an inexpensive Super 8 camera with a usable lens, a roomy film compartment, and a trigger mechanism that can be adapted. Avoid rare collector pieces or cameras with personal significance. A donor with missing film parts, broken transport gears, or cosmetic wear may be ideal because its future as a film camera is already limited.
2. Test the Pi and Camera Module Outside the Body
Before opening the vintage camera, confirm that the Raspberry Pi boots correctly, recognizes the camera module, records video, and responds to a basic GPIO button. Debugging software is much easier when the hardware is sitting on a desk instead of hiding behind decades-old screws.
3. Study the Lens and Film Plane
Disassemble slowly and photograph every stage. Identify where the original film frame sat and how the lens assembly relates to it. The goal is to place the digital sensor where it can receive a focused image from the original lens.
4. Prototype the Sensor Mount
Use temporary mounting methods first. Double-sided tape, removable putty, or a small adjustable bracket can help find the correct position. Only use epoxy or permanent adhesive after the live preview shows acceptable focus and alignment.
5. Connect the Trigger Through GPIO
Test the original trigger with a multimeter before wiring it to the Pi. Determine whether it acts as a simple switch and whether it can safely be used as a GPIO input. Add pull-up or pull-down logic in software as needed, and protect exposed joints with heat-shrink tubing.
6. Build for Maintenance, Not Just the Reveal Photo
Make sure the microSD card remains accessible. Consider how the battery will be charged. Leave enough slack in cables to open the body later. A camera that looks brilliant in a social media post but requires full disassembly to copy footage is not a finished design. It is a very stylish hostage situation.
Experience Notes: What a Build Like This Feels Like in Practice
Working with a Soviet Super 8 camera converted into a Raspberry Pi Zero digital camera is an unusual blend of satisfaction, confusion, and occasional suspicion that the camera is judging you. The experience is not like assembling a kit with a neat instruction sheet and identical screws in labeled bags. It is closer to restoring a strange old machine while teaching it a new language.
The first memorable moment usually comes before the electronics are even installed. Vintage cameras have a physical presence that modern gadgets rarely match. The grip is more substantial. The trigger has resistance. The zoom ring may turn with a little stiffness, as though it has spent decades considering whether you have earned the right to use it. Holding the camera makes the project feel less like a computer experiment and more like a small piece of industrial archaeology.
Then the engineering begins, and the romance gets a little dustier. Removing panels reveals old mechanical linkages, metal framing, wiring paths, and empty spaces that are never quite as large as they appeared from the outside. A Raspberry Pi Zero may be tiny, but every connector, battery lead, camera cable, and piece of insulation adds bulk. Suddenly, fitting the electronics inside becomes a three-dimensional puzzle with consequences.
The sensor alignment stage is often the emotional center of the build. A live preview appears, but it may be blurry, crooked, dark, or so tightly cropped that it looks as though the camera has become deeply interested in distant pigeons. Tiny adjustments can produce dramatic changes. Move the sensor slightly, and focus improves. Rotate it by a fraction, and one corner stops looking haunted. Shift it again, and the lens finally behaves as though it remembers its original job.
Using the original trigger after wiring it to the Raspberry Pi is another satisfying moment. A press that once advanced film can now tell a Linux computer to record digital video. That connection between old hardware and new software feels more meaningful than adding another generic push button. It keeps the camera’s original gesture alive.
There are also practical lessons. Battery placement matters more than expected because weight distribution changes how the camera feels in the hand. Cable routing matters because a pinched ribbon cable can turn a successful prototype into an afternoon of troubleshooting. Heat matters because the camera may work beautifully for a one-minute test but become temperamental after a longer recording session.
The final footage can be imperfect, and that is often the reward. It may have a narrow field of view, soft corners, unexpected contrast, or colors that lean a little strange. Those quirks are not necessarily problems to eliminate. They are part of the camera’s new identity: not true Super 8 film, not ordinary digital video, but a hybrid visual tool with a story behind every frame.
A project like this also changes the way people look at obsolete technology. An old camera does not have to remain a shelf ornament, and it does not have to be treated as disposable clutter. With careful planning, it can become a useful, expressive device again. The Raspberry Pi Zero does not erase the camera’s history. It gives that history another scene to play.
Conclusion: A Tiny Computer With a Big Cinematic Personality
The Soviet Super 8 Camera Hides Raspberry Pi Zero project is a reminder that modern maker projects do not have to look futuristic to be clever. By placing a tiny computer and image sensor inside an old film camera, the build preserves the tactile charm of analog filmmaking while adding the convenience of digital recording.
Its limitations are exactly what make it interesting. The small sensor creates a tight crop. The old lens introduces character. The body imposes strict space limits. The trigger becomes a GPIO control. None of that is convenient in the mass-market sense, but it is wonderfully rewarding in the maker sense.
For photographers, electronics hobbyists, Raspberry Pi fans, and anyone with a soft spot for mechanical objects, this is more than a hidden-computer project. It is proof that obsolete hardware can still create something new, useful, and unexpectedly cinematic.