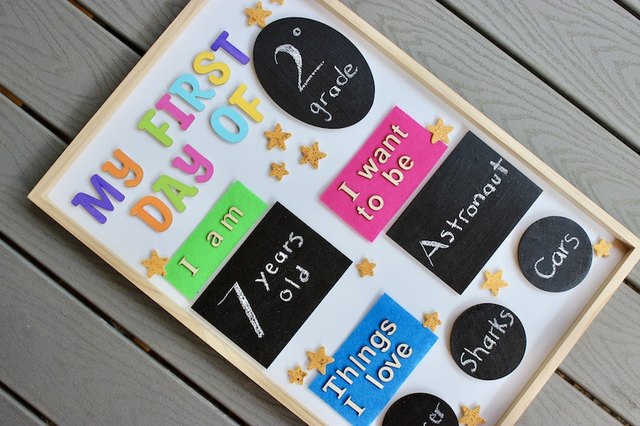
The first day of school arrives with freshly sharpened pencils, suspiciously clean sneakers, and at least one child insisting that a backpack containing three folders is “way too heavy.” Before everyone races out the door, a customizable first day of school sign can turn that wonderfully chaotic morning into a lasting family memory.
Unlike a single-use printed poster, a reusable school sign can grow with your child. Change the name, grade, date, teacher, favorite subject, and future ambition each year without rebuilding the entire project. The same board can even work for siblings, the last day of school, graduation photos, or any milestone involving a child standing still for approximately seven seconds.
This guide explains how to make a durable, attractive, and genuinely customizable first day of school sign using wood, chalkboard paint, dry-erase material, vinyl lettering, stencils, or printable inserts. No professional workshop is required, and owning a cutting machine is optional.
Why Make a Reusable First Day of School Sign?
A reusable sign saves time, reduces waste, and creates visual consistency across yearly school photos. When those pictures are placed side by side, the matching board makes every change easier to notice: new handwriting, missing teeth, longer legs, unexpected career plans, and the gradual disappearance of enthusiasm for being photographed before 8 a.m.
Commercial milestone boards commonly combine permanent headings with writable spaces for changing information. Craft platforms also recommend removable vinyl, printable stickers, whiteboards, and personalized wooden signs because these materials make annual updates easier. Whiteboard designs are especially convenient for families photographing several children in one morning because the information can be erased and rewritten quickly.
Choose the Best Type of Customizable School Sign
Before buying supplies, decide how much of the sign should be permanent and how much should change. The most practical design uses fixed decorative text around several reusable writing areas.
Option 1: Wooden Chalkboard Sign
A wood panel painted with true chalkboard paint has a classic classroom appearance. Permanent headings can be added with paint, vinyl, or stencils, while ordinary chalk fills the blank sections.
This option looks charming in photographs, but chalk can smudge when small hands touch the board. It is best for families who enjoy a handmade, slightly imperfect style.
Option 2: Dry-Erase Sign
A framed whiteboard, acrylic panel, or dry-erase board is the fastest option to update. Use permanent vinyl for headings and dry-erase markers for the answers.
Dry-erase surfaces are cleaner than chalkboards and allow mistakes to disappear instantly. That is useful when someone writes “professional dinosaur” in the favorite-subject box and then changes the answer to science after negotiations.
Option 3: Printable Insert Sign
Create the design digitally, print it on cardstock, and place it inside a picture frame. Write on the glass with a dry-erase marker, or print a new customized page each year.
This is the simplest method for anyone who prefers designing on a computer rather than painting. Back-to-school template libraries can provide useful inspiration for layouts, lettering, icons, and classroom-themed graphics.
Option 4: Interchangeable Wood Sign
Use permanent lettering for the title and attach removable pieces for the grade, date, or school year. Small wooden tags, magnetic labels, hook-and-loop dots, mini clothespins, and sliding cards all work well.
This version requires a little more construction, but it is highly durable and does not depend on handwriting.
Materials and Tools
Choose supplies according to the sign style you selected. You do not need everything on this list.
- An unfinished wood panel, framed chalkboard, whiteboard, acrylic sheet, or picture frame
- Fine-grit sandpaper or a sanding sponge
- Clean lint-free cloth or tack cloth
- Wood primer, when required by the chosen paint
- Acrylic craft paint or chalkboard paint
- Foam brush, small paintbrush, or foam roller
- Painter’s tape
- Permanent or removable adhesive vinyl
- Transfer tape and a scraper tool
- Letter stencils, if vinyl is not being used
- Chalk, chalk markers, or dry-erase markers
- Ruler, pencil, and level
- Clear protective finish for non-writable painted areas
- Decorations such as ribbon, miniature pencils, stars, apples, or wooden shapes
Remember that chalk-finish decorative paint and chalkboard paint are not the same product. Chalk-finish paint creates a matte decorative surface, while chalkboard paint is formulated to produce a writable area. Always read the product label before painting the entire board and discovering that your “chalkboard” is merely a very stylish rectangle.
Plan the Information Before Designing
A school sign can contain as little or as much information as you like. The most useful fields include:
- Child’s first name
- First day or last day
- Grade level
- Date or school year
- Age
- Teacher’s name
- Favorite subject
- Favorite book or activity
- “When I grow up, I want to be…”
- Current height
For a cleaner design, select four to six fields instead of trying to document the child’s complete biography. The name, grade, date, favorite thing, and future ambition usually provide enough personality without making the board resemble a tax form.
Step-by-Step Instructions
Step 1: Choose an Easy-to-Photograph Size
An 11-by-14-inch board is large enough to read in most portraits while remaining manageable for young children. A 12-by-16-inch board provides more room for detailed prompts. For preschoolers, avoid an oversized or heavy wood panel that hides half the child or becomes an accidental shield.
Hold a plain piece of cardboard in front of the child before purchasing the sign base. Take a test photo from the distance you expect to use. This quick check reveals whether the size is practical.
Step 2: Prepare the Surface
If you are using unfinished wood, lightly sand the front, back, and edges. Sand in the direction of the grain, smooth sharp corners, and wipe away every trace of dust. Fill noticeable dents or holes before priming.
Clean, sanding, and priming are important because paint adheres more evenly to a properly prepared surface. Bare or porous wood often benefits from primer, while glossy surfaces should usually be lightly scuffed. Product instructions should always take priority because drying and preparation requirements vary.
Step 3: Paint the Background
Apply a thin, even coat using a foam roller or quality brush. Allow it to dry according to the manufacturer’s directions, then add another coat if coverage appears uneven.
Several thin coats usually produce a smoother finish than one heroic puddle of paint. Watch the edges for drips and keep the board flat while it dries whenever possible.
For a traditional school look, use black or dark green chalkboard paint. For a modern sign, try navy blue, warm white, muted teal, dusty pink, or natural stained wood. The background should contrast clearly with the lettering.
Step 4: Condition a Chalkboard Surface
Do not write on fresh chalkboard paint immediately. After the paint has fully cured for the period listed on its label, rub the side of a piece of chalk across the entire writable area. Cover the surface, erase it, and then begin writing.
This conditioning step helps prevent the first words from leaving permanent-looking shadows. Rust-Oleum’s chalkboard guidance similarly recommends allowing the finish to dry fully, covering the surface with the side of chalk, and erasing it before normal use.
Step 5: Sketch the Layout
Divide the sign into three visual zones:
- A prominent title at the top
- The child’s name and grade in the center
- Smaller changeable details near the bottom
Use a ruler to mark light guidelines. Keep important text away from the outer edges, especially if the sign will be framed.
Good design hierarchy helps viewers understand the sign at a glance. Make the title or child’s name the largest element, use strong contrast, align related fields, and leave open space between sections. Readability matters more than squeezing in another decorative crayon. Adobe’s design guidance emphasizes hierarchy, contrast, alignment, repetition, balance, and negative space as basic tools for organizing information.
Step 6: Add Permanent Lettering
Permanent headings might include “My First Day of School,” “Grade,” “Age,” “I Love,” and “When I Grow Up.” These labels should stay in place while the answers remain changeable.
With a cutting machine, create the headings from adhesive vinyl. Weed away the excess material, apply transfer tape, center the lettering, and burnish it firmly before peeling the transfer layer away at a low angle.
For a board used by multiple children, place names and grades in removable sections rather than permanent vinyl. Removable vinyl is useful for elements that must change, while permanent vinyl is better for headings you expect to keep.
Step 7: Create Writable or Interchangeable Areas
Leave blank lines, painted rectangles, circles, or ribbon-shaped spaces beside each heading. Check that the writing tool can be erased from the selected material before completing the whole sign.
Another approach is to attach small blank cards with hook-and-loop dots. Prepare cards for preschool through twelfth grade, plus first-day and last-day labels. Store the unused pieces in a labeled envelope taped to the back of the sign.
Step 8: Add Decorative Details
Keep embellishments lightweight and securely attached. Small stars, rulers, apples, books, pencils, rainbows, or alphabet shapes reinforce the school theme without overwhelming the information.
A ribbon or handle can make the sign easier to carry, but avoid loose decorations that block text or fall off during the photo. Hot glue and rushed mornings are natural enemies.
Step 9: Protect the Finished Sign
Seal decorative painted sections when the paint manufacturer recommends it, but do not coat over a chalkboard or dry-erase area unless the protective product is specifically compatible with that surface. An ordinary clear sealer may prevent the board from erasing properly.
When sealing chalk-finish decorative paint, use a compatible wax or clear finish and allow it to cure before handling. Protective finishes can improve resistance to scratches and moisture on heavily used decorative surfaces.
Step 10: Test the Sign Before School Morning
Complete a full rehearsal the evening before school. Fill in every field, erase it, rewrite it, and take a photo in the expected location.
Check for glare, tiny lettering, spelling mistakes, loose decorations, and marker colors that disappear against the background. A test photo is much kinder than discovering at 7:42 a.m. that “kindergarten” has been missing an “r” for three days.
How to Make the Sign Without a Cutting Machine
A craft cutter creates polished vinyl lettering, but it is not essential.
Use Printed Lettering and Graphite Transfer
Type the headings in a word processor, print them at the correct size, and shade the back of the paper with pencil. Place the paper over the board, trace the letter outlines, and paint over the transferred lines.
Apply Reusable Stencils
Secure the stencil with painter’s tape or low-tack adhesive. Load a stencil brush or foam applicator with a small amount of paint, remove the excess, and dab vertically. Using too much paint is the main cause of bleeding under the stencil.
Smooth preparation, firmly secured stencils, and light paint application improve edge definition. Even then, minor imperfections are normal in handmade work and usually disappear when the entire sign is viewed from a normal distance.
Use Printable Labels
Design headings on a computer and print them on sticker paper or full-sheet labels. Test the layout on ordinary paper first. Confirm that the printer is set to the correct paper size and quality setting.
If a background color or image must reach the edge of a printed piece, extend it into the bleed area. Keep essential text inside a safe margin so normal trimming variations do not cut into letters. Avery’s printing guidance recommends testing alignment and accounting for both bleed and safety margins in print-to-edge designs.
Design Ideas for Different Styles
Classic Chalkboard
Use a black background, white lettering, yellow ruler lines, red apples, and small colorful accents. This familiar classroom design photographs well and works for every grade.
Minimalist Modern
Choose a natural wood base with black lettering and simple white writable spaces. Use one clean sans-serif font and a restrained palette.
Bright Rainbow
Add a muted rainbow at the top with coordinating stars around the border. Keep the center light and uncluttered so the answers remain readable.
Notebook Paper
Paint the board white, add evenly spaced blue horizontal lines, and place a red vertical line near the left side. Letter the title in a handwriting-style font.
Interchangeable Pencil Sign
Cut the base into a large pencil shape or paint a rectangular board to resemble one. Attach the grade level on a removable wooden tag.
Common Mistakes and How to Fix Them
The Lettering Looks Crooked
Use a level and temporary center marks before applying vinyl or stencils. Measure from the actual edges of the board, not from a decorative frame that may be slightly uneven.
Paint Bleeds Under the Stencil
Wait until the base coat is completely dry, secure the stencil, and use less paint. Remove the stencil while the new paint is still slightly wet instead of allowing it to form a thick bridge over the edge.
Vinyl Will Not Stick
Make sure the surface is smooth, dry, clean, and fully cured. Textured chalkboard finishes can be difficult for detailed vinyl, so use larger letters or place vinyl on the frame rather than the writable center.
The Chalkboard Will Not Erase Cleanly
Confirm that the paint cured fully and that the surface was conditioned before use. Try regular chalk before liquid chalk markers because some markers may stain porous finishes. Test every marker in an inconspicuous corner.
The Sign Looks Too Busy in Photos
Remove two decorative elements and enlarge the most important text. A child, a backpack, a front porch, and a sign already create plenty of visual information. The board does not also need glitter, six fonts, and a three-dimensional school bus.
A Privacy Reminder Before Posting School Photos
A first day of school sign is intended to preserve memories, but it can also display personal details. Before posting a photo publicly, consider omitting the school name, teacher’s full name, exact classroom, bus number, home address, and other information that could identify a child’s routine or location.
You can create two versions of the photo: a complete one for a private family album and a simplified one for social media. Ask older children whether they are comfortable with the picture being shared. The American Academy of Pediatrics encourages parents to consider a child’s privacy and the reason for posting before sharing personal content online.
Real-World Experiences: Lessons That Make the Project Better
The most useful lessons about making a customizable first day of school sign rarely come from the glamorous finished photograph. They appear while paint is drying, vinyl is sticking to itself, and a child is asking whether third grade can be postponed until Thursday.
The First Design Is Usually Too Complicated
Many first attempts begin with an ambitious list of prompts: age, height, teacher, school, favorite food, favorite color, favorite book, favorite subject, best friend, dream job, shoe size, and possibly current thoughts about municipal government. Once all that information is squeezed onto the board, the text becomes too small to read in a normal photograph.
A better experience comes from choosing a few details that will be interesting years later. Name, grade, date, favorite activity, and future ambition create a useful snapshot of childhood without turning the sign into a questionnaire.
Simple Layouts Survive More School Years
Trendy graphics can be fun, but a neutral structure is easier to reuse. A classic wood frame, readable headings, and interchangeable accent colors work for preschool photos as well as middle school pictures.
Families often discover that the sign should visually support the child rather than compete with the child. When the design is simple, bright backpacks, patterned outfits, changing hairstyles, and different photo locations still look coordinated.
Children Make the Sign More Meaningful
A perfectly lettered board may be beautiful, but allowing the child to write one or two answers adds personality. Early handwriting, backward letters, creative spelling, and wildly optimistic career goals become part of the memory.
One year the answer may be “astronaut.” The next year it may be “dog trainer,” followed by “person who sells snacks.” The uneven writing is not a flaw. It is evidence of exactly who the child was at that moment.
Testing the Night Before Prevents Morning Drama
The school morning is not the ideal time to discover that a dry-erase marker is empty or that chalk cannot be seen against dark blue paint. Preparing the sign the night before gives the ink time to dry, confirms that all pieces are available, and leaves one less task between breakfast and departure.
Set the finished sign beside the backpack, shoes, and any forms that need to leave the house. This simple routine reduces the chance that the handmade masterpiece will remain on the kitchen table while the school bus drives away.
Reusable Pieces Need Their Own Storage System
Interchangeable grade labels are only useful when they can be found. Tiny wooden pieces have a mysterious ability to disappear into craft drawers and reappear beside holiday decorations three years later.
Attach a resealable envelope, shallow pouch, or small lidded container to the back of the sign. Store grade labels, date pieces, chalk, markers, and a cleaning cloth together. Photograph the complete set before putting it away so missing parts are easier to identify.
Perfection Matters Less Than Tradition
A handmade sign may contain a slightly crooked word, a visible brushstroke, or a tiny paint smudge. Those details generally disappear in the photograph, and they certainly matter less than continuing the tradition.
The real value of the project emerges after several years. The board stays roughly the same while the child changes dramatically. Teeth grow in, backpacks get larger, answers become more thoughtful, and eventually the child may hold the sign with affectionate embarrassment. That repeating visual reference is what turns a basic craft project into a family keepsake.
Conclusion
A customizable first day of school sign does not need expensive equipment or flawless lettering. It needs a sturdy base, a readable layout, durable permanent headings, and easy-to-change spaces for the details that make each school year unique.
Wood and chalkboard paint create a traditional handmade look. A whiteboard offers fast updates. Printable inserts provide a low-mess option, while interchangeable labels produce a polished sign that can serve several children. Whichever method you choose, prepare the surface carefully, test every material, keep the design simple, and complete the sign before the first-day rush begins.
Years from now, nobody will remember whether the vinyl was perfectly centered. They will remember the missing front tooth, the oversized backpack, and the year someone confidently announced a plan to become a firefighter, veterinarian, and professional cupcake tester at the same time.