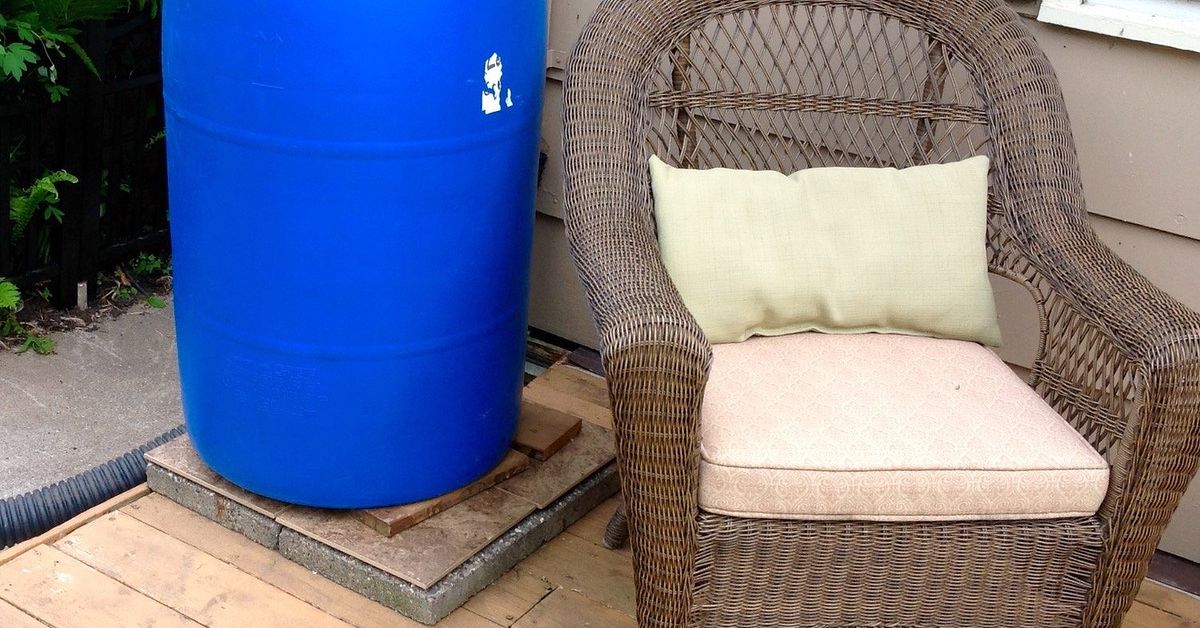
A rain barrel may be wonderful at conserving water, reducing stormwater runoff, and keeping thirsty plants happy, but let us be honest: many models have all the visual charm of an industrial pickle drum. The bright blue plastic, bulky lid, exposed hose, and improvised concrete-block pedestal can make even a carefully designed garden look as though it has acquired a small municipal utility department.
Fortunately, you do not have to choose between environmental responsibility and an attractive backyard. With the right paint, screening, plants, materials, and placement, an ugly rain barrel can become a polished garden featureor disappear so convincingly that visitors never notice it.
The key is to improve its appearance without interfering with its job. The inlet must continue receiving water, the overflow must remain unobstructed, the spigot must be reachable, and every opening should stay protected from insects and debris. In other words, give the barrel a makeover, but do not dress it in a costume so elaborate that it can no longer breathe, drain, or dispense water.
Make Sure the Rain Barrel Works Before Making It Pretty
Before reaching for paint samples or cedar boards, inspect the rain barrel as a complete water-management system. A beautiful barrel that leaks, tips, overflows beside the foundation, or becomes a mosquito resort is not a successful DIY project. It is merely an attractive problem.
Check the foundation
A full rain barrel is extremely heavy, so it needs a flat, stable, level base. Concrete pavers, compacted gravel, or a properly constructed platform generally look neater and perform better than loose bricks stacked in a hurry. Raising the barrel also improves gravity-fed water pressure and creates enough space to fit a watering can beneath the spigot.
If the barrel is already sitting on blocks, consider concealing the base with painted exterior-grade lumber, stone veneer, or a removable skirt. Never use decorative materials that weaken the platform or make it difficult to check for settling.
Protect every opening
The inlet should have a tight screen or closed connector that keeps leaves, animals, and mosquitoes out. Inspect the lid, inlet, overflow opening, and any unused fittings. Decorative gaps may look harmless, but mosquitoes require very little access to reach standing water.
Preserve the overflow route
Every rain barrel needs a safe way to release excess water during heavy rain. The overflow hose should direct water away from the building foundation and toward a landscaped area where it can soak into the soil without causing erosion. Do not hide the overflow so completely that it becomes kinked, crushed, or impossible to inspect.
Keep essential parts accessible
You should be able to reach the spigot, clean the screen, remove sediment, inspect fittings, and disconnect the system when necessary. Any decorative enclosure should include a door, removable panel, open back, or generous access space.
Choose the Right Rain Barrel Makeover
The best makeover depends on your budget, the barrel material, your garden style, and how visible the container is from patios, windows, and neighboring properties. Some barrels look dramatically better with paint alone. Others benefit from a full enclosure and strategic planting.
Option 1: Paint the rain barrel
Painting is usually the fastest and least expensive way to transform a plastic rain barrel. A color that coordinates with the house, fence, shed, or surrounding foliage can make the container feel intentional rather than improvised.
Deep green, charcoal, brown, muted black, and warm gray help a barrel recede into the landscape. Cream, terracotta, navy, or sage can turn it into a decorative focal point. Darker and more opaque finishes may also help limit the amount of sunlight reaching the stored water, which can discourage algae growth.
Use a coating specifically labeled for outdoor plastic. Many rain barrels are made from polyethylene, a material that can be difficult to paint because its surface resists adhesion. Check the barrel manufacturer’s recommendations, test the coating in a small hidden area, and follow all product directions for cleaning, priming, temperature, drying, and curing.
Option 2: Build a wooden slat enclosure
A simple wood surround can make an ordinary barrel resemble a custom garden cabinet. Vertical cedar or pressure-treated slats work particularly well because they add texture without creating a visually heavy box.
Build the enclosure as a freestanding structure rather than fastening boards directly to the barrel. Leave room for air circulation, plumbing, expansion, maintenance, and removal. A hinged front panel provides access to the spigot and lower fittings, while an open or removable top makes screen cleaning easier.
Finish the wood with an exterior stain that coordinates with a deck, fence, raised bed, or shed. For a modern look, use narrow vertical slats with even spacing. For a rustic look, use wider boards, warm stain, and black exterior hardware.
Option 3: Install a lattice or trellis screen
A small privacy screen is ideal when you want to hide the barrel without enclosing it completely. Wood lattice, metal garden panels, horizontal slats, or a freestanding trellis can block the main sightline while leaving the sides and back open for maintenance.
Place the screen far enough away that it does not rub against plumbing or trap moisture. If you add vines, choose manageable plants and guide them onto the screen rather than allowing stems to wrap around the downspout, overflow hose, lid, or faucet.
Annual vines provide quick coverage but may require seasonal replanting. Perennial vines offer a longer-lasting solution, although vigorous species can turn a tasteful screen into a botanical hostage situation. Match the plant to your climate and available sunlight, and avoid invasive varieties.
Option 4: Add a removable planter top
A planter can visually soften the barrel and connect it to the rest of the garden. The safest approach is usually a lightweight, removable planter shelf or stand positioned around or above the barrel without sealing the lid.
Do not place a heavy container directly on a lid that was not designed to support it. Avoid blocking the inlet screen or creating a setup that must be dismantled every time the barrel needs cleaning. Trailing flowers, ornamental grasses, herbs, and compact annuals can provide color while disguising hard plastic edges.
Option 5: Turn the barrel into garden art
If hiding the rain barrel is impossible, celebrate it. A mural can make the container look like a giant flowerpot, a woodland scene, a patterned ceramic vessel, or a playful work of outdoor art.
Geometric patterns suit contemporary gardens, while painted leaves, birds, flowers, or insects complement cottage landscapes. Stencils are useful for anyone whose freehand flowers tend to resemble suspicious fried eggs. Keep the design simple enough to read from a distance, and use outdoor-compatible coatings throughout the project.
How to Paint an Ugly Plastic Rain Barrel
Good preparation matters more than artistic talent. Paint applied over dirt, algae, chalky plastic, or moisture may peel no matter how expensive the can was.
Materials you may need
- Mild dish soap and clean water
- A soft brush or nonabrasive sponge
- Fine-grit sandpaper or a sanding pad, if recommended
- Lint-free cloths
- Painter’s tape and plastic sheeting
- Plastic-compatible primer, when required
- Exterior paint formulated for plastic
- Stencils, artist brushes, or paint markers for details
- Protective gloves, eyewear, and appropriate respiratory protection
Step 1: Empty and disconnect the barrel
Choose a dry period and use or drain the stored water. Disconnect the downspout diverter, hose, and removable accessories. Painting an empty barrel is safer and allows you to turn or reposition it without wrestling several hundred pounds of water.
Step 2: Clean the exterior thoroughly
Wash away soil, mildew, pollen, algae, grease, and cobwebs with mild soap and water. Rinse well and allow the surface to dry completely. Paint and dampness have a famously poor relationship.
Step 3: Identify the plastic and read the coating label
Look for a recycling symbol or material name molded into the barrel. Some plastic paints can be applied directly, while others require a bonding primer or surface preparation. Polyethylene deserves special attention because not every coating adheres reliably to it.
Step 4: Scuff only when recommended
If the barrel manufacturer and paint instructions permit sanding, lightly scuff glossy areas with fine-grit sandpaper. The goal is to reduce shine, not carve decorative canyons into the plastic. Remove all dust afterward with a clean cloth.
Step 5: Mask the working components
Cover the spigot, threads, gaskets, inlet screen, overflow port, labels you need to retain, and any transparent water-level indicator. Do not coat sealing surfaces or moving parts. Paint belongs on the shell, not inside the water-storage area or plumbing.
Step 6: Apply light coats
Work outdoors or in a properly ventilated space under the temperature and humidity conditions specified by the coating manufacturer. Several light coats usually create a smoother, more durable finish than one thick coat. Heavy applications tend to drip, wrinkle, and preserve fingerprints for future archaeologists.
Step 7: Add decorative details
Once the base color is ready for recoating, use stencils, painter’s tape, or small brushes to add patterns. Restrict detailed artwork to the most visible side. There is little reward in spending three hours painting a butterfly behind the downspout where only the spiders will appreciate it.
Step 8: Allow the finish to cure
Dry-to-touch time and full curing time are not the same thing. Let the coating cure according to the label before reinstalling hardware, reconnecting the system, or exposing the barrel to rain. Rushing this stage can cause scratches, sticking, and premature peeling.
Rain Barrel Design Ideas for Different Garden Styles
Modern and minimalist
Paint the barrel matte charcoal, black, or deep bronze. Add a narrow horizontal-slat screen and conceal brightly colored hoses with dark, UV-resistant tubing where appropriate. Repeat the same finish on nearby planters for a coordinated appearance.
Cottage garden
Choose sage green, soft cream, muted blue, or terracotta. Add a floral stencil, a small trellis, and loose plantings of annual flowers or herbs. A gravel base edged with brick can make the entire area look established rather than patched together.
Rustic or farmhouse
Surround the barrel with stained vertical wood slats and dark metal accents. A removable sign, vintage-style house number, or simple botanical motif adds character without interfering with maintenance.
Colorful family garden
Use bold patterns, handprints, pollinator illustrations, or a neighborhood mural. Children can help design the artwork, but an adult should handle surface preparation, spray products, cutting, plumbing, and structural work.
Naturalistic landscape
Use an earthy color and place the barrel behind a curved bed containing ornamental grasses, compact shrubs, and native perennials. Keep plants far enough away to preserve airflow and access. The goal is concealment, not an expedition through wet foliage every time you need the spigot.
Common Rain Barrel Makeover Mistakes
Painting without checking compatibility
Ordinary exterior paint may not bond to slick plastic. A beautiful finish that peels after one season creates more work and considerably less beauty.
Blocking the insect screen
Fabric, decorative moss, soil, and plant debris can obstruct an inlet. Keep the screen visible and easy to clean after storms.
Hiding the overflow hose too well
An overflow hose buried under mulch or squeezed behind a rigid enclosure may kink. Check the complete drainage route after the makeover by safely testing the system with water.
Building a permanent enclosure
Rain barrels eventually need maintenance, repair, or replacement. Screwing the barrel into a miniature wooden fortress guarantees that a simple task will later require tools, patience, and several new vocabulary words.
Letting plants take control
Plants can hide the barrel beautifully, but roots, stems, and fallen leaves should not interfere with fittings. Prune regularly and maintain a clear path to the faucet and lid.
Ignoring seasonal weather
In freezing climates, follow local recommendations for draining, disconnecting, bypassing, or storing the barrel before winter. A decorative enclosure should not prevent seasonal access.
How to Keep the Finished Rain Barrel Beautiful
Inspect the makeover several times during the rainy season. Clean the inlet screen, remove debris, confirm that the overflow remains open, and watch for leaks around fittings. Touch up chipped paint before water and sunlight enlarge the damaged area.
Wash painted surfaces with mild soap and a soft cloth rather than aggressive cleaners or stiff wire brushes. Inspect wooden enclosures for loose fasteners, rot, and fading. Reapply an exterior wood finish as needed, particularly on horizontal surfaces that receive direct rain.
Use the stored water regularly so the barrel has capacity for the next storm. Rain-barrel water is generally intended for non-potable outdoor uses unless a properly designed and treated system has been established for another purpose. Consider the roof material, local guidance, and the sensitivity of the plants being watered.
Experience-Based Lessons From Real-World Rain Barrel Makeovers
The most useful lesson from common homeowner projects is that the simplest makeover often lasts the longest. An elaborate design may look spectacular in photographs, but the everyday test comes later: Can the screen be cleaned in two minutes? Can a watering can fit beneath the faucet? Can the overflow hose be inspected without dismantling half the garden?
One frequently reported experience is discovering that color matters more than decoration. A bright blue barrel may dominate a small yard, while the same barrel painted deep green or charcoal seems to shrink into the background. Homeowners sometimes begin with plans for murals, trim, faux metal bands, and ornamental hardware, only to realize that one well-chosen base color delivers most of the visual improvement.
Another practical lesson involves preparation. People who clean, dry, test, and correctly prime the surface generally get a better result than those who treat the barrel like an oversized craft project. Plastic can look clean while still holding a film of pollen, sunscreen, soil, or manufacturing residue. Skipping preparation saves an hour on the first weekend and may create several hours of scraping and repainting the following year.
Wooden surrounds also teach an important lesson about clearance. A tightly fitted enclosure may look like custom cabinetry on installation day, but plastic barrels can shift slightly, plumbing fittings need room, and damp leaves collect in narrow gaps. A freestanding surround with removable panels is less sleek on the drawing board and far more pleasant when maintenance season arrives.
Plant-based concealment tends to improve with patience. Newly installed grasses and perennials may look too small during the first month, tempting the gardener to cram in more plants. By midsummer, those innocent little plants can become a leafy roadblock around the spigot. Leaving deliberate access space rarely looks exciting at planting time, but it prevents muddy sleeves, broken stems, and accidental encounters with whatever insect has claimed the faucet as private property.
Overflow testing is another step people appreciate only after skipping it. A screen, enclosure, or planter can change how water moves around the barrel. Testing the inlet and overflow before the next major storm makes it possible to spot a kinked hose, loose fitting, or poorly directed discharge while the weather is calm. Discovering those problems during a midnight downpour is considerably less charming.
Many successful projects evolve rather than appearing fully formed. A homeowner may begin by painting the barrel, add a gravel pad later, install a screen the following season, and finally repeat the same materials in nearby planters. This gradual approach spreads out the cost and allows the design to respond to actual use. It also prevents buying decorative accessories that look wonderful in a shopping cart but block the only convenient route to the spigot.
The best experience-based rule is straightforward: beautify the barrel in layers, and test its function after every layer. Paint it, reconnect it, and observe a storm. Add a screen, then check access. Introduce plants, then watch how they grow. A rain barrel is working equipment, not a sculpture that happens to be wet. When appearance and function are improved together, the result feels integrated into the garden instead of merely disguised.
Conclusion
Making an ugly rain barrel beautiful does not require hiding every inch of it. A compatible paint finish, an attractive freestanding screen, a removable wood surround, or carefully placed plants can transform an industrial-looking container into a coordinated part of the landscape.
Begin with safety and function: stabilize the base, protect all openings, preserve the overflow route, and maintain access to the spigot and screen. Then choose a makeover that matches your home and your willingness to perform maintenance. The most successful design is not necessarily the fanciest one. It is the design that still looks good after several storms and does not require minor demolition whenever the screen needs cleaning.