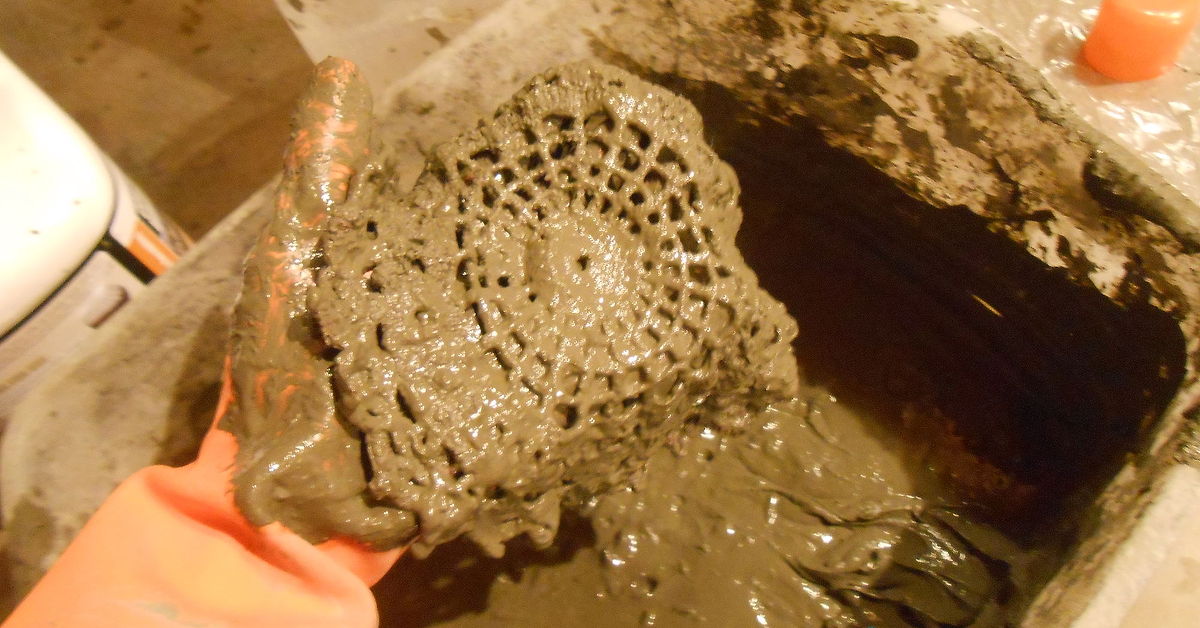
Cement lace is what happens when a delicate crochet doily wanders into a hardware aisle and comes home with a dramatic new personality. By soaking lace, a crocheted mat, or another absorbent textile in a fine cement mixture and shaping it over a mold, you can create bowls, planters, candle covers, wall art, and sculptural garden accents that preserve the original stitch pattern in stone-like form.
The project looks complicated, but the basic process is pleasantly simple: choose the right textile, prepare a smooth cement slurry, saturate every fiber, shape the piece, and cure it slowly. The real skill lies in controlling thickness, moisture, and support. Get those three things right and your doily becomes a crisp piece of concrete art. Get them wrong and it may become a decorative tortilla chip.
What Is Cement Lace?
Cement lace is a thin, textile-reinforced cement craft. Instead of pouring concrete into a solid mold, you use a piece of crochet as the framework. Wet cement coats and penetrates the yarn, then hardens through hydration. The open spaces in the stitch pattern remain visible, producing the contrast that makes the finished piece look both heavy and airy.
Cement is the binding powder, while ordinary concrete also contains sand and aggregate. Because gravel cannot pass through fine stitches, this craft works best with a smooth portland-cement slurry, mortar-style product, surface-bonding cement, or fine-particle craft mix. Start with a shallow bowl or small planter. Cement lace is decorative, not structural, load-bearing, fireproof, or intended as cookware.
Materials and Tools
- A cotton doily, crocheted placemat, lace runner, crochet hat, or small open-weave textile
- Portland cement with a concrete acrylic fortifier, or a fine-particle cementitious craft mix
- Clean water
- A plastic bucket or disposable mixing bowl
- A sturdy mixing stick or margin trowel
- A plastic, foam, or sealed wooden mold
- Plastic wrap, a plastic bag, or a compatible concrete-release product
- Nitrile or alkali-resistant waterproof gloves
- Safety glasses and suitable respiratory protection for dusty work
- A drop cloth, plastic sheeting, and a spray bottle
- Optional concrete pigment, masonry paint, acrylic paint, or water-based sealer
Choose the Right Crochet Item
Cotton usually performs better than slick synthetic fiber because it absorbs slurry and offers more grip. Choose strong, medium-weight crochet with balanced openings and no brittle areas. Wash used pieces to remove starch, softener, grease, and dust. Practice on a thrift-store doily before volunteering a family heirloom for mineralization.
Select a Mold That Will Release Easily
Plastic bowls, nursery pots, foam forms, and rounded containers release more easily than rigid glass or metal. Avoid undercuts and narrow necks. Cover the mold with smooth plastic wrap or a thin bag; wrinkles can print into the finished surface.
Safety Before Style
Dry cement is alkaline, and wet cement can irritate or burn skin during prolonged contact. Concrete and mortar products may also contain crystalline silica. Mixing, sanding, drilling, or grinding can release fine dust that should not be inhaled. Work outdoors or in a well-ventilated area, avoid creating airborne dust, wear eye protection, and follow the safety data sheet for the exact product you buy.
Add powder gently, use wet finishing methods when practical, and never dry-sweep cement dust. Keep children and pets away. Do not wash slurry into plumbing or storm drains; let residue harden and dispose of it according to local rules.
How to Make Cement Lace Step by Step
1. Test the Shape Before Mixing
Drape the dry textile over your protected mold. Decide where the center should sit and how the edges should fall. Pinch or fold excess fabric now, while it still behaves like fabric. Mark the orientation with a small thread or washable marker if the pattern has a definite front and back.
2. Prepare a Fine Cement Slurry
A traditional craft formula uses about five parts sifted portland cement to one part compatible acrylic or bonding additive, plus enough water for a pudding-like slurry. Product formulas differ, however, so the label and safety data sheet always take priority. An easier option is a fine-particle craft concrete or smooth repair mix designed for thin work.
Add liquid first and powder gradually. Mix until smooth. The slurry should cling to a stick and pass through the crochet without running off like gray soup. Excess water can weaken the coating; too little prevents saturation.
3. Saturate the Doily Completely
Submerge the textile and, wearing waterproof gloves, massage slurry through both sides, opening folded stitches and coating knots and intersections. Lift it, let excess drip back, and smooth heavy blobs without wringing the piece. The yarn must be saturated, not merely frosted on top.
4. Drape and Sculpt
Center the wet textile over the mold, smooth the crown, and arrange the sides. Distribute folds evenly for a formal bowl or create controlled waves for an organic form. Strengthen thin edges with extra slurry. For a planter, shape a drainage hole while wet with a protected dowel rather than drilling fragile lace later.
5. Begin a Slow, Moist Cure
Place the mold level, away from sun, freezing temperatures, rain, and strong wind. Once the surface is firm enough, cover it loosely with plastic to slow moisture loss. Light misting may help, but never wash the coating away. Wait at least 24 to 48 hours before testing, and longer when the product, weather, or size requires it. Early hardness is not full strength.
6. Demold Without Starting a Wrestling Match
Flex the mold gently or lift the lace with its plastic barrier and peel the barrier away gradually. Support the rim with both hands. If the piece resists, stop; another day of curing is cheaper than reconstructive bowl surgery.
7. Cure Further and Finish the Surface
Continue curing the demolded piece on a padded, level surface according to the product instructions. Do not load, hang, or plant in it immediately. Smooth rough spots with dust-controlled methods, then leave the surface natural or add pigment, a thin color wash, dry brushing, or metallic accents. Once fully cured and dry, apply a compatible water-based sealer in light coats. Sealer improves cleanability but does not make the bowl food-safe.
How to Prevent Cracks, Bald Spots, and Other Craft Drama
Cracks During Demolding
Early removal, a thin coating, weak yarn, poor support, or a trapping mold are common causes. Cure longer, reinforce the rim, and use a flexible form with gentle curves.
Flaking Cement
Starch, oil, resistant synthetic fibers, or rushed dipping can prevent adhesion. Clean the textile and massage slurry through every stitch. Use only a fortifier approved for the selected cement product.
Blocked Pattern or Chalky Surface
Open blocked holes with a rounded tool while wet. For chalkiness, reduce excess water, cure more carefully, and avoid incompatible additives. The goal is coated yarn, not a concrete pancake in a lace costume.
Creative Cement Lace Variations
Drape a lace runner over a cylinder for a lantern-style cover used only with battery lights, shape a crochet hat into a planter, or cast small motifs flat as wall medallions. Two aligned, fully saturated layers can add strength. For outdoor display, choose exterior-rated materials, provide planter drainage, and protect delicate pieces from severe freeze-thaw cycles.
Project Experience: Lessons From Making Cement Lace
My first useful lesson was that the doily decides more of the final result than the mold does. A dense crochet pattern creates a sturdy, almost carved surface, while a wide, airy pattern produces beautiful shadows but needs careful handling. The prettiest lace in the thrift-store basket was not necessarily the best candidate. One small cotton mat with slightly thicker thread outperformed several elegant pieces because it absorbed the slurry evenly and had strong intersections.
The second lesson arrived in a bucket: mix less than you think you need. Cement lace uses a surprisingly modest amount of slurry, and a large batch begins changing consistency while you are still persuading one stubborn flower motif to lie flat. Small batches stay manageable, reduce waste, and make it easier to adjust the texture. I had better results when the mixture resembled thick pancake batter or puddingnot paste and definitely not chocolate milk, although all three descriptions made the workshop sound hungrier than expected.
Mold preparation also proved more important than it looked. Loose plastic bags release well, but deep creases leave ridges on the inside of the finished bowl. Stretching plastic wrap smoothly over the form produced a cleaner surface. On rounded plastic containers, a very light compatible release treatment helped, but too much created oily patches where the cement coating looked uneven. The winning approach was simple: a flexible mold, a smooth barrier, and no heroic amount of release agent.
I also learned not to “fix” every fold. Perfect symmetry can make the piece look factory-made, while a few deliberate waves preserve the handmade character. The trick is distinguishing an artistic fold from a structural weak point. Broad, supported curves are attractive. A sharp pinch with almost no cement at its tip is a future crack sending you an early invitation.
Curing was the least exciting stage and the most influential. A piece left uncovered in moving air lightened quickly and looked finished, but its rim became fragile. A similar piece protected from rapid moisture loss remained darker longer and felt noticeably more dependable after demolding. That experience cured me of treating “dry to the touch” as “ready for adventure.” Now I wait longer, lift with two hands, and support the full rim.
Finishing taught another useful restraint. Heavy paint can hide the crochet texture that made the project worth doing. A thin color wash, dry-brushed highlight, or natural gray finish usually keeps the lace readable. Sealer is best applied in light coats; thick puddles collect in the openings and create glossy membranes that resemble accidental windowpanes.
Finally, not every failure deserves the trash. A cracked bowl can become a wall fragment, garden accent, or test piece for paint and sealer. A lopsided form may look excellent with a trailing plant. Cement lace rewards flexibility because the process combines a soft, unpredictable textile with a rigid mineral coating. You guide the result, but you do not completely command itand that mild rebellion is part of the charm.
Conclusion
Creating cement lace with doilies and crochet items is an approachable way to transform soft textile patterns into durable-looking sculptural decor. Success depends less on expensive equipment than on thoughtful material choices: use absorbent, sound crochet; choose a fine cementitious mix; follow the manufacturer’s liquid ratio; saturate every fiber; shape the textile over an easy-release mold; and protect it from rapid drying while it cures.
Start with a shallow bowl before attempting a hanging planter or large sculpture. Practice gives you a feel for slurry consistency, edge thickness, and demolding time. Soon, the forgotten doilies at your local thrift shop will stop looking like table linens and start looking like tiny architectural opportunities.