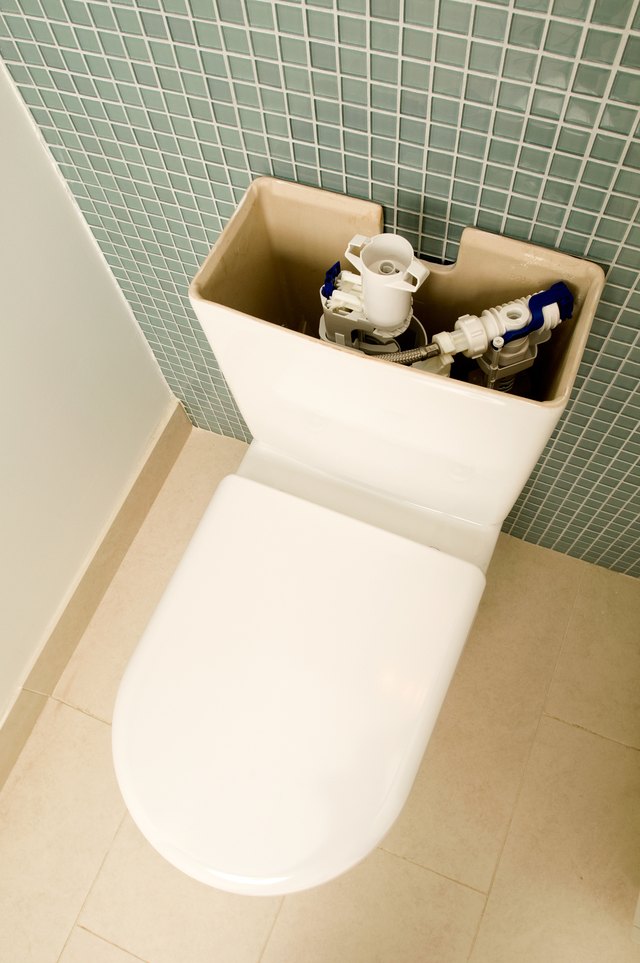
A toilet cistern leaking underneath is one of those home problems that announces itself with quiet drama. First, a tiny puddle appears. Then you wipe it up. Then it returns, smugly, like it pays rent. The good news is that most leaks under a toilet cisternalso called a toilet tank in American plumbing languagecome from a small group of fixable parts: tank bolts, rubber washers, the tank-to-bowl gasket, the flush valve seal, the water supply connection, or, less often, a cracked tank.
This guide explains how to diagnose the leak, what tools you need, and how to repair the most common causes without turning your bathroom into a low-budget water park. If the toilet is cracked, unstable, or leaking from the floor every time you flush, call a licensed plumber. But if the leak is dripping from underneath the cistern, you may be able to fix it with a tank-to-bowl gasket kit, a few basic tools, and a healthy respect for porcelain, which is strong until it suddenly decides not to be.
What Does “Leaking Underneath the Cistern” Usually Mean?
When water appears below the toilet tank, it is easy to assume the whole toilet has failed. In reality, the leak location tells a story. Water dripping from the underside of the cistern often points to a failed seal where the tank meets the bowl, worn rubber washers around the tank bolts, loose or corroded bolts, or a leaking supply line connection. Water around the very bottom of the toilet bowl may instead indicate a wax ring or flange problem. That is a different repair.
Before grabbing a wrench, dry the toilet completely with paper towels or an old towel. Then flush once and watch carefully with a flashlight. Look under the tank, around the bolt heads inside the cistern, at the large gasket between the tank and bowl, and where the supply hose connects to the fill valve. This “detective phase” takes five minutes and can save you from replacing the wrong part while muttering plumbing-themed poetry.
Common Causes of a Toilet Cistern Leaking Underneath
1. Loose Tank Bolts
Two-piece toilets use bolts to fasten the tank to the bowl. Over time, vibration, age, mineral buildup, and repeated flushing can loosen the connection. If water is gathering near the bolt holes, the bolts may need gentle tightening. The key word is gentle. Overtightening can crack the tank, and a cracked tank is not a repair project; it is a shopping trip.
2. Worn Rubber Washers
Rubber washers sit around the tank bolts to create a watertight seal. Rubber eventually hardens, compresses, or breaks down, especially in hard water or when harsh in-tank cleaning tablets are used. Once the washer stops sealing, water sneaks down the bolt and drips underneath the cistern.
3. Failed Tank-to-Bowl Gasket
The tank-to-bowl gasket, sometimes called a sponge gasket or spud washer, seals the large opening where water leaves the tank during a flush. If the leak appears between the tank and bowl, especially after flushing, this gasket may be worn, flattened, misaligned, or the wrong size.
4. Leaking Flush Valve Nut
The flush valve assembly passes through the bottom of the tank. If the locknut underneath the tank is loose or the flush valve gasket has deteriorated, water can drip from the center underside of the cistern. In that case, replacing the flush valve or installing a full toilet tank repair kit may be smarter than replacing only the outer gasket.
5. Faulty Water Supply Connection
Sometimes the cistern is innocent. The supply line may be leaking where it connects to the fill valve under the tank. A loose coupling nut, damaged washer, old flexible hose, or cross-threaded connection can create a steady drip that looks like a tank leak.
6. Condensation
In humid bathrooms, a cold tank can sweat. If the outside of the cistern is wet but no single drip point appears, condensation may be the culprit. Improve ventilation, run the bathroom fan, or use an anti-sweat toilet tank liner if needed.
7. Cracked Porcelain
A hairline crack in the cistern can leak slowly and dangerously. If you find a crack, do not patch it with caulk, epoxy, or heroic optimism. Replace the tank or toilet. Water pressure plus cracked porcelain is not a friendship you want to test.
Tools and Parts You May Need
- Adjustable wrench
- Flathead screwdriver
- Sponge, towels, or wet/dry vacuum
- Bucket or small bowl
- Flashlight
- Tank-to-bowl gasket kit
- New tank bolts, nuts, and rubber washers
- Replacement supply line, if the old one leaks
- Flush valve kit, if the center seal is leaking
- Gloves
- Penetrating oil or hacksaw for badly rusted bolts
Before buying parts, identify your toilet brand and model if possible. Many universal kits fit common toilets, but some models require specific gaskets or bolt systems. Check inside the tank for a model number stamped into the porcelain or printed on the underside of the lid.
Step-by-Step: How to Fix a Toilet Cistern Leaking Underneath
Step 1: Turn Off the Water Supply
Find the shutoff valve on the wall or floor behind the toilet. Turn it clockwise until it stops. Do not force an old valve with a wrench; if it will not close, you may need to shut off water to the house and replace the valve. Flush the toilet to empty most of the tank.
Step 2: Drain the Tank Completely
Hold the flush handle down to remove as much water as possible. Use a sponge, towel, or wet/dry vacuum to remove the remaining water from the cistern. This step is not glamorous, but neither is pouring tank water onto your socks.
Step 3: Confirm the Leak Source
With the tank dry, inspect the bolt heads inside the cistern. Look for rust, cracked washers, mineral buildup, or signs that water has been traveling down the bolts. Check the large gasket under the tank and the supply line connection. If the leak only happens during flushing, the tank-to-bowl gasket is highly suspicious.
Step 4: Try Gentle Tightening First
If the bolts are only slightly loose and the washers look healthy, tighten the nuts under the tank one-quarter turn at a time, alternating from side to side. Keep the tank level. Do not crank down on one bolt until the tank tilts. The goal is even pressure, not a porcelain stress test.
After tightening, turn the water back on, let the tank fill, and watch for 10 to 15 minutes. Flush a few times. If the leak stops, congratulations: you have repaired the toilet and earned the right to tell people you “handled some plumbing today.” If the leak continues, replace the hardware.
Step 5: Disconnect the Supply Line
Place a bucket under the supply connection. Unscrew the supply line from the bottom of the tank. If the hose is old, stiff, corroded, or leaking, replace it with a new braided stainless steel supply line of the correct length.
Step 6: Remove the Tank
Use a screwdriver inside the tank to hold each bolt steady while loosening the nuts from underneath with a wrench. If the bolts are rusted, apply penetrating oil and wait a few minutes. For severe corrosion, you may need to cut the bolts carefully. Once the bolts are removed, lift the tank straight up and set it on a towel.
Toilet tanks are awkward rather than extremely heavy. If yours is bulky or wedged into a tight space, ask someone to help. Dropping a tank is a fast way to turn a twenty-dollar gasket job into a “why is there porcelain everywhere?” situation.
Step 7: Remove the Old Gasket and Hardware
Turn the tank gently on its side. Remove the old tank-to-bowl gasket from the flush valve outlet. Scrape away mineral deposits or old rubber residue with a cloth or plastic scraper. Avoid scratching the porcelain or damaging the flush valve threads.
Remove all old washers, nuts, and bolts. Do not reuse corroded hardware. If one washer has failed, the others are probably not training for a comeback.
Step 8: Install the New Tank-to-Bowl Gasket
Press the new gasket onto the flush valve outlet according to the kit instructions. Make sure it sits evenly and matches the toilet type. A 2-inch gasket will not properly replace a 3-inch gasket, and “close enough” is how leaks write their autobiography.
Step 9: Install New Tank Bolts and Washers
Insert each new bolt from inside the tank with the correct rubber washer placement. In many common kits, the rubber washer goes directly under the bolt head inside the tank to seal the hole. Avoid placing a metal washer directly under the bolt head inside the tank unless your manufacturer’s instructions specifically say to do so, because metal against porcelain and water is a leak invitation.
Some toilets use special grommets or three-bolt systems. Follow the manufacturer’s instructions for your model. If your toilet is a Kohler, American Standard, Mansfield, Gerber, or another brand with a distinctive gasket shape, confirm compatibility before tightening everything down.
Step 10: Reinstall the Tank
Lower the tank onto the bowl, aligning the bolts with the bowl holes and seating the gasket evenly over the flush opening. Add washers and nuts underneath. Tighten each nut gradually, alternating sides so the tank comes down evenly. Stop when the tank feels stable and the gasket is compressed enough to seal.
Do not tighten until porcelain touches porcelain unless your toilet design specifically requires it. Many tanks need a small even gap or cushioned contact points. The safest rule is simple: snug, level, and stablenot crushed.
Step 11: Reconnect the Water Supply
Reconnect the supply line by hand first to avoid cross-threading. Then tighten slightly with a wrench if needed. Do not overtighten plastic fill valve shanks; they can crack. Turn the shutoff valve on slowly and let the tank fill.
Step 12: Test for Leaks
Dry everything again. Place dry paper towels under the tank bolts, around the gasket area, and beneath the supply connection. Wait 15 minutes, then flush several times. If the towels stay dry, your repair is working. Check again later the same day and the next morning.
What If the Toilet Still Leaks?
If the toilet still leaks underneath the cistern after replacing the bolts and gasket, review these possibilities:
- The gasket is the wrong size or shape.
- The tank is uneven or not seated correctly.
- A rubber washer is missing, reversed, or pinched.
- The flush valve gasket inside the tank is leaking.
- The supply line connection is dripping and fooling you.
- The porcelain tank has a crack.
If the leak comes from the center bottom of the tank, replace the flush valve assembly. If water appears at the floor around the toilet base after flushing, the problem may be the wax ring, closet flange, or toilet basenot the cistern. If you see a crack, stop using the toilet and replace the damaged part.
Should You Use Caulk or Sealant to Stop a Cistern Leak?
No. Caulk is not a proper fix for a leaking toilet cistern. It may hide the leak temporarily, but water will continue moving through the failed seal. Worse, trapped moisture can damage flooring, subflooring, and nearby walls. A leaking tank needs mechanical repair: new washers, new bolts, a new gasket, a new flush valve, or a replacement tank.
Sealant belongs in select plumbing situations, but not as a bandage over tank bolt leaks. If the seal depends on rubber washers and compression, replace the rubber and restore the compression. Your toilet is asking for a gasket, not a craft project.
How Much Does This Repair Cost?
A basic tank-to-bowl gasket and bolt kit is usually inexpensive compared with a plumber visit. A full toilet tank repair kit costs more but may be worth it if the fill valve, flapper, flush valve, and hardware are all old. A new supply line is also affordable and smart to replace if it is corroded or stiff.
The most expensive outcome is ignoring the leak. A tiny drip can stain flooring, swell baseboards, encourage mold, and rot subfloor material. Repairing the leak early is cheaper, cleaner, and much less embarrassing than explaining why your bathroom floor has developed “character.”
When to Call a Plumber
Call a licensed plumber if the shutoff valve will not close, the tank or bowl is cracked, the toilet rocks badly, water leaks from the base after flushing, bolts are too corroded to remove safely, or you are uncomfortable lifting the tank. Also call a professional if the leak returns after a proper gasket and bolt replacement. Persistent leaks may involve a warped tank surface, damaged flush valve seat, hidden crack, or floor flange issue.
Prevention Tips for Future Toilet Tank Leaks
- Avoid harsh in-tank cleaning tablets that can degrade rubber parts.
- Check under the tank every few months for moisture or rust.
- Replace old supply lines before they become brittle.
- Do not lean on the toilet tank or use it as a shelf for heavy items.
- Keep the tank level and stable after any repair.
- Use manufacturer-compatible parts whenever possible.
Experience Notes: What This Repair Teaches You in Real Life
Fixing a toilet cistern that is leaking underneath is one of those DIY jobs that looks intimidating until you understand what is actually happening. Water is not mysterious; it is just persistent. It will always follow gravity, sneak through weak rubber, and expose every shortcut you took. The first lesson is to diagnose slowly. Many homeowners see water under the toilet and immediately assume the worst, but a careful dry-and-watch test often reveals the leak is coming from one bolt washer or a tired gasket.
The second lesson is that old toilet hardware rarely comes apart politely. Rusted bolts may spin, nuts may refuse to move, and mineral buildup may make everything look like it was installed during the Bronze Age. Patience helps. A little penetrating oil, the right wrench, and steady pressure work better than brute force. Porcelain does not forgive overconfidence.
The third lesson is to replace related parts while the tank is already off. If the tank-to-bowl gasket has failed, the bolt washers are probably old too. If the bolts are corroded, the supply line may not be far behind. Doing the complete repair once is better than doing three tiny repairs across three weekends while your bathroom slowly becomes a suspense film.
Another practical experience: take pictures before disassembly. A quick phone photo of the bolt order, washer placement, and supply connection can save you confusion later. Toilet repair kits usually include instructions, but your original setup offers useful cluesunless the previous repair was wrong, which happens more often than anyone wants to admit.
Also, do not rush the leak test. A tank can look dry for two minutes and then form a tiny bead of water under a bolt. Use paper towels as leak detectors. They reveal moisture quickly and make it easier to tell whether the drip is from the tank bolts, the supply line, or the gasket. After the first successful test, check again after several flushes and again the next day. A good repair should stay dry under normal use.
Finally, this job teaches a useful homeowner mindset: small leaks deserve immediate attention. A toilet cistern leaking underneath may not seem urgent if the drip is slow, but water damage does not care about your schedule. Fix it early, use the right parts, tighten evenly, and resist the temptation to solve a gasket problem with a tube of caulk. Your future floor will be grateful, even if it does not send a thank-you card.
Conclusion
A toilet cistern leaking underneath is usually caused by worn tank bolt washers, loose hardware, a failed tank-to-bowl gasket, a leaking flush valve connection, or a faulty supply line. Start by drying the area and identifying the exact source. If gentle tightening does not solve the problem, replace the tank-to-bowl gasket and bolt hardware as a set. Work slowly, tighten evenly, and test carefully before declaring victory.
This repair is approachable for many DIY homeowners, but it rewards patience more than muscle. If you discover cracked porcelain, a stubborn shutoff valve, severe corrosion, or water leaking from the floor after flushing, bring in a professional. The goal is not just to stop the drip todayit is to keep the bathroom dry, safe, and free from surprise puddles with a sense of humor.
Note: This article is written for general homeowner education. For cracked porcelain, unstable toilets, damaged shutoff valves, or persistent leaks, contact a licensed plumber.