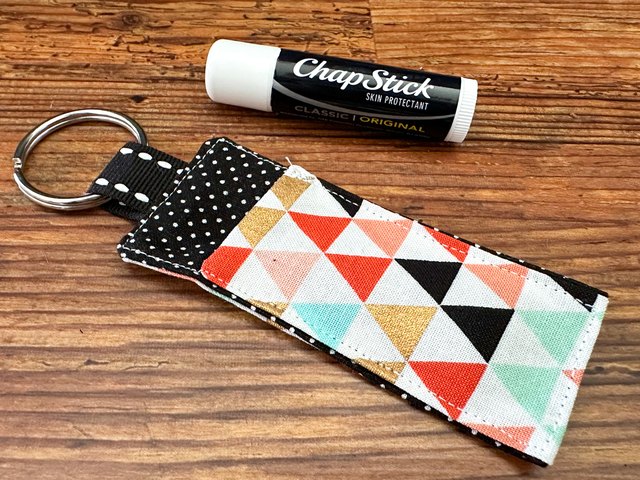
Somewhere in the universe, there is a mysterious black hole made entirely of lost lip balm tubes. They vanish into coat pockets, backpack corners, car cup holders, couch cushions, and that one purse pocket nobody has fully explored since 2019. The good news? You can fight back with one of the easiest, cutest, and most useful sewing projects around: a custom fabric lip balm holder.
This small sewing project is perfect for beginners, gift makers, craft fair sellers, teachers, parents, and anyone who enjoys turning tiny fabric scraps into something that actually earns its keep. A fabric lip balm holder clips to a keychain, backpack, purse, lanyard, tote bag, or diaper bag, keeping your favorite balm within reach instead of buried in a fabric abyss.
In this guide, you will learn how to sew a custom fabric lip balm holder using cotton fabric, lightweight interfacing, basic sewing tools, and keyring hardware. We will cover measurements, fabric choices, step-by-step sewing instructions, customization ideas, troubleshooting tips, and real-life experience notes so your project looks polished instead of “I wrestled a napkin and lost.”
Why Make a Custom Fabric Lip Balm Holder?
A DIY lip balm holder is small, fast, affordable, and useful. That combination is basically the craft-world equivalent of finding fries at the bottom of the takeout bag. It uses very little fabric, so it is excellent for scrap busting. It also makes a thoughtful handmade gift because nearly everyone uses lip balm, especially during cold weather, dry summers, travel, school days, sports practice, or long commutes.
Unlike a bulky pouch, a fabric chapstick holder is designed to fit one standard tube snugly. It can hang from your keys or clip onto a zipper pull, which means you do not have to dig through three receipts, two gum wrappers, and a mystery penny every time your lips feel dry. Better yet, the holder can be customized with favorite colors, sports prints, floral cotton, novelty fabric, monograms, school colors, holiday themes, or matching sets for friends.
Best Fabric for a Lip Balm Holder
The best fabric for a custom fabric lip balm holder is woven cotton, such as quilting cotton. It is easy to cut, easy to press, easy to sew, and available in more prints than any reasonable human can resist. Cotton also behaves well under a sewing machine, which is important because this project is small and small projects punish slippery fabric like a tiny sewing courtroom.
Canvas, denim, and linen blends can also work if they are not too bulky. These fabrics create a sturdier holder, but beginners may find them slightly harder to turn and topstitch neatly. Avoid very stretchy knits, sheer fabric, satin, or anything that frays aggressively. A lip balm holder needs structure. It should hug the tube without sagging like a tired sock.
Should You Use Interfacing?
Yes, interfacing is highly recommended. Lightweight fusible interfacing gives the fabric body and helps the finished holder keep its shape. It also makes thin cotton easier to sew and gives the project a more professional feel. Fusible interfacing is applied to the wrong side of the fabric with an iron, then allowed to cool so the adhesive bond can set properly.
If you use heavier fabric such as canvas or denim, you may be able to skip interfacing. However, for quilting cotton, a light or medium-light fusible interfacing is usually the sweet spot. Think of it as posture support for your fabric. Without it, the holder may look floppy. With it, the holder stands up and says, “I have my life together.”
Supplies You Will Need
- Two pieces of cotton fabric, each about 2.25 inches by 7 inches
- One small fabric strip for the tab, about 1 inch by 3.5 inches
- Lightweight fusible interfacing for each fabric piece
- One key ring, swivel clasp, lobster clasp, or key fob hardware
- Matching thread
- Sewing machine
- Iron and ironing board
- Fabric scissors or rotary cutter
- Ruler or measuring tape
- Pins or sewing clips
- Safety pin, turning tool, or chopstick for turning corners
These measurements fit many standard lip balm tubes, but brands can vary slightly. If your tube is wider or taller than average, add a little extra width or length before sewing. The goal is snug, not suffocating. Your lip balm should slide in securely without requiring a rescue team.
Before You Sew: Prepare the Fabric
Press your fabric before cutting. Wrinkles are not charming here; they make measurements less accurate and seams less tidy. Cut your main fabric pieces and interfacing pieces to the same size. Fuse the interfacing to the wrong side of the fabric according to the manufacturer’s directions. Usually, this means placing the adhesive side against the fabric, pressing with heat, lifting the iron instead of sliding it, and letting the piece cool before handling.
Pressing matters throughout this project. Sewing beginners sometimes treat the iron like an optional guest. It is not. The iron is the quiet overachiever that makes your handmade item look crisp, flat, and giftable. Press seams as you go, and your lip balm holder will look much cleaner.
Step-by-Step: How to Make a Custom Fabric Lip Balm Holder
Step 1: Make the Keyring Tab
Take the small tab strip and place it wrong side up. Fold both long edges toward the center and press. Then fold the strip in half lengthwise again, enclosing the raw edges inside. Press well. Stitch along both long edges if you want a neat, durable tab. Slide the key ring or swivel clasp onto the tab, then fold the tab in half.
This tab is what allows the holder to attach to keys, bags, or backpacks. If you want a stronger tab, use interfacing or a slightly heavier fabric. If you plan to sell these at craft fairs, reinforced tabs are worth the extra minute because people will tug on them like they are testing climbing gear.
Step 2: Place the Main Fabric Pieces
Put the two main fabric pieces right sides together. The pretty sides should face each other. Place the folded tab between the two layers near the top edge, with the raw ends of the tab lined up with the raw edge of the fabric. The hardware should be inside the fabric sandwich, away from the seam edge.
Clip or pin the layers in place. Make sure the tab is centered and secure. This is one of the few moments in the project where a little patience prevents a lot of muttering later.
Step 3: Sew Around the Holder
Using a straight stitch, sew around the fabric rectangle with about a 1/4-inch seam allowance. Leave a small opening along one side or at the bottom for turning. Backstitch at the beginning and end to strengthen the seam. A reverse stitch is useful because it helps secure your stitches and keeps the seam from unraveling during turning and daily use.
Keep your stitches slow and steady, especially near the tab area. Because the project is small, speed is not your friend. The sewing machine may be capable of racing, but this is not the Kentucky Derby. Slow sewing gives you more control and cleaner corners.
Step 4: Trim the Corners and Turn Right Side Out
Trim the corners carefully without cutting through the stitching. This reduces bulk and helps the corners look sharper after turning. Turn the holder right side out through the opening. Use a turning tool, chopstick, or capped pen to gently push out the corners. Do not stab the fabric like you are interrogating it. Gentle pressure works best.
After turning, press the piece flat. Fold the raw edges of the opening inward so they line up neatly with the sewn edges. Press again. At this point, your project will start looking like a real accessory rather than a tiny fabric envelope with ambitions.
Step 5: Fold the Bottom Up to Create the Pocket
Place a lip balm tube on the fabric piece to check the pocket height. Fold the bottom edge upward so it covers most of the tube, leaving enough space at the top to grab the lip balm easily. A good pocket depth usually covers about two-thirds to three-quarters of the tube.
Clip the folded pocket in place. Check that the lip balm fits before sewing. This test fit is important because a small difference in seam allowance or fabric thickness can change the final fit. If the pocket feels too tight, fold it slightly lower. If it feels too loose, fold it higher or sew closer along the side edges.
Step 6: Topstitch the Sides
Topstitch around the holder, sewing down one side, across the bottom, and up the other side. This closes the turning opening and forms the lip balm pocket at the same time. Keep the stitching close to the edge, around 1/8 inch if you can manage it. If that feels too stressful, use a slightly wider topstitch. Handmade does not mean perfect; it means made with intention and occasionally coffee.
Do not sew across the top opening of the pocket. That would create a very secure holder for absolutely nothing, which is technically impressive but not useful. After topstitching, slide the lip balm into the pocket and check the fit.
Customizing Your Fabric Lip Balm Holder
The basic holder is simple, but customization is where it becomes fun. You can use seasonal fabric for stocking stuffers, floral prints for spring gifts, school colors for backpacks, or tiny food prints for anyone who thinks tacos belong on everything. You can also mix two fabrics: one for the outside and one for the inside pocket. Contrast topstitching can add a decorative touch, while matching thread creates a cleaner look.
Add a Name or Monogram
If you have an embroidery machine, add a small monogram before assembling the holder. If not, use iron-on vinyl, fabric stamps, or a small letter patch. Keep decoration away from seam allowances and fold lines so it does not disappear into the construction. A single initial on the pocket can make the holder feel personalized without overcrowding the tiny space.
Use a Swivel Clasp Instead of a Key Ring
A swivel clasp makes the holder easy to clip onto a backpack, purse, diaper bag, belt loop, or zipper pull. A plain split key ring is cheaper and works well for keychains. For gifts, swivel clasps often feel a little more polished. For kids, clips may be easier to attach to school bags, but make sure the hardware is sturdy and age-appropriate.
Make a Matching Set
Once you understand the process, make matching accessories. A lip balm holder pairs nicely with a tissue pouch, coin purse, lanyard, key fob, reusable snack bag, or mini hand sanitizer holder. Matching sets are great for teacher gifts, bridesmaid bags, craft fairs, holiday baskets, and “I forgot your birthday but I can sew fast” emergencies.
Common Mistakes and How to Fix Them
The Lip Balm Is Too Tight
If the tube barely fits, the seam allowance may be too wide or the fabric may be too thick. Next time, sew with a slightly narrower seam allowance or cut the main pieces a little wider. For this holder, even 1/8 inch can make a noticeable difference. Small projects are dramatic like that.
The Lip Balm Falls Out
If the holder is too loose, increase the pocket height or stitch slightly farther in from the edge. You can also add a snap, elastic loop, or small flap if you want extra security. For everyday use, a snug pocket is usually enough, but active users may prefer a closure.
The Corners Look Bulky
Trim the seam allowance at the corners before turning, but do not cut through the stitches. Press carefully after turning. If the fabric is heavy, reduce bulk by using lighter interfacing or skipping interfacing on the tab.
The Tab Feels Weak
Reinforce the tab with interfacing, sew multiple rows of stitching, or use a stronger fabric. Always backstitch over the tab area because that spot receives the most pulling. A pretty holder is nice, but a pretty holder that detaches and escapes into the parking lot is less nice.
Creative Gift Ideas for Fabric Lip Balm Holders
A custom fabric lip balm holder is a fantastic small gift because it is practical, inexpensive, and easy to personalize. Add a new lip balm tube and package it with a handwritten tag. For teachers, use pencil, apple, book, or school-themed fabric. For coworkers, choose modern prints or neutral colors. For kids, try dinosaurs, stars, animals, sports, rainbows, or favorite color combinations.
During the holidays, make a batch using Christmas, winter, or plaid fabric and tuck them into stockings. For summer, choose bright fruit prints and pair them with SPF lip balm. For bridesmaids, match the fabric to the wedding colors. For craft fairs, display them clipped to a small board or basket so shoppers can see the variety at a glance.
This project is also a smart way to use leftover fabric from larger sewing projects. If you made a tote bag, apron, quilt, or pajama pants, use the scraps to create matching lip balm holders. It gives leftover fabric a purpose and makes your handmade work feel coordinated.
Beginner Sewing Tips for a Cleaner Finish
Use a fresh needle if your stitches look uneven. A universal needle works well for quilting cotton. Match your thread color to the fabric if you want mistakes to blend in. Use clips instead of pins if the fabric layers feel small and slippery. Press after every major step. Most importantly, sew slowly around corners and near the tab.
Test your stitch length on a scrap before sewing the final piece. A medium stitch length works well for cotton fabric. If stitches are too tiny, turning the holder can stress the seam. If they are too long, the seam may not feel secure. A balanced straight stitch gives the project strength without making the fabric pucker.
When topstitching, focus on guiding the fabric rather than pushing it. Let the feed dogs move the fabric through the machine. Your job is to steer, not shove. This one habit improves almost every sewing project, from tiny lip balm holders to tote bags and pillow covers.
Experience Notes: What I Learned Making Fabric Lip Balm Holders
The first thing you learn when making a custom fabric lip balm holder is that small projects are not always easier just because they are small. They are faster, yes. They use less fabric, absolutely. But they also require accuracy because tiny seams have very little room for chaos. If your cutting is crooked, the finished holder will politely announce it to the world. That is why careful measuring, pressing, and clipping make such a difference.
One useful experience is to make the first holder as a test version. Use fabric you like but are not emotionally attached to. Do not begin with the precious designer scrap you have been saving since the dawn of your sewing journey. Make one sample, test the fit with your favorite lip balm brand, and adjust the measurements if needed. Once the fit is right, then you can confidently cut into the fancy fabric.
Another lesson is that interfacing changes everything. Without interfacing, quilting cotton can feel too soft, especially after the lip balm tube goes in and out several times. With lightweight fusible interfacing, the holder feels more stable and gift-worthy. However, too much interfacing can make the project bulky, especially at the corners and tab. The best result usually comes from a light structure rather than heavy stiffness.
The tab deserves more attention than beginners expect. It is easy to focus on the pocket and forget that the tab is the part doing the daily work. It gets clipped, pulled, tossed into bags, grabbed from hooks, and occasionally yanked by someone in a hurry. Reinforcing the tab area with backstitching is a small step that prevents future disappointment. If making holders for kids’ backpacks, extra stitching around the tab is especially smart.
Fabric choice also affects the final personality of the holder. Tiny prints often look best because the project is small. Large florals, oversized graphics, or big novelty motifs may get cut off in awkward places. Nobody wants half a cat face unless the theme is “mysterious feline witness.” Small-scale dots, gingham, mini florals, stars, stripes, and scattered novelty prints tend to work beautifully.
Batch sewing is another helpful trick. If you plan to make several holders, cut all fabric and interfacing first, fuse everything at once, sew all tabs, then assemble each holder. This assembly-line approach saves time and keeps your work consistent. It is also more satisfying because suddenly you have ten finished gifts and can briefly pretend you are a handmade-product factory with excellent taste.
For gifting, presentation matters. A simple kraft tag, ribbon, or small card can make a fabric lip balm holder feel boutique instead of last-minute. Insert a new lip balm tube, clip the holder to the card, and write a short note such as “For emergency lip rescue.” It is practical, personal, and charming without being expensive.
Finally, do not chase perfection too aggressively. A handmade lip balm holder should be neat and functional, but it does not need to look machine-manufactured. Slight variations are part of handmade charm. What matters most is that the seams are secure, the tube fits well, the tab is strong, and the fabric makes someone smile. If it saves one lip balm from disappearing into the couch, it has already fulfilled its heroic destiny.
Conclusion
Learning how to make a custom fabric lip balm holder is a simple sewing win with a big payoff. This project teaches useful beginner skills such as cutting accurately, applying fusible interfacing, sewing straight seams, turning corners, topstitching, and attaching hardware. It is quick enough for an afternoon, affordable enough for batch sewing, and customizable enough for nearly any occasion.
Whether you are making one for yourself, stitching gifts for friends, preparing teacher appreciation presents, or building inventory for a craft booth, a DIY fabric lip balm holder is a practical accessory that people actually use. Choose sturdy cotton, press carefully, reinforce the tab, test the fit, and have fun with the fabric. Your lip balm finally gets a home, and your scrap pile gets a second chance at greatness.