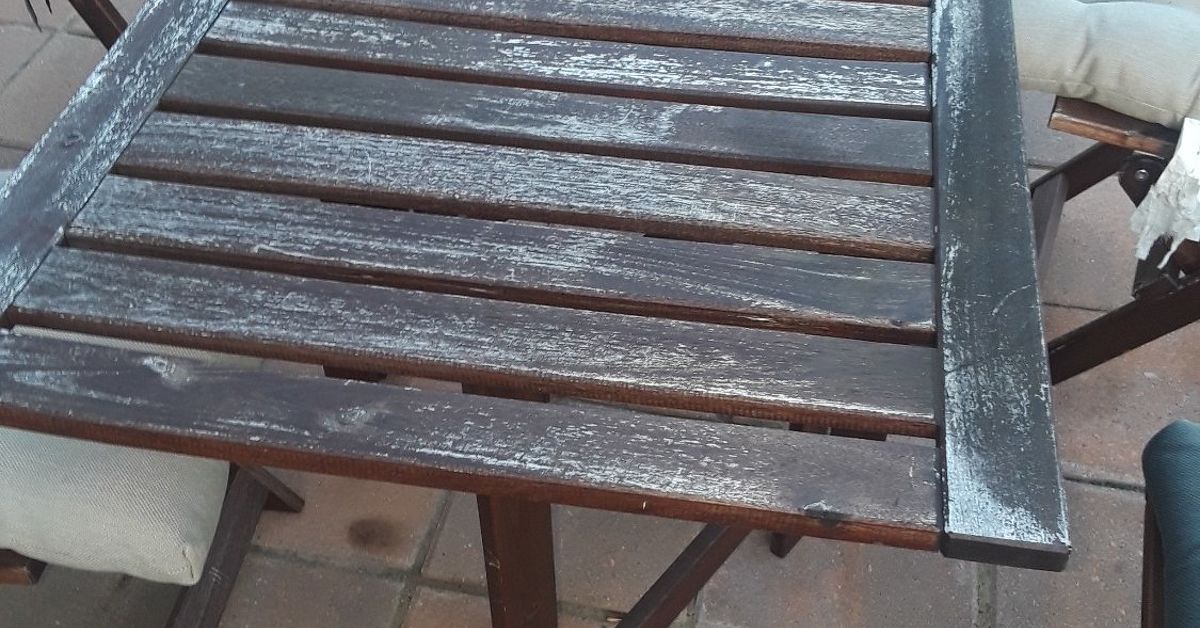
There comes a moment in every patio table’s life when it stops saying “outdoor dining oasis” and starts whispering “abandoned campground snack station.” If your IKEA outdoor table has gone gray, patchy, dry, sticky, faded, or suspiciously crunchy around the edges, don’t haul it to the curb yet. Most IKEA wooden outdoor tables, especially popular acacia pieces from lines like NÄMMARÖ and older ÄPPLARÖ styles, are built to be refreshed. They simply need cleaning, light repair, sanding, fresh stain, and a little weather protection.
This guide walks you through how to redo an IKEA outdoors table in a practical, beginner-friendly way. We’ll cover how to identify the table’s condition, choose the right finish, sand without turning your table into modern art, apply stain evenly, and maintain the table so it survives sun, rain, spilled lemonade, and at least one person who insists on setting a wet glass directly on the wood.
Why IKEA Outdoor Tables Fade in the First Place
IKEA outdoor wood furniture is often made from solid acacia or eucalyptus, both commonly used outdoors because they are dense, durable woods. Many pieces are pre-treated with wood stain before purchase, which gives them that warm, fresh-from-the-catalog color. But outdoor furniture lives a dramatic life. It faces ultraviolet rays, rain, temperature swings, pollen, dust, bird surprises, barbecue smoke, and the occasional rogue sprinkler.
Over time, the protective stain thins out. When that happens, water no longer beads on the surface; it sinks in. The wood may turn gray, feel rough, show small cracks, or look uneven. That does not always mean the table is ruined. It usually means the finish has retired and moved to Florida.
Before You Start: Inspect the Table
Before buying supplies, take five minutes to inspect the table carefully. Look at the tabletop, legs, edges, screw areas, and underside. The underside matters because moisture often hides there like it pays rent.
Check for Structural Problems
Tighten loose bolts, screws, and brackets. IKEA outdoor tables are usually easy to disassemble or adjust, which is helpful when refinishing. If the table wobbles, fix that first. A beautiful finish on a shaky table is like putting a tuxedo on a raccoon: memorable, but not ideal.
Look for Rot, Deep Cracks, or Splintering
Small surface cracks and rough spots can be sanded and filled. Deep rot, soft wood, or large splitting may require replacement parts or a more serious repair. Press the wood gently with a screwdriver in hidden areas. If it feels spongy, the wood may be too damaged for a simple refinish.
Do the Water-Bead Test
Sprinkle a few drops of water on the tabletop. If the droplets bead up, the finish still has some life. If the water soaks in quickly and darkens the wood, it is time to re-stain. This simple test is one of the easiest ways to know whether your IKEA outdoor table needs attention.
Supplies You’ll Need
You do not need a professional workshop to redo an IKEA outdoor table. A driveway, balcony, garage, or shaded patio can work as long as you have ventilation and enough room to move around.
- Mild dish soap or outdoor wood cleaner
- Bucket of warm water
- Soft brush or sponge
- Clean rags or microfiber cloths
- Drop cloth or plastic sheeting
- Painter’s tape, if protecting metal or plastic parts
- Sandpaper: 80, 120, 150, and 180 or 220 grit
- Sanding block or random orbital sander
- Exterior-grade wood filler, if needed
- Tack cloth or vacuum
- Exterior wood stain, outdoor furniture oil, or stain-and-sealer
- Brush, stain pad, or lint-free applicator cloth
- Gloves, eye protection, and a dust mask or respirator
Step 1: Clean the Table Thoroughly
Start with cleaning. This is not the glamorous part, but it is the part that decides whether your new finish bonds properly or peels off in defeat. Mix mild soap with warm water and scrub the table with a soft brush or sponge. Focus on grime, pollen, sticky food residue, and the mysterious gray film that appears after a season outdoors.
Rinse with clean water, but avoid blasting the table with an aggressive pressure washer. High pressure can raise the grain, force water into joints, and damage softer areas. After washing, let the table dry completely. Depending on humidity and weather, this can take 24 to 48 hours. Do not rush. Staining damp wood is like painting over a puddle and hoping for a miracle.
Step 2: Remove Old Flaking Finish
If your IKEA outdoor table has peeling stain, chipped paint, or uneven glossy patches, remove the loose finish before sanding. You can use a plastic scraper for lifting flakes. For stubborn areas, a furniture-safe stripper may help, but many IKEA outdoor tables only need sanding because the original finish is usually thin.
If using any chemical stripper, work outdoors or in a very well-ventilated area. Follow the manufacturer’s instructions exactly. Wear gloves and eye protection. “I’ll just wing it” is not a safe refinishing strategy, although it is a popular way to create regrettable garage stories.
Step 3: Sand the Table Smooth
Sanding is where the makeover really begins. For heavily weathered wood, start with 80-grit sandpaper to remove roughness and old finish. Then move to 120 grit, followed by 150 or 180 grit. For a smoother final feel, you can finish with 220 grit, but avoid polishing the surface so much that the stain cannot penetrate.
Always sand with the grain of the wood. On slatted IKEA tables, sand each board individually and pay attention to edges, corners, and gaps. A sanding sponge is useful for rounded corners and tight spaces. If using an orbital sander, keep it moving and avoid digging into one spot.
How Much Should You Sand?
You do not need to remove every trace of the original color unless you want a completely new stain tone. For a refresh, sand until the surface feels even, dry gray fibers are removed, and loose finish is gone. For a dramatic color change, you will need more thorough sanding so the new stain absorbs consistently.
Step 4: Repair Small Cracks and Holes
After sanding, inspect the surface again. Fill small holes, dents, or cracks with exterior-grade wood filler. Choose a stainable filler if you plan to use transparent or semi-transparent stain. Let the filler dry according to the product directions, then sand it smooth.
For outdoor furniture, less filler is often better. Large filler patches may absorb stain differently from the surrounding wood. If the table has character marks, you can leave some of them. A patio table should look refreshed, not like it has been airbrushed for a dating profile.
Step 5: Clean Off Every Bit of Dust
Dust is the enemy of a smooth finish. Vacuum the table, wipe it with a clean damp cloth, and use a tack cloth for final dust removal. Check the gaps between slats and underneath the tabletop. Any leftover sanding dust can create rough spots or cloudy patches in the stain.
Step 6: Choose the Best Finish for an IKEA Outdoor Table
The best finish depends on the look you want and how much maintenance you are willing to do. IKEA often recommends re-staining wooden outdoor furniture regularly to prevent drying, cracking, and moisture penetration. For most IKEA acacia tables, an exterior wood stain or outdoor furniture oil is the easiest route.
Option 1: Clear Outdoor Wood Oil
A clear outdoor wood oil keeps the table looking natural and warm. It is easy to apply and simple to refresh later. The tradeoff is that it may need more frequent maintenance, especially in full sun or wet climates.
Option 2: Semi-Transparent Exterior Stain
Semi-transparent stain adds color while still showing the wood grain. This is a great choice if your IKEA table has faded but the wood is still attractive. Light brown, teak, cedar, and acacia tones usually work well.
Option 3: Solid Exterior Stain
Solid stain covers more imperfections and gives the table a painted look while still being designed for exterior wood. Choose this if the tabletop is blotchy, uneven, or beyond the “natural wood glow-up” stage.
Option 4: Spar Urethane or Exterior Varnish
A spar urethane or exterior varnish creates a protective film over the wood. It can look beautiful, but film finishes may peel when they fail and can be more work to repair. For a table that lives uncovered in harsh weather, a penetrating outdoor stain or oil is often easier to maintain.
Step 7: Test the Stain First
Always test your stain on the underside of the table or a hidden area. IKEA acacia can absorb stain unevenly if the old finish remains in some spots. Testing helps you avoid surprise colors like “orange deck disaster” or “espresso regret.”
Let the test area dry fully before judging the color. Wet stain often looks darker and richer than the final result. If the color is too light, add another coat. If it is too dark, choose a lighter stain before committing to the whole table.
Step 8: Apply the Stain or Oil
Work in the shade on a dry day. Avoid direct sunlight, high humidity, extreme heat, and rain in the forecast. Many exterior finishes perform best in mild temperatures, often around 50 to 90 degrees Fahrenheit, but always follow the label on your specific product.
Apply the stain in thin, even coats. Use a brush for edges and gaps, and a stain pad or lint-free cloth for flat surfaces. Work with the grain and keep a wet edge to avoid lap marks. On slatted tables, stain one board at a time from end to end.
If using oil, let it soak in for the recommended time, then wipe off the excess. Do not leave puddles. Excess oil can become sticky and attract dirt. If using exterior stain, follow the recommended recoat window. Two thin coats are usually better than one thick coat. Thick coats can dry unevenly, peel, or look like pancake syrup had a design opinion.
Step 9: Let the Table Cure
Drying and curing are not the same. A finish may feel dry to the touch in a few hours, but it may need a day or several days before it is ready for regular use. Keep the table protected from rain, leaves, dust, pets, and enthusiastic family members who want to “just check if it’s dry.”
Before placing dishes, planters, or decorations on the table, read the finish label for cure time. If you use the table too soon, items can leave marks or stick to the surface.
Design Ideas for Redoing an IKEA Outdoor Table
Redoing an IKEA outdoor table does not have to mean simply restoring it to its original color. You can use the project as a small patio design upgrade.
Warm Natural Refresh
Use a clear or light brown outdoor oil to revive the acacia tone. Pair it with cream cushions, black planters, and a striped umbrella for a relaxed modern look.
Dark Café Style
Choose a darker semi-transparent stain, such as walnut or espresso, for a bistro-inspired feel. This works especially well with metal chairs, string lights, and potted herbs.
Coastal Gray Finish
If the wood is already weathered gray, lean into it with a soft gray exterior stain. Add white cushions, blue accents, and woven placemats. Suddenly your patio says “beach house,” even if the nearest ocean is three states away.
Two-Tone Table Makeover
Stain the tabletop and paint the legs with exterior paint. Black legs with a warm wood top look modern and hide scuffs. White legs create a farmhouse patio feel. Just make sure any paint used is rated for exterior surfaces.
Common Mistakes to Avoid
Skipping the Cleaning Stage
Stain does not bond well to dirt, mildew, grease, or pollen. Clean first, refinish second. Your future self will thank you.
Sanding Too Aggressively
IKEA outdoor tables are often solid wood, but you still want to sand carefully. Over-sanding can create dips, uneven color, and rounded edges that were not part of the plan.
Staining in Direct Sun
Hot sunlight can cause stain to dry too quickly, leaving lap marks and uneven color. A shaded work area gives you more control.
Applying Too Much Product
More stain does not equal more protection. Thin, even coats are the goal. Wipe off excess oil and follow recoat times.
Forgetting the Underside
The underside of the table also faces humidity and temperature changes. It does not need to look showroom-perfect, but sealing or staining it helps protect the whole piece.
How to Maintain the Table After Redoing It
Once your IKEA outdoor table looks alive again, maintenance is simple. Clean it regularly with mild soap and water. Wipe spills promptly. Use coasters, placemats, or a table runner when serving food and drinks. Cover the table when not in use, especially during long rainy periods or winter weather.
Repeat the water-bead test every few months. If water starts soaking in instead of beading up, refresh the finish. Depending on your climate, sun exposure, and storage habits, you may need to re-stain once or twice a year. A covered porch table may last longer between touch-ups than a table sitting in full sun and rain.
Is Redoing an IKEA Outdoor Table Worth It?
In most cases, yes. A basic refresh is affordable, satisfying, and much cheaper than buying a new outdoor dining set. It also keeps usable furniture out of the landfill. That is a win for your wallet, your patio, and your reputation as the person who “totally meant to do this project last summer.”
The main exception is severe rot or structural damage. If the wood is soft, unstable, or splitting badly around fasteners, replacement may be safer. But if the issue is fading, dryness, roughness, or ugly color, a redo can make the table look dramatically better in a weekend.
Real-Life Experience: What Redoing an IKEA Outdoor Table Actually Feels Like
Redoing an IKEA outdoor table sounds simple when written as a list: clean, sand, stain, done. In real life, the project has a personality. It begins with optimism. You look at the table and think, “This will take two hours.” Then you discover pollen packed between the slats, one mystery sticky spot, and a screw that has apparently entered witness protection.
The first lesson is that cleaning takes longer than expected, but it is oddly satisfying. Once the gray film and dirt come off, you can finally see what condition the wood is in. Sometimes the table already looks 30 percent better after washing. That is the project’s way of encouraging you before sanding begins.
Sanding is the messy middle. It is not difficult, but it requires patience. On an IKEA slatted table, each board has edges, gaps, and end grain. The flat top goes quickly with an orbital sander, but the spaces between boards need hand sanding. This is where music helps. So does accepting that you will become lightly dusted like a powdered doughnut.
The most rewarding moment happens when the first coat of oil or stain touches the wood. Dry, tired acacia suddenly turns rich and warm again. The grain appears, the color deepens, and you feel like a furniture wizard. This is also the moment when you must resist applying too much product. Wipe off the excess. Keep it thin. The table wants protection, not frosting.
One practical experience-based tip: raise the table on scrap blocks if possible. It is much easier to stain the legs and lower edges when the table is slightly elevated. Another tip is to start with the underside or a hidden edge if you are nervous. By the time you reach the visible tabletop, your brush technique will be smoother.
Weather is the boss of this project. Choose a dry, mild day and check the forecast like you are planning a tiny outdoor wedding for your furniture. Rain too soon after staining can ruin the finish. Direct sun can make the stain dry too fast. Wind can blow leaves, dust, or one dramatic insect directly into your fresh coating. A shaded garage, covered patio, or calm morning is your friend.
The final lesson is that maintenance is easier than restoration. Once you have redone the table, do not wait until it looks abandoned again. Clean it occasionally, cover it when storms roll in, and refresh the finish when water stops beading. A quick maintenance coat is far less work than a full sanding marathon. Your table will stay better-looking, and you will not have to negotiate with 80-grit sandpaper every spring.
In the end, redoing an IKEA outdoor table is one of those DIY projects that gives a big visual payoff without requiring expert skills. It is approachable, budget-friendly, and forgiving. Even if the result is not perfect, it will almost certainly look better than the faded, thirsty table you started with. And once it is done, you get the best reward: sitting outside with a drink, admiring your work, and casually telling guests, “Oh, I refinished that.” Say it modestly. You earned the moment.
Conclusion
Redoing an IKEA outdoors table is a smart way to extend the life of your patio furniture and refresh your outdoor space without spending a fortune. Start by inspecting the table, cleaning it thoroughly, sanding with care, repairing small flaws, and choosing an exterior finish that matches your style and maintenance habits. For most IKEA acacia tables, outdoor wood oil or exterior stain is the easiest and most practical solution.
The secret is preparation. A clean, dry, evenly sanded table will accept stain better and look more professional. Work in good weather, apply thin coats, respect drying times, and protect the table afterward with regular cleaning and a cover. With a weekend of effort, your faded IKEA table can go from “please don’t look too closely” to “dinner outside tonight?”
Note: This article synthesizes practical refinishing guidance from real outdoor furniture care recommendations, exterior wood stain instructions, DIY furniture restoration methods, and IKEA-style maintenance best practices for wood patio furniture.