A ribbon chandelier is one of those DIY home decor projects that looks like it requires a design degree, a secret crafting society membership, and possibly a small parade permit. Good news: it does not. With ribbon, a hoop or wreath form, a few basic tools, and a little patience, you can create a floating, colorful statement piece for a birthday party, nursery, bridal shower, holiday table, patio dinner, photo backdrop, or any corner of the house that has been looking a bit too “blank wall, sad vibes.”
Before we begin, let’s clear up one important detail: this tutorial is for a decorative ribbon chandelier, not a hardwired electrical fixture. You can add battery-operated fairy lights if you want a soft glow, but the ribbon should never touch a hot bulb, candle flame, or exposed wiring. Ribbon is charming. Ribbon is not fireproof magic.
This guide walks you through a classic tiered ribbon chandelier using metal wreath forms or embroidery hoops, plus practical styling tips, safety notes, troubleshooting advice, and real-world experience from making and hanging these fluttery beauties. By the end, you will know exactly how to make a ribbon chandelier that looks polished, balanced, and intentionally designednot like a ribbon drawer had a dramatic incident.
What Is a Ribbon Chandelier?
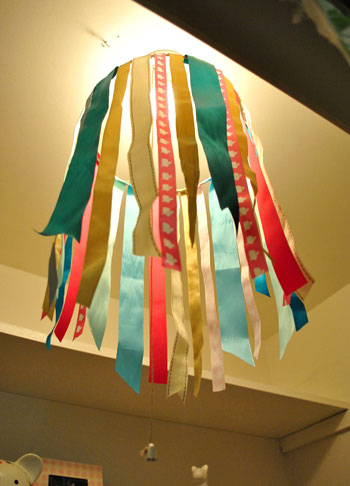
A ribbon chandelier is a hanging decorative piece made from ribbon strands attached to a circular frame. The ribbons hang downward to create movement, texture, and color. Some designs use one hoop for a simple canopy effect, while others use two or three hoops to create a cascading chandelier shape. The look can be playful, elegant, bohemian, patriotic, romantic, seasonal, or wonderfully over-the-top, depending on the ribbon colors and materials you choose.
Ribbon chandeliers are popular for party decor because they are lightweight, inexpensive, customizable, and reusable. They also work well in permanent home styling when made with neutral colors, satin ribbon, velvet ribbon, grosgrain ribbon, lace, macrame cord, or fabric strips. Think of it as a chandelier’s crafty cousinthe one who arrives with scissors, snacks, and excellent color coordination.
Materials You’ll Need
You can make a ribbon chandelier with craft-store basics. The exact amount of ribbon depends on the size of your hoop and how full you want the finished piece to look.
Basic Supplies
- One large metal wreath form, embroidery hoop, or lightweight craft hoop, about 14 to 24 inches wide
- One smaller hoop, about 8 to 12 inches wide, if making a two-tier chandelier
- Ribbon in several colors, widths, or textures
- Sharp fabric scissors
- Measuring tape or ruler
- Floral wire, clear fishing line, thin cord, or strong string
- Hot glue gun or fabric glue
- Ceiling hook, removable ceiling hook, curtain rod, branch, or event frame for hanging
- Optional: battery-operated fairy lights, tassels, beads, faux flowers, paper butterflies, ornaments, or bows
How Much Ribbon Do You Need?
For a full-looking 18-inch hoop, plan on about 60 to 100 yards of ribbon. That sounds like a lot until you start cutting strands and realize ribbon disappears faster than cookies at a craft night. If you want a lighter, airier look, use fewer strands and space them farther apart. If you want a lush, waterfall effect, attach the ribbons close together and mix narrow and medium-width ribbon.
A simple formula helps: measure your hoop circumference, decide how close each ribbon strand should sit, then multiply by the strand length. For example, an 18-inch hoop has a circumference of about 56 inches. If you place one ribbon strand every half inch, you will need roughly 112 strands. If each strand is 28 inches long, that is about 87 yards of ribbon. Add extra for mistakes, bows, and the inevitable “just one more color” moment.
Choosing the Best Ribbon for a DIY Ribbon Chandelier
The ribbon you choose controls the personality of the chandelier. Satin ribbon creates a smooth, polished look. Grosgrain ribbon adds structure and subtle texture. Velvet ribbon feels rich and cozy, especially for holidays or winter events. Sheer organza ribbon gives a dreamy, airy effect. Lace ribbon works beautifully for weddings, nurseries, and romantic bedrooms. Wired ribbon holds shape well, especially for bows and sculpted loops, but it can look bulky if used for every hanging strand.
For the best result, mix two or three textures rather than using only one. A white satin ribbon chandelier is pretty. A white satin, ivory lace, and pale champagne organza chandelier? That is the decorative equivalent of speaking fluent elegance.
Color Ideas That Always Work
- Soft nursery: blush, cream, peach, pale lavender, and white
- Birthday party: rainbow colors, hot pink, yellow, turquoise, and orange
- Wedding shower: ivory, champagne, sage green, and dusty rose
- Holiday decor: red, green, gold, velvet burgundy, navy, or silver
- Patriotic party: red, white, and blue ribbons in alternating lengths
- Boho style: cream cotton ribbon, macrame cord, jute, and natural linen strips
- Modern home decor: black, white, tan, taupe, and metallic gold accents
Step-by-Step: How To Make A Ribbon Chandelier
Step 1: Decide on the Shape
Start by choosing between a single-tier or two-tier ribbon chandelier. A single-tier chandelier uses one hoop and is best for quick party decorations, small bedrooms, playrooms, and table centerpieces. A two-tier chandelier uses a larger hoop on top and a smaller hoop below, creating a more dramatic cascading shape.
If this is your first attempt, begin with a single hoop. You can always graduate to the two-tier version later and proudly tell people, “Yes, I am now advanced in ribbon architecture.”
Step 2: Prepare the Hoop
If you are using a metal wreath form, check for sharp edges or rough spots. If you are using an embroidery hoop, tighten the screw and make sure the ring is sturdy. You can spray-paint the hoop, wrap it with ribbon, or leave it plain if the ribbons will cover it completely.
For a clean finish, wrap the hoop with a base ribbon before adding the hanging strands. Add a dot of hot glue to secure the starting point, wrap the ribbon around the frame, and glue the end in place. This step hides the frame and makes the chandelier look finished from every angle.
Step 3: Cut the Ribbon Strands
Decide how long you want the ribbons to hang. For a chandelier above a party table, 24 to 30 inches is usually enough. For a dramatic photo backdrop, try 36 to 48 inches. For a nursery or bedroom corner, keep the ribbon high enough that children and pets cannot pull on it.
Cut the ribbons slightly longer than needed because knots, folds, and trimming will shorten them. For a layered look, cut some strands at 24 inches, some at 30 inches, and a few at 36 inches. Different lengths create movement and prevent the bottom edge from looking too stiff.
Step 4: Prevent Fraying
Ribbon edges can fray, especially satin and organza. Cut the ends at a diagonal or into a small inverted “V” shape for a finished look. You can also dab the edges with a small amount of fray-check solution or clear fabric glue. Avoid using an open flame to seal ribbon unless you are experienced and working with a safe synthetic ribbon in a controlled setting. For most crafters, scissors and fabric glue are the calmer, less dramatic option.
Step 5: Attach the Ribbons to the Hoop
The easiest method is a lark’s head knot. Fold one ribbon strand in half, place the loop over the hoop, pull the ribbon tails through the loop, and tighten gently. This creates a neat knot and lets the two tails hang evenly.
You can also tie each ribbon with a simple double knot, especially if using narrow ribbon. If you want a completely smooth top edge, glue the ribbon ends around the hoop instead of knotting them. Glue gives a flatter finish, while knots add texture and make the chandelier easier to adjust later.
Work around the hoop in sections. Alternate colors as you go so the pattern stays balanced. Step back every few minutes to check the distribution. This is much easier than reaching the end and realizing all the pink ribbon is having a private party on one side.
Step 6: Add a Second Tier
To make a two-tier ribbon chandelier, cut three or four equal lengths of fishing line, floral wire, or strong cord. Tie them from the large top hoop down to the smaller bottom hoop. Keep the spacing even so the lower hoop hangs level.
Once the smaller hoop is attached, add shorter ribbons to it. The lower tier can match the top tier, or it can feature a lighter accent color. For example, a wedding chandelier might use ivory and champagne ribbons on the top hoop, then sheer white ribbon on the bottom hoop for a soft floating effect.
Step 7: Create the Hanger
Cut three or four equal lengths of clear fishing line, ribbon, or cord. Tie them evenly around the top hoop and gather them above the center. Tie the ends together in a strong knot or attach them to a metal ring. This creates a balanced hanger.
Before you hang the chandelier, hold it up and check whether it tilts. If one side dips, adjust the hanger lengths until the hoop sits level. A tilted ribbon chandelier can look whimsical, but usually in the “something went wrong at craft headquarters” way.
Step 8: Add Decorative Details
This is where your ribbon chandelier becomes personal. Add a large bow at the top, small tassels along the bottom edge, faux flowers tucked into the frame, paper stars for a birthday party, mini ornaments for Christmas, or wooden beads for a boho look.
If you want a soft glow, use battery-operated fairy lights. Wrap them loosely around the hoop or tuck the battery pack into a small pouch tied to the top. Keep lights away from ribbon piles, do not use damaged light strands, and turn the lights off when unattended.
How To Hang a Ribbon Chandelier Safely
A ribbon chandelier should be lightweight, but it still needs secure hanging. For temporary party decor, use a removable ceiling hook rated for more weight than your chandelier. For a permanent display, use a ceiling hook installed into a joist or appropriate anchor. If hanging outdoors, protect it from wind and moisture, and take it down after the event.
Never hang a ribbon chandelier over candles, stovetops, fireplaces, space heaters, or hot light bulbs. If you are decorating an existing chandelier, keep ribbon away from bulbs and electrical parts. LED bulbs run cooler than traditional incandescent bulbs, but “cooler” does not mean “safe to bury in ribbon.” Leave breathing room.
For children’s rooms, nurseries, and play spaces, hang the chandelier high and out of reach. Avoid beads, small ornaments, or loose parts if toddlers are nearby. Pretty decor is wonderful; surprise choking hazards are not part of the aesthetic.
Styling Ideas for Every Occasion
Birthday Party Ribbon Chandelier
Use bright satin and grosgrain ribbon in the party colors. Add curled ribbon, paper circles, or mini balloons tied near the hoop. Hang it above a cake table or gift station to create an instant focal point.
Wedding or Bridal Shower Ribbon Chandelier
Choose ivory, champagne, blush, and soft green ribbons. Add lace and pearl-like beads sparingly for a romantic look. A two-tier chandelier looks especially pretty over a dessert table or guest book area.
Nursery Ribbon Chandelier
Use soft pastels, white cotton ribbon, and lightweight lace. Keep the design simple, washable, and securely hung. Avoid long strands near cribs, changing tables, or anywhere a child could reach.
Holiday Ribbon Chandelier
For Christmas, try velvet ribbon in burgundy, forest green, navy, and gold. For the Fourth of July, use red, white, and blue ribbons cut in staggered lengths. For Halloween, use black, orange, purple, and a little metallic ribbon for spooky sparkle without going full haunted mansion.
Boho Ribbon Chandelier
Mix cream ribbon, cotton strips, macrame cord, jute twine, and wooden beads. Keep the palette natural and relaxed. Uneven ribbon lengths actually help this style feel handmade and organic.
Common Mistakes and How To Fix Them
The Chandelier Looks Too Sparse
Add more ribbon strands, especially around the front and sides. If you are running low on ribbon, fill gaps with lace, yarn, fabric strips, or curling ribbon in coordinating colors.
The Colors Look Uneven
Remove a few strands and redistribute them. A simple repeating patternpink, white, gold, pink, white, goldusually solves the problem quickly.
The Hoop Tilts
Adjust the hanging cords. Make sure they are tied at equal distances around the hoop. If one decorative section is heavier, move some embellishments to the opposite side.
The Ribbon Ends Look Messy
Trim the strands while the chandelier is hanging. This helps you see the final shape. Use sharp scissors and cut at an angle, in a V shape, or in gentle waves for a softer finish.
The Glue Shows
Cover glue spots with a wrapping ribbon, small bows, faux greenery, or decorative trim. Crafting is partly about problem-solving and partly about stylishly hiding evidence.
Experience Notes: What I Learned Making Ribbon Chandeliers
The first thing you learn when making a ribbon chandelier is that ribbon has opinions. Satin wants to slip. Organza wants to float away like it has a meeting elsewhere. Wired ribbon wants to bend dramatically, even when you asked it politely not to. That is why the best approach is to test a few strands before cutting the whole pile. Tie three or four ribbons to the hoop, hang it from a doorknob or cabinet handle, and see how the materials behave. This tiny test can save you from cutting 90 strands at the wrong length, which is the kind of crafting tragedy that requires coffee and a small emotional reset.
Another useful lesson: fullness matters more than perfection. When you look closely at a ribbon chandelier, you may notice one strand is shorter, one knot is chunkier, and one ribbon has twisted backward. Once the chandelier is hanging and moving gently, nobody sees those tiny details. They see color, softness, and motion. The overall effect is what counts. In fact, slight variation often makes the piece look more expensive because it feels layered rather than factory-flat.
It also helps to think about where the chandelier will be viewed from. If it hangs over a dining table, people will see the underside, so the inner hoop and knots should look neat. If it hangs against a wall as a backdrop, focus the fullest ribbons toward the front. If it is for photos, test it with your phone camera before the event. Some ribbons look gorgeous in person but reflect harshly in photos, especially shiny metallics. A little metallic ribbon is lovely; too much can make your pictures look like a disco ball attended a baby shower.
Transporting a ribbon chandelier is another adventure. The easiest method is to lay it flat in a large box or hang it from a garment rack in the car. Do not stuff it into a bag unless you enjoy detangling ribbon like a patient wizard. If the ribbons wrinkle, hang the chandelier in a bathroom while a hot shower runs nearby, keeping it away from direct water. The steam can relax light creases. For stubborn wrinkles, use a garment steamer carefully and test one ribbon first.
Finally, give yourself more time than you think. The project is easy, but repetitive. Cutting, trimming, tying, and balancing take patience. Put on music, sort the ribbon by color, and work in batches. The process becomes surprisingly relaxing once you get into a rhythm. And when you finally hang the finished chandelier, there is a very real “I made that” moment. It is cheerful, inexpensive, personal, and just fancy enough to make guests ask where you bought it. That is your cue to smile modestly and say, “Oh, this little thing?” while silently accepting your crown as ruler of ribbon decor.
Conclusion
Learning how to make a ribbon chandelier is a simple way to turn basic craft supplies into a memorable decorative centerpiece. With a hoop, ribbon, careful measuring, and secure hanging, you can create a custom piece for parties, holidays, weddings, nurseries, patios, or everyday home decor. The best ribbon chandeliers combine color, texture, movement, and safety. Start with a strong frame, choose ribbons that match your theme, cut them in varied lengths, attach them evenly, and finish with bows, tassels, flowers, or battery-operated lights if desired.
The beauty of this project is that it does not need to be perfect to be beautiful. A few uneven strands add charm. A mix of textures adds depth. A handmade bow adds personality. Whether you make a soft ivory chandelier for a bridal shower or a rainbow version for a birthday party, the result feels festive, personal, and wonderfully affordable.
Note: This article is intended for decorative DIY guidance. If adding lights, use only safe, battery-operated or properly rated LED products, keep ribbon away from heat sources, and never use ribbon near open flames or exposed electrical components.