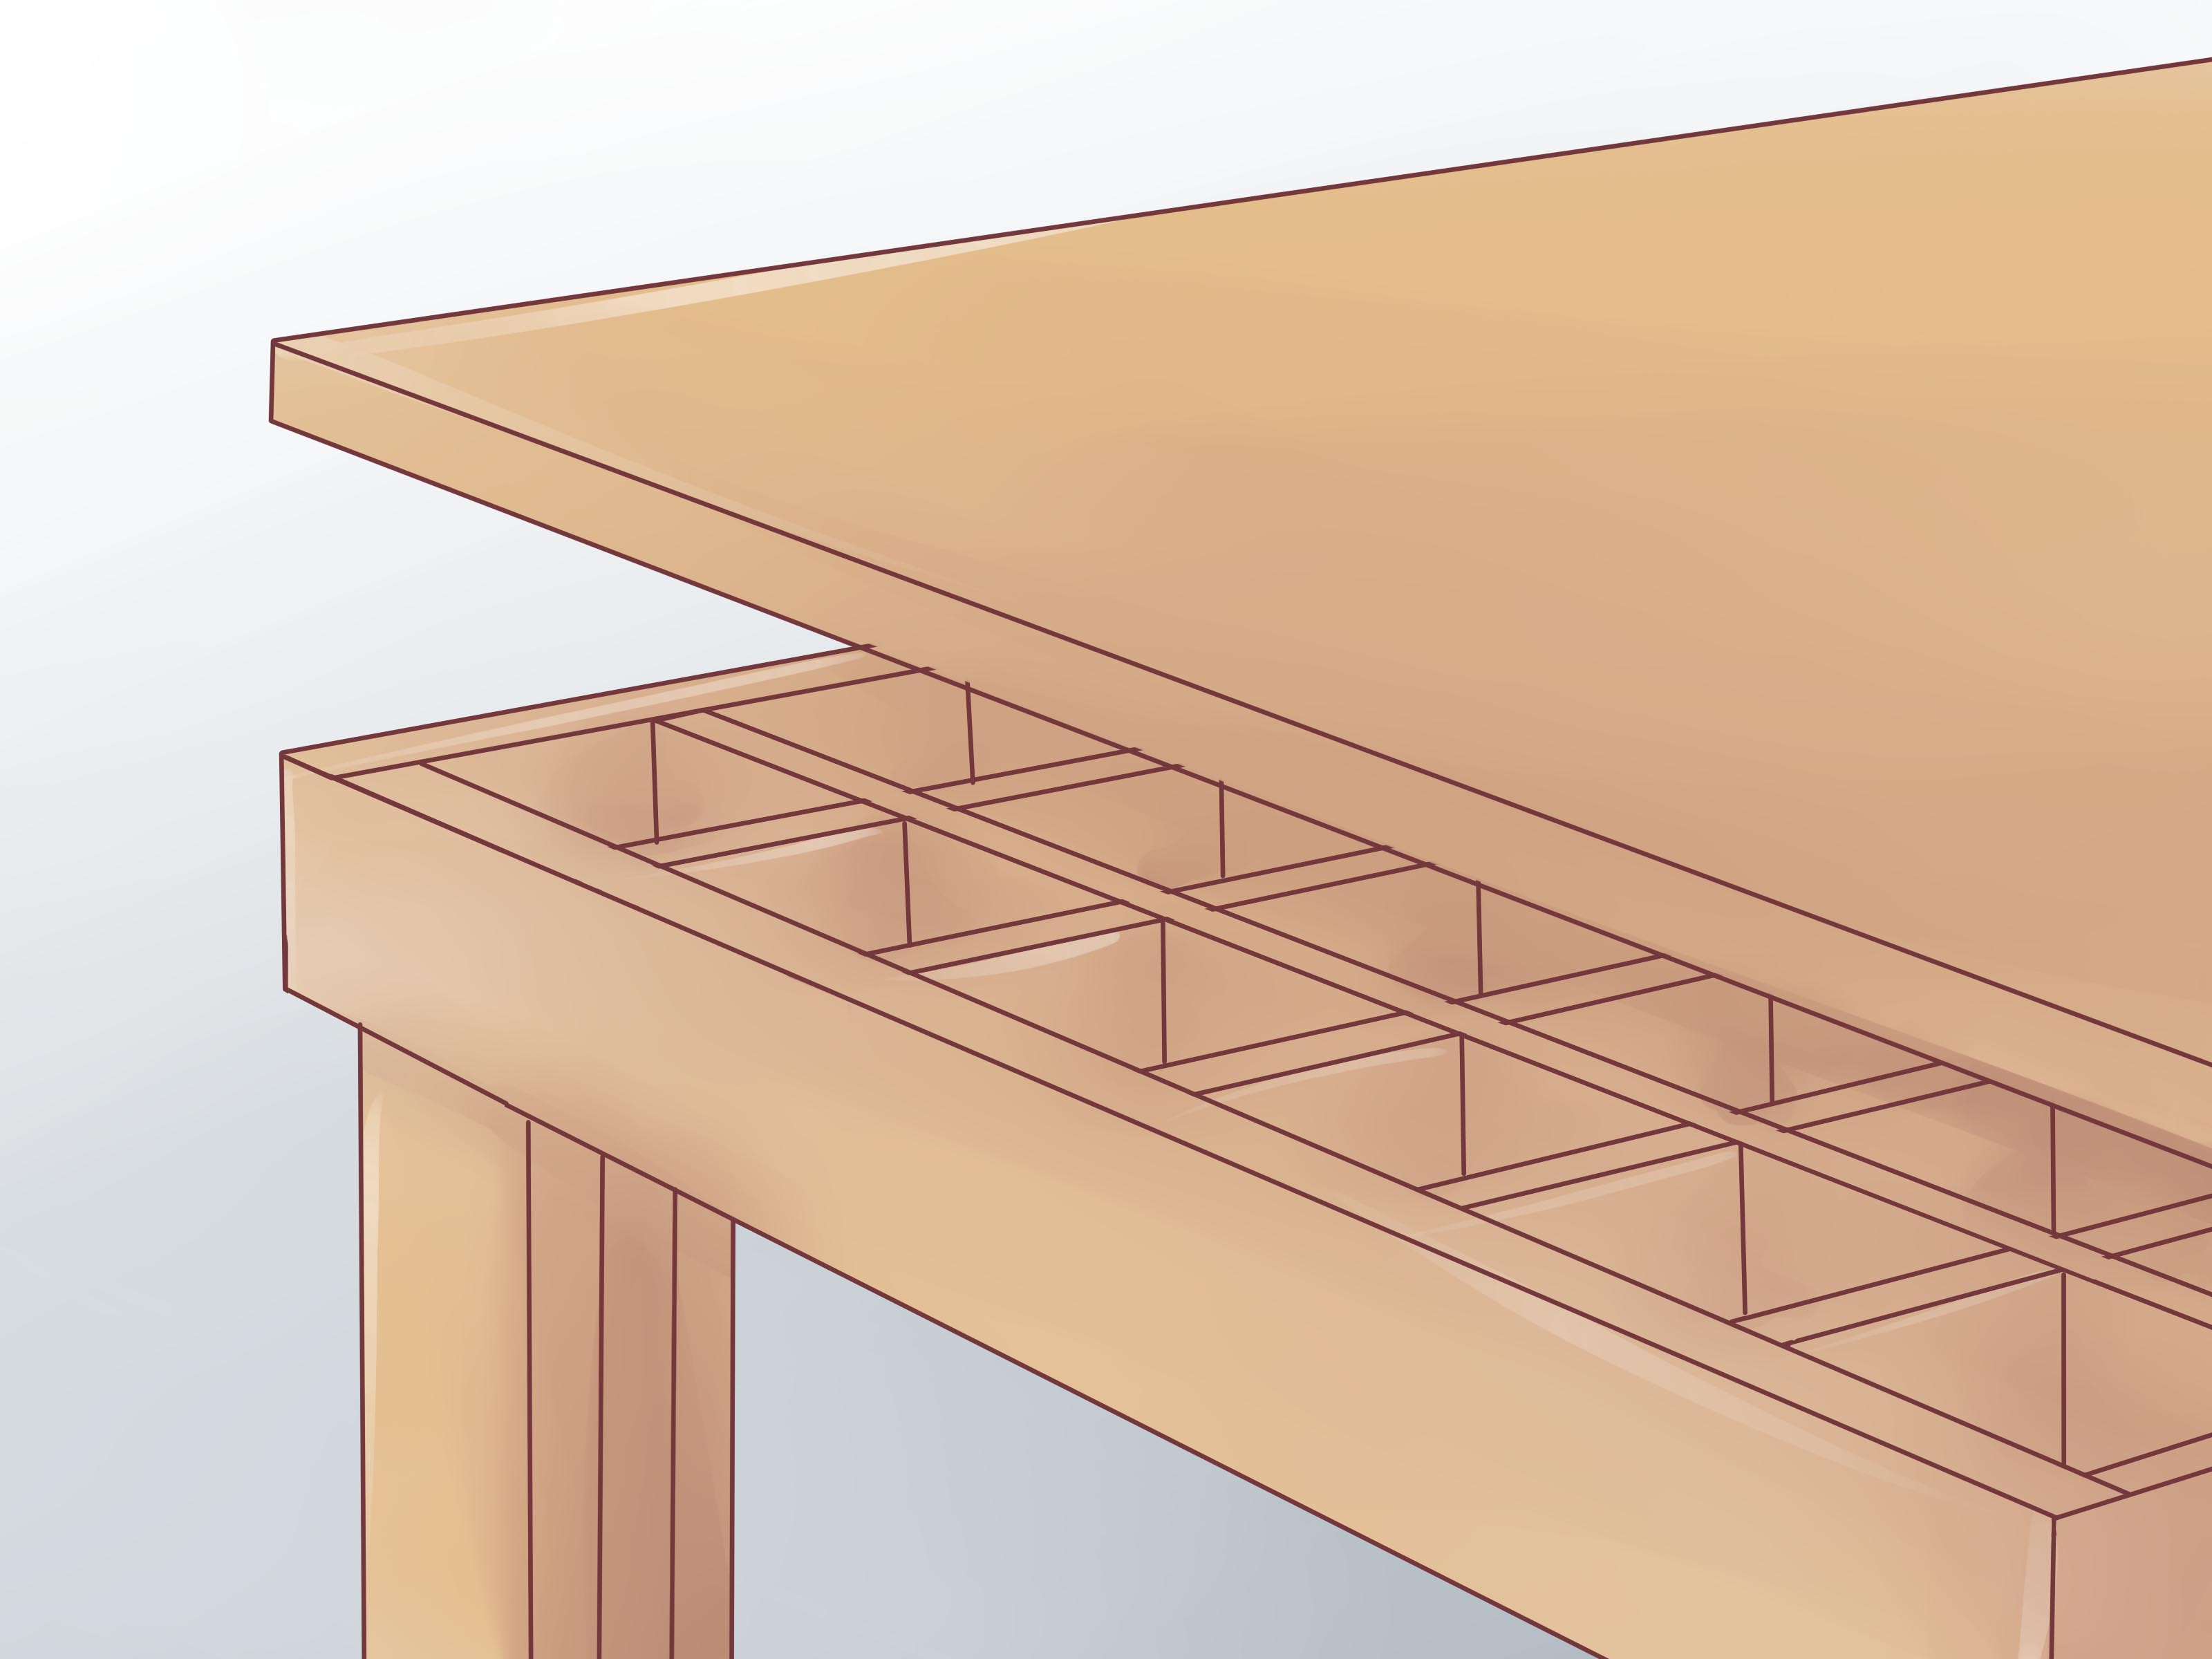
If you have ever tried to assemble a cabinet on a bench that dips in the middle, rocks on one corner, or behaves like it was built on a trampoline, welcome. You have met the enemy: an unreliable work surface. A torsion box workbench top is one of the smartest ways to build a bench that stays flat, feels stiff, and does not require you to sell a kidney for a 4-inch slab of maple.
At its core, a torsion box is wonderfully simple. You sandwich an internal grid between two skins, and suddenly a stack of sheet goods starts acting far stronger and flatter than the individual parts ever could on their own. That is why torsion-box designs show up in assembly tables, work surfaces, and even bench structures that need to resist sagging and twist without becoming absurdly heavy.
For DIYers, furniture makers, and garage-shop woodworkers, building a torsion box workbench top hits a sweet spot: excellent flatness, reasonable cost, easy-to-source materials, and a construction process that is more approachable than it sounds. It is also a project that rewards care. Rush it, and you build a giant flat-looking potato chip. Build it thoughtfully, and you get a top that makes every future project easier.
What Is a Torsion Box Workbench Top?
A torsion box workbench top is a hollow, ribbed panel made from three main parts: a bottom skin, an internal grid, and a top skin. Once glued together on a truly flat reference surface, the top and bottom skins work with the grid to resist bending and twisting. Think of it as a lightweight structural sandwich. Fancy in theory, friendly in practice.
The biggest reason woodworkers build torsion-box tops is flatness. A good torsion box is excellent for layout work, glue-ups, clamping, cabinet assembly, and general bench duty. It can also be built from plywood, MDF, or a combination of both, depending on your priorities. MDF is famously flat and stable, while plywood is lighter, tougher, and generally better at taking abuse. Many builders use what fits their shop, budget, and patience level.
One important reality check: a torsion box is not automatically the perfect bench for every kind of work. If your shop life involves heavy hand-planing, pounding mortises like you are auditioning for a blacksmith documentary, or mounting massive vises without reinforcement, you need to design for that. A torsion box can absolutely be part of a strong bench system, but it works best when you plan the base, thickness, clamping zones, and hardware locations in advance.
Why Build a Torsion Box Instead of a Solid Slab?
1. It stays flatter with less material
A solid-wood top is classic and beautiful, but it is also expensive, heavy, and still vulnerable to seasonal movement. A torsion box gives you a stiff, stable top without requiring a mountain of hardwood.
2. It is easier on the budget
Sheet goods are usually easier to source and easier on the wallet than thick hardwood stock. That makes a torsion box a very attractive option for a first serious bench.
3. It can be customized
You can size it for a small garage, a rolling outfeed table, a cabinetmaker’s bench, or a hybrid workstation. You can also add sacrificial hardboard, dog holes, T-track, replaceable skins, or edge banding.
4. It is strong without being ridiculous
A well-built torsion box feels impressively rigid, especially when paired with a sturdy base. Translation: you get performance without building a workbench that weighs as much as a compact car.
Best Materials for a Torsion Box Workbench Top
Top and bottom skins
The skins do much of the structural work, so this is not the place for mystery scraps that have already lived three previous lives. Good options include:
- MDF: very flat, smooth, and stable; great for assembly and layout surfaces
- Plywood: lighter, stronger at the edges, and more durable under shop use
- Hybrid approach: MDF for flatness plus a tougher replaceable top layer such as hardboard or plywood
If your bench will see glue drips, paint, finish, and mild chaos, a replaceable sacrificial top layer is a brilliant move. That way, your torsion box stays true while the upper skin can take the abuse.
Internal grid
The grid can be made from plywood strips, MDF strips, or straight solid wood. Plywood is a common choice because it is dimensionally stable and easy to cut accurately. What matters most is uniformity. If one rib is taller than the others, congratulations, you have built twist directly into the project.
Adhesives and fasteners
Wood glue does the real work here. Screws, brads, or narrow crown staples can help hold pieces in place during assembly, but the glue bond is what turns separate parts into one rigid structure. Use enough clamps, cauls, or weight to keep the skins fully seated while the glue cures.
How Thick Should a Torsion Box Workbench Top Be?
For a genuine workbench top, thicker is usually better. A finished thickness of about 2 to 4 inches is a very practical range for most shops. Thicker tops generally feel stiffer, support more weight, and give the bench a more substantial working height and presence.
If you are building a light-duty assembly bench, you can stay on the thinner end. If you want a main shop bench, especially one that will carry benchtop tools or support vises, lean thicker and reinforce the hardware zones. A torsion box top does not need to be massive, but it should not feel flimsy either.
Planning the Build Before You Cut Anything
Before making sawdust, decide what this bench top needs to do. Not what sounds cool. What it actually needs to do.
- Will it be your main woodworking bench or an assembly table?
- Do you need dog holes, a vise, or hold-downs?
- Will it sit on cabinets, sawhorses, or a fixed base?
- Do you need mobility, storage, or outfeed support?
- Will the top need to resist pounding, or mainly stay dead flat?
A common and very practical size is around 30 inches deep and 60 to 72 inches long. That gives you enough room for real work without turning the bench into a permanent traffic jam in the middle of the shop.
Step-by-Step: How to Build a Torsion Box Workbench Top
Step 1: Build or find a dead-flat reference surface
This is the most important part of the whole project. The torsion box will faithfully copy whatever surface you build it on. If your setup has cup, twist, or sag, your top will too. Use a known-flat platform, leveled beams on sawhorses, or a carefully shimmed sheet-good setup. Check it with a long level, straightedge, winding sticks, and diagonal strings if needed.
Step 2: Cut the skins accurately
Break down your sheet goods carefully and keep factory edges where possible. A clean, straight cut matters because the skins define the outer geometry of the top. Use a fine-tooth blade designed for sheet goods to reduce tear-out and wandering.
Step 3: Rip the grid pieces
Cut all internal ribs to exactly the same width. This is not a “close enough” moment. If your design calls for a 3-inch-tall grid, every rib should be exactly that height. Consistency is what keeps the top flat and the load distributed evenly.
Step 4: Lay out the internal structure
Create a perimeter frame and then fill the center with evenly spaced ribs. Keep openings logical and consistent. If you know you will mount a vise, install dog holes, or bolt the top to a base, add solid blocking or doubled ribs in those areas now. Future-you will be extremely grateful and slightly smug.
Step 5: Assemble the grid on the first skin
Place the bottom skin on your flat reference surface. Glue the perimeter and ribs in place. Use clamps, brads, or screws as needed to keep everything aligned while the glue sets. Confirm that nothing has crept out of square. This is a good time to check diagonals.
Step 6: Add the top skin
Spread glue evenly across the grid and perimeter, then position the top skin carefully. Apply even pressure across the full surface. Clamps are great. Weights work too. Cauls can help. The goal is full contact without introducing a hump in one area and a valley in another.
Step 7: Let it cure completely
Do not rush this. A torsion box gains its integrity when the glue fully cures while the assembly is supported on a flat surface. Moving it too soon is a great way to sabotage all your careful prep.
Step 8: Trim and square the edges
Once the glue is cured, flush-trim or saw the edges clean. Then check the panel for square, flatness, and twist. Minor edge cleanup is normal. Major correction is a sign that something went wrong earlier, which is woodworking’s polite way of saying, “We need to have a talk.”
Step 9: Add edging, sacrificial surface, or hardware prep
If you want cleaner edges and better durability, add hardwood or plywood edging. If you want a replaceable work surface, install hardboard or another sacrificial top layer. If you plan to use dog holes, T-tracks, or a vise, now is the time to mark reinforced zones and drill only where the internal structure supports them.
Should You Use MDF or Plywood?
This question starts more friendly debates in shops than it should.
Choose MDF if your top priority is flatness, smoothness, and a stable assembly surface. MDF is excellent for that job. It is also heavy, which can help a bench feel more planted.
Choose plywood if you want better screw-holding at edges, lower weight, and a tougher surface. Quality plywood also handles bumps and shop wear better than MDF.
Choose both if you want the best compromise: a flat structural core and a more durable wear layer. That is often the sweet spot for a torsion box workbench top that has to survive actual life.
How to Add Dog Holes, Vises, and Clamping Features
This is where many otherwise smart builds go sideways. A hollow top means you cannot randomly drill dog holes or bolt on heavy hardware wherever the mood strikes.
Plan clamping features before assembly. Add solid wood or doubled sheet-good blocking wherever you want a vise, holdfast-compatible area, or a line of dog holes. If you skip this, you may drill into a void and discover that your bench has all the authority of wet cardboard.
Also think about overhangs. A little overhang can make clamping much easier, but too much unsupported overhang can invite flex. Balance convenience with structure.
Common Mistakes to Avoid
- Building on an unflat surface: this is the number one mistake
- Using inconsistent grid heights: uneven ribs equal built-in twist
- Skipping reinforcement: hardware zones need support
- Moving the panel too early: let the glue cure fully
- Choosing materials without thinking about use: assembly-table needs are not always workbench needs
- Ignoring the base: a great top on a wobbly base is still a wobbly bench
Finishing and Protecting the Top
You do not need a precious museum finish here. This is a workbench, not a piano at a black-tie gala. A simple protective finish that resists glue squeeze-out and shop grime is usually enough. Some woodworkers leave the top nearly bare. Others use a light coat of polyurethane, shellac, or a shop-friendly topcoat. Another smart move is to keep the structural top protected under a replaceable sacrificial skin.
If you use MDF, sealing exposed edges is especially helpful because they are thirsty and vulnerable to damage. Even a basic seal coat can improve durability.
Real-World Lessons From Building and Using a Torsion Box Top
The real experience of building a torsion box workbench top is funny in a very woodworking way: it looks simple on paper, then immediately reveals whether you are patient or merely optimistic. Most builders start out thinking the hard part will be cutting the panels. It is not. The hard part is discipline. Getting every rib identical, making sure the assembly surface is actually flat, checking diagonals, resisting the urge to say “eh, close enough” when one strip is a hair proud, and waiting for glue to cure without poking the project every 11 minutes like an anxious raccoon.
In actual shop use, though, the payoff is huge. The first thing people notice is not glamour. It is calm. Panels sit where they should. Glue-ups do not rock. Cabinet parts stop arguing with one another. When you lay a long straightedge across the bench and it stays honest, the whole shop suddenly feels more competent. Even if your miter saw is still being dramatic and your tape measure has somehow vanished again, the bench itself becomes trustworthy.
Another common experience is learning that “flat” and “heavy-duty” are cousins, not twins. A torsion box top can be spectacular for assembly, layout, routing, sanding, and general shop work. But if you expect it to behave exactly like a giant traditional hardwood bench without designing for that role, reality will tap you on the shoulder. Builders who love their torsion-box tops usually do one of two things: they either use them for the jobs they are best at, or they reinforce them intelligently for vises, dog holes, pounding, and heavier hand-tool work. The happy ending is not luck. It is planning.
Many woodworkers also discover that material choice changes the daily feel of the bench. MDF gives a satisfyingly flat, almost machine-like surface. Plywood feels tougher and more forgiving. A hybrid top often ends up being the practical favorite because it combines precision with durability. In other words, the bench starts out as a philosophy debate and ends as a personality test.
There is also the strangely satisfying experience of building something hollow that feels solid. That is part of the charm of torsion-box construction. Friends may look at it and assume it is just a plywood sandwich. Then they try to flex it, fail, nod slowly, and suddenly become much more respectful of geometry.
Perhaps the best long-term experience is this: once you build one good torsion box, you start seeing uses for them everywhere. Outfeed tables. Assembly platforms. Router stations. Portable work surfaces. Shop fixtures. It becomes one of those techniques that quietly upgrades the whole shop because it teaches a deeper lesson. Strength is not always about mass. Sometimes it is about smart structure, careful layout, and refusing to glue on the second skin until you are absolutely sure the first step was right.
And honestly, that may be the biggest reason this project is worth building. A torsion box workbench top does more than give you a flat surface. It trains you to work more accurately, think ahead, and respect setup. That is a pretty good return from a stack of sheet goods and a bottle of glue.
Final Thoughts
If you want a work surface that is flat, stiff, customizable, and realistic to build in a home shop, a torsion box workbench top is an excellent solution. It is not magic, and it is not a shortcut around careful construction. But when you build it on a dead-flat reference surface, use consistent materials, reinforce the hardware zones, and match the design to the kind of work you actually do, it performs beautifully.
Build it once, build it accurately, and it may become the most reliable thing in your entire shop. Which, depending on your shop, is saying a lot.


