Some keyboards are tools. Some keyboards are fashion statements. And then there are custom Arduino keyboards that look like they were designed by someone who owns both a soldering iron and a very dramatic lighting setup. “Arduino Keyboard Is Gorgeous Inside And Out” is not just a catchy title; it describes a kind of project that makes hardware enthusiasts lean closer to the screen and whisper, “Wait… the wiring looks better than my desk.”
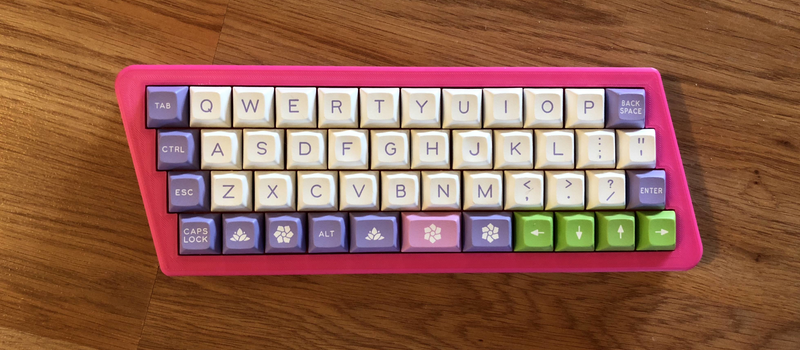
The project that inspired this discussion is a hand-wired custom mechanical keyboard known as the z.48. It uses an Arduino Pro Micro-style controller, a compact 48-key layout, Gateron mechanical switches, DSA Hana keycaps, and a 3D-printed case. That sounds like a parts list, but the finished keyboard is more than the sum of its tiny, clicky pieces. It is a reminder that DIY electronics can be beautiful, practical, and slightly dangerous to your free time. Once you enter the custom keyboard rabbit hole, you may emerge three weeks later explaining switch actuation force to a confused family member at dinner.
Why an Arduino Keyboard Still Feels Special
An Arduino keyboard is appealing because it puts the builder in charge of the entire typing experience. Instead of accepting a factory layout, a fixed firmware, and a plastic shell that looks like it was designed during a very sad lunch break, the builder can decide how many keys the board needs, where those keys belong, what each key does, and how the finished keyboard should feel.
The Arduino Pro Micro became popular in custom keyboard projects because it is small, inexpensive, and built around the ATmega32U4 microcontroller. That chip supports native USB, which means it can act like a real USB Human Interface Device, including a keyboard. In plain English, the computer does not need to know that your keyboard began life as a weekend project surrounded by wire clippings. It simply sees a USB keyboard and gets on with the business of receiving keystrokes.
This is the magic trick at the heart of many Arduino keyboard builds. Press a switch, complete a circuit, let the microcontroller scan the keyboard matrix, and send the right keycode to the computer. It sounds simple, but good execution requires planning. The difference between a clean keyboard and a spaghetti-themed electrical sculpture is patience, layout discipline, and enough soldering practice to avoid creating tiny metallic stalactites.
The z.48: A Compact Keyboard With Serious Personality
The z.48 build stands out because it combines a compact form factor with excellent internal craftsmanship. It is inspired by small 40% keyboards, but instead of following a perfectly ortholinear grid, it uses a subtle stagger. That makes it friendlier to people who are used to traditional keyboard layouts while keeping the efficiency of a tiny board.
A 48-key keyboard might sound impossible if you live on a full-size board with a number pad, function row, navigation cluster, media controls, and enough spare keys to launch a small spacecraft. But compact keyboard users rely on layers. A layer is like a second keyboard hidden under the first one. Hold a function key, and the same physical keys can become numbers, symbols, arrows, media controls, or macros. Suddenly, fewer keys does not mean fewer functions. It means the keyboard has learned some very useful party tricks.
The z.48 used firmware generated with a keyboard firmware builder and ran on a Pro Micro-style controller. In today’s custom keyboard world, many builders also turn to QMK firmware because it supports layers, macros, tap-hold behavior, combos, encoders, RGB lighting, and other features that can make a keyboard feel personally tailored. For an Arduino keyboard, firmware is not just background code. It is the personality layer between the hardware and the human.
Gorgeous on the Outside: Case, Keycaps, and Layout
The first thing most people notice about a custom keyboard is the exterior. The z.48 has an angled, almost rhombus-like shape that gives it motion even while it is sitting still. It looks compact without looking cramped, playful without looking like a toy, and technical without appearing unfinished.
The case was 3D printed, which is one reason the project feels so personal. A 3D-printed keyboard case gives builders freedom that standard cases cannot match. Want a weird angle? Print it. Want a high-profile shell? Model it. Want a board that looks like a keyboard from an alternate timeline where office equipment became cool? Congratulations, you have found your weekend.
Keycaps also matter. The DSA Hana-style look gives the board a soft, colorful identity. DSA-profile keycaps are uniform, which makes them especially useful for compact and custom layouts because keys can be moved around more easily than sculpted sets. On a layout with layers and nonstandard placement, uniform keycaps are less of a luxury and more of a sanity-preserving device.
Then there are the switches. Gateron mechanical switches have long been appreciated by budget-conscious and enthusiast keyboard builders for offering smooth feel at reasonable prices. The exact switch choice changes the character of the board. Linear switches feel smooth, tactile switches give a bump, and clicky switches proudly announce every sentence to the room. Choose unwisely, and your keyboard may become the reason your roommate starts browsing noise-canceling headphones.
Gorgeous on the Inside: The Art of Hand Wiring
The inside of this Arduino keyboard is where the project goes from “nice build” to “please frame this and put it in a hardware museum.” Instead of relying on a printed circuit board, the z.48 was hand-wired. Every switch had to be connected into a matrix using wire, solder, and a level of patience normally associated with ship-in-a-bottle hobbyists.
A keyboard matrix lets a microcontroller read many keys without needing one dedicated pin for every switch. Switches are arranged in rows and columns. The controller scans the matrix, checks where a row and column connect, and identifies which key has been pressed. Diodes are often added to prevent ghosting and false keypresses when multiple keys are pressed at the same time.
Hand wiring can look messy when rushed, but it can look stunning when done carefully. The z.48’s wiring has a clean, colorful, almost woven appearance. The builder reportedly used a soldering iron to melt away insulation at connection points, producing a neat result without excessive stripping. That kind of detail matters. A keyboard interior may not be visible during normal use, but knowing it is beautiful inside changes how the object feels. It becomes less like a gadget and more like a craft piece with USB support.
Why the Arduino Pro Micro Became a Keyboard Hero
The Pro Micro and similar ATmega32U4 boards became common in keyboard projects because they hit a sweet spot. They are small enough to fit inside compact cases, affordable enough for experiments, and capable enough to handle USB keyboard duties. For a hand-wired build, that combination is hard to beat.
The key advantage is native USB. Older Arduino Uno-style boards can be used for HID experiments, but doing so is more complicated because the main microcontroller does not natively present itself as a keyboard in the same straightforward way. ATmega32U4-based boards, including the Arduino Leonardo, Arduino Micro, and many Pro Micro-style boards, are more naturally suited to USB input-device projects.
That does not mean every build is effortless. Builders still need to understand pin mapping, firmware flashing, matrix definitions, diode direction, debouncing, and how to recover when the board refuses to behave. But the Pro Micro lowered the barrier enough that many hobbyists could create custom keyboards without designing a full PCB first.
Compact Keyboards and the Beauty of Layers
People who have never used a 40% keyboard often ask the same question: “Where did all the keys go?” The answer is not “into the couch,” although that is a reasonable guess if you have pets. The answer is layers.
With layers, the keyboard can place numbers, symbols, arrows, navigation keys, and media shortcuts behind function keys. For example, holding a layer key might turn QWERTY into a number row, convert HJKL into arrow keys, or make a nearby key launch a macro. This design rewards muscle memory. Once learned, a compact board can feel surprisingly fast because the hands move less.
This is why Arduino keyboards are so interesting. They are not just smaller versions of ordinary keyboards. They can be designed around actual habits. A programmer might want brackets, equals signs, and arrow keys close to home position. A video editor might want media shortcuts and timeline controls. A writer might want em dashes, text snippets, and a dedicated key that types “no, the deadline is not flexible” with appropriate emotional weight.
3D Printing Makes the Case Personal
The 3D-printed case is another reason this keyboard feels special. A custom case changes the entire identity of the board. It determines typing angle, sound, weight, rigidity, and visual style. In a small keyboard, the case must also hold switches securely, protect wiring, and provide enough space for the controller and USB port.
Printing a keyboard case is not just a matter of downloading a file and hoping the printer feels generous. Tolerances matter. Switch cutouts need to grip correctly. Plate thickness affects how securely switches snap in. Infill affects weight and rigidity. Layer height affects the finish. Heat-set inserts can make assembly more durable by giving screws a stronger anchor than raw plastic.
When a 3D-printed keyboard case is done well, it gives the project a boutique quality. It says, “This object exists because someone imagined it, modeled it, printed it, wired it, and probably muttered at it around midnight.” That story is part of the charm.
What Makes This Build Better Than a Store-Bought Keyboard?
A store-bought mechanical keyboard can be excellent. Modern boards offer hot-swappable switches, gasket mounts, aluminum cases, wireless modes, RGB lighting, and software customization. But a DIY Arduino keyboard offers something different: authorship.
When you build a keyboard, every decision becomes intentional. The layout exists because you chose it. The switches feel the way they do because you selected them. The firmware behaves the way it does because you mapped it. Even mistakes become part of the story. A slightly imperfect solder joint that you fixed after an hour of troubleshooting may not be glamorous, but it teaches more than clicking “add to cart.”
The z.48 is compelling because it shows that a prototype does not have to look rough. It can be experimental and polished at the same time. It can be compact without being confusing, handmade without being sloppy, and technical without losing its sense of style.
Practical Lessons for Building an Arduino Keyboard
Start With the Layout
The layout determines everything else. Before buying switches or printing a case, decide how many keys you need and where they should go. Test the layout on paper. Pretend to type. If a crucial symbol requires finger gymnastics worthy of a circus audition, revise the layout.
Respect the Matrix
Keyboard matrices are efficient, but they demand accuracy. Label rows and columns, plan diode direction, and document which microcontroller pins go where. Future-you will appreciate present-you for leaving notes. Future-you is already tired.
Use Firmware as a Design Tool
Do not treat firmware as an afterthought. Layers, tap-hold keys, macros, and transparent key behavior can turn a limited layout into a powerful daily driver. A good compact keyboard is not just hardware with fewer keys; it is hardware plus clever firmware.
Make the Inside Serviceable
Beautiful wiring is wonderful, but repairability matters. Leave enough slack to open the case. Avoid placing the controller where the USB cable will stress it. Secure wires so they do not flex every time the keyboard moves. A gorgeous build should not become modern art the first time a switch fails.
Experience: What It Feels Like to Build and Use an Arduino Keyboard
Working on an Arduino keyboard teaches you quickly that keyboards are not simple. They only look simple because manufacturers hide the drama under plastic. The first time you place switches into a plate, the project feels easy. The second you start wiring rows, columns, and diodes, the keyboard looks at you and says, “Welcome to the real curriculum.”
The most satisfying moment is not the final photo. It is the first successful keypress. You plug the board into the computer, open a text editor, press one switch, and a letter appears. It is a tiny event, but it feels enormous. That one character proves the switch works, the wiring works, the controller works, the firmware works, and your soldering iron has not betrayed you today. For a DIY builder, that single letter might as well arrive with fireworks.
Then comes debugging. One key works. Another does not. A whole row might be silent. Two keys may trigger together like they are emotionally attached. This is where the experience becomes educational. You learn to check continuity with a multimeter, inspect solder joints, verify diode direction, and compare firmware pin definitions against the actual wiring. It can be frustrating, but each fix makes the board feel more yours.
Using a compact Arduino keyboard also changes how you think about typing. At first, layers feel strange. You may reach for a missing number row and discover empty air, which is humbling. But after a few days, the logic starts to click. Numbers live under one layer. Symbols live under another. Arrows sit near the home row. Suddenly, the keyboard feels less like a reduced device and more like a command center compressed into a tiny footprint.
The best part is customization. You can place backspace where your finger naturally lands. You can make a key send a frequently used phrase. You can create shortcuts for coding, writing, gaming, editing, or launching apps. The keyboard stops being a generic accessory and becomes a physical extension of your workflow. That is the real luxury of an Arduino keyboard: not aluminum, not RGB, not expensive switches, but control.
There is also an emotional reward in knowing what is inside. A cleanly hand-wired keyboard feels different because you understand its construction. You know each row, each column, each diode, each little decision. When someone says, “Nice keyboard,” you can say, “Thanks, I built it,” and then try very hard not to explain keyboard matrices for twenty minutes. You may fail. That is normal.
An Arduino keyboard like the z.48 proves that DIY hardware can be more than functional. It can be expressive. It can be elegant. It can be gorgeous inside and out, which is more than many of us can say before coffee.
Conclusion
“Arduino Keyboard Is Gorgeous Inside And Out” captures the spirit of a project that blends electronics, design, firmware, 3D printing, and mechanical keyboard obsession into one beautifully compact object. The z.48 is not memorable only because it uses an Arduino Pro Micro-style controller or because it has a small layout. It is memorable because every part of the build shows intention.
The exterior has personality. The 3D-printed case gives it shape and stance. The keycaps bring color and charm. The compact layout shows confidence. But the interior is where the keyboard becomes art. Clean hand wiring, careful matrix construction, and thoughtful assembly turn a functional input device into something worth admiring from both sides.
For builders, this project is a reminder that custom keyboards are not just about buying premium parts. They are about solving problems creatively. For users, it shows why compact programmable keyboards can be practical, expressive, and fun. And for anyone who has ever looked at a keyboard and thought, “I could make that weirder,” the Arduino keyboard is an open invitation.