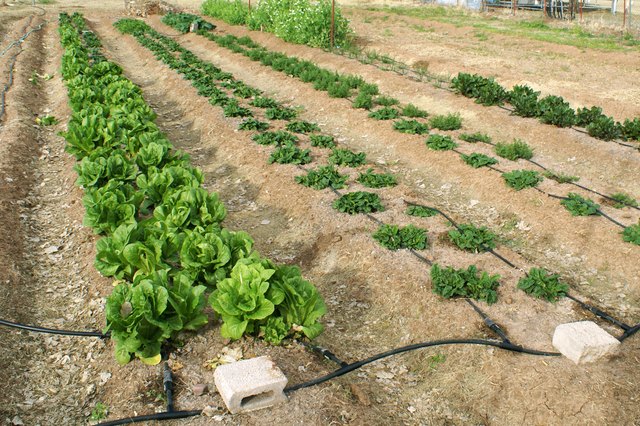
Planting a vegetable garden in rows is one of the most classic, practical, and beginner-friendly ways to grow food at home. It is neat, easy to plan, simple to water, and wonderfully satisfying when those straight green lines begin popping out of the soil like nature’s own barcode. Whether you want crisp lettuce, juicy tomatoes, crunchy carrots, green beans, peppers, cucumbers, or enough zucchini to politely overwhelm your neighbors, row gardening gives your plants structure and gives you a clear path to manage them.
The beauty of a row vegetable garden is that it works for many spaces, from a small backyard plot to a larger homestead garden. Rows make it easier to organize crops by height, season, spacing, and care needs. They also help with weeding, harvesting, watering, and crop rotation. Instead of guessing where everything went after planting day, you can look at your garden and say, “Ah yes, the beans are there, the carrots are there, and the mystery seedlings are probably something I planted on purpose.”
This guide explains how to plant a vegetable garden in rows from start to finish, including choosing the right location, preparing soil, measuring rows, spacing vegetables, planting seeds and transplants, watering properly, controlling weeds, and using practical experience to avoid common mistakes.
Why Plant a Vegetable Garden in Rows?
Row gardening is a traditional method for a good reason: it is organized and efficient. In a row garden, vegetables are planted in long, straight lines with walking paths between them. This layout is especially useful when you want easy access to each crop without stepping on the growing area.
Rows are helpful for beginners because they make the garden easier to understand. You can see where one crop begins and another ends. You can water along the base of plants, pull weeds from the pathways, and harvest without playing vegetable Twister. Rows also allow you to plant larger crops, such as corn, okra, squash, tomatoes, and pole beans, with enough space for airflow and maintenance.
Another advantage is planning. When vegetables are planted in rows, it is easier to calculate how much seed you need, how many plants fit in your garden, and where each crop should go next season. That matters because vegetable gardening is not just about throwing seeds into dirt and hoping for a salad. It is about creating a system where plants have the right light, soil, water, and space to grow well.
Step 1: Choose the Best Location for Your Row Garden
The first rule of vegetable gardening is simple: vegetables love sunlight. Most fruiting vegetables, including tomatoes, peppers, cucumbers, beans, squash, and eggplants, need at least six hours of direct sun per day. More sun is usually better, especially for crops that produce flowers and fruit. Leafy greens such as lettuce, spinach, kale, and Swiss chard can tolerate some partial shade, but they still grow best with bright light.
Look for Sun, Water, and Convenience
Choose a garden spot that is close to a water source. A vegetable garden located far from water may look charming in April, but by July it can feel like you are hauling buckets across a desert expedition. Convenience matters. The easier it is to water, weed, and harvest, the more likely you are to keep up with garden care.
Also choose a spot with good drainage. Vegetables do not like soggy roots. After heavy rain, water should not sit on the garden surface for long periods. If your soil drains poorly, consider making slightly raised rows or planting in raised beds with row-style planting inside them.
Avoid Problem Areas
Do not plant your vegetable rows under large trees. Tree roots compete for water and nutrients, while branches create shade. Avoid low spots where cold air settles in spring, because frost can damage young plants. Also stay away from areas that may have been treated with herbicides or contaminated by chemicals, old paint, or construction debris.
Step 2: Decide the Size of Your Garden
One of the most common beginner mistakes is starting too large. A big garden sounds exciting until the weeds hold a family reunion in June. A manageable beginner garden might be about 4 feet by 8 feet, 10 feet by 10 feet, or another size that fits your available time and space. You can always expand later after you learn what grows well and how much work you enjoy.
If your goal is fresh herbs, salad greens, and a few tomatoes, you do not need a massive plot. If you want to preserve tomatoes, freeze beans, and grow storage crops, you will need more room. Match the garden size to your household, your cooking habits, and your maintenance schedule.
Step 3: Plan Your Rows on Paper First
Before digging, sketch your garden. This does not need to be a professional landscape design. A simple notebook drawing works. Write down the garden dimensions, the direction of sunlight, where the water source is, and which vegetables you want to grow.
Put Tall Crops Where They Will Not Shade Short Crops
Plant tall crops such as corn, pole beans, okra, trellised cucumbers, and indeterminate tomatoes where they will not block sunlight from smaller vegetables. In many gardens, placing tall crops on the north side helps prevent them from shading shorter plants. However, the exact layout depends on your property and how sunlight moves across it.
Group Crops by Care Needs
Vegetables with similar water and fertility needs can be grouped near each other. For example, tomatoes and peppers are warm-season crops that like consistent moisture and rich soil. Lettuce, spinach, radishes, and peas are cool-season crops that can be planted earlier and replaced later with summer vegetables. Grouping plants this way makes the garden easier to manage.
Step 4: Prepare the Soil
Healthy soil is the foundation of a productive vegetable garden. Before planting rows, remove grass, weeds, rocks, and debris. Loosen the soil with a garden fork, broadfork, or tiller if needed. The soil should be crumbly, not compacted like a driveway with dreams.
Work in compost or well-rotted organic matter to improve soil structure, drainage, and nutrient-holding capacity. Compost helps sandy soil hold moisture and helps clay soil become easier to work. If possible, test your soil before planting. A soil test can tell you the pH and nutrient levels, helping you avoid guessing with fertilizer.
Create Raised or Flat Rows
Rows can be flat or slightly raised. Flat rows work well in well-drained soil. Raised rows are helpful in heavy clay or wet areas because they improve drainage and warm up faster in spring. To make raised rows, pull soil from the paths into the planting area and rake the top smooth. This creates a long, slightly elevated bed where seeds or transplants can grow.
Step 5: Mark Straight Garden Rows
Straight rows are not required for vegetables to grow, but they make planting, watering, and weeding much easier. The simplest method is to use two stakes and a string. Push one stake into the soil at each end of the planned row, tie string between them, and pull it tight. Use the string as a guide to create a shallow furrow.
A furrow is a narrow trench used for planting seeds. You can make one with the corner of a hoe, a stick, a trowel, or your hand. For tiny seeds such as lettuce, carrots, and radishes, keep the furrow shallow. For larger seeds like beans, peas, corn, and squash, plant deeper according to the seed packet.
Step 6: Understand Row Spacing and Plant Spacing
Spacing is where row gardening becomes both science and common sense. Plants need enough room for roots, leaves, airflow, and harvesting. If plants are too close, they compete for water and nutrients. Crowded plants may also have more disease problems because air cannot move easily between leaves. If plants are too far apart, you waste garden space and give weeds more room to party.
Common Row and Plant Spacing Examples
Always check your seed packet or local extension planting guide, but these examples are useful for planning:
- Carrots: Plant seeds shallowly, then thin seedlings to about 2 to 4 inches apart.
- Radishes: Plant close together and thin to about 1 to 2 inches apart.
- Lettuce: Space leaf lettuce more closely than head lettuce; leave enough room for mature growth.
- Bush beans: Plant seeds a few inches apart in rows, then thin as needed.
- Tomatoes: Space plants widely enough for cages, staking, airflow, and harvesting.
- Peppers: Give each plant room to branch and produce fruit.
- Squash and cucumbers: Allow generous spacing, especially for vining types.
- Corn: Plant in blocks of several short rows rather than one long row for better pollination.
The distance between rows depends on the crop and whether you need walking space or equipment space. Hand-maintained gardens can often use narrower paths than gardens managed with wheelbarrows or tillers. Leave enough space to walk comfortably without brushing against plants every time you pass through.
Step 7: Plant Seeds in Rows
Many vegetables are easy to direct seed into garden rows. Beans, peas, carrots, radishes, beets, lettuce, spinach, corn, cucumbers, and squash are commonly planted from seed. Seed packets provide planting depth, spacing, and timing, and they are worth reading. They are tiny instruction manuals wearing colorful jackets.
How to Sow Seeds in a Row
- Use a string line to mark the row.
- Create a shallow furrow at the correct depth.
- Place seeds along the furrow according to recommended spacing.
- Cover seeds gently with fine soil.
- Firm the soil lightly so seeds make good contact.
- Water gently after planting.
- Label the row with the vegetable name and date.
Keep the seedbed consistently moist until seeds germinate. This does not mean drowning the row. It means watering gently enough to keep the top layer of soil from drying out. A harsh spray can wash seeds away, especially tiny seeds. Use a watering can with a rose head or a gentle hose setting.
Step 8: Plant Transplants in Rows
Some vegetables are commonly planted as transplants, especially tomatoes, peppers, eggplants, broccoli, cabbage, and many herbs. Transplants give warm-season crops a head start and help cool-season crops mature before the weather turns too hot.
How to Set Transplants in Row Gardens
Dig a hole slightly wider than the root ball. Remove the plant gently from its container, loosen circling roots if needed, and place it at the proper depth. Most transplants should be planted at the same depth they were growing in the container. Tomatoes are an exception because they can be planted deeper; buried stems can form additional roots.
After planting, firm the soil around the roots and water thoroughly. If the weather is hot or windy, give new transplants temporary protection for a few days. A stressed transplant is like a person arriving at a party without knowing anyone: it needs a little time to settle in.
Step 9: Thin Seedlings at the Right Time
Thinning means removing extra seedlings so the remaining plants have enough room to grow. It may feel painful to pull out baby plants, but crowding is worse. Carrots, beets, lettuce, radishes, and spinach often need thinning because their seeds are small and easy to plant too thickly.
Thin seedlings when they are small but easy to handle. Use scissors to snip extras at the soil line if pulling might disturb nearby roots. For root crops like carrots and beets, proper thinning is especially important because crowded roots become small, twisted, or oddly shaped. Funny-looking carrots are charming, but they are not always what you want for dinner.
Step 10: Water Rows Correctly
Vegetable gardens generally need consistent moisture, especially during germination, flowering, and fruit development. A common target is about one inch of water per week from rain or irrigation, though sandy soils, hot weather, and container-like raised rows may need more frequent watering.
Water the Soil, Not the Leaves
Water at the base of plants when possible. Drip irrigation, soaker hoses, or careful hand watering can deliver moisture directly to the root zone. Keeping leaves dry may reduce disease pressure, especially for crops like tomatoes, cucumbers, squash, and beans.
Morning is often the best time to water. Plants can take up moisture before the heat of the day, and any wet foliage has time to dry. Avoid frequent shallow watering because it encourages shallow roots. Deeper, less frequent watering helps roots grow downward, making plants more resilient.
Step 11: Mulch Between Rows
Mulch is one of the best tools for row vegetable gardens. It helps suppress weeds, conserve soil moisture, reduce mud splash, and keep pathways cleaner. Organic mulches such as straw, shredded leaves, untreated grass clippings, and compost can also improve soil as they break down.
Apply mulch after seedlings are established and the soil has warmed, especially for warm-season crops. Keep mulch slightly away from plant stems to prevent rot. In pathways, mulch can make the garden easier to walk through after rain and can dramatically reduce the number of weeds you need to pull.
Step 12: Weed Early and Often
Weeds compete with vegetables for water, nutrients, sunlight, and space. The easiest weeds to remove are the tiny ones. If you wait until they are knee-high and emotionally attached to the garden, the job becomes much harder.
Use a hoe to lightly cultivate between rows, but avoid digging too deeply near vegetable roots. Hand-pull weeds close to plants. Mulch helps, but it is not magic. Regular short weeding sessions are better than one dramatic weekend battle with a jungle.
Step 13: Use Succession Planting
Succession planting means planting more than once during the season so you can harvest over a longer period. Instead of planting all your lettuce, radishes, or beans on one day, plant a small amount every one to two weeks while the weather is suitable. This prevents the classic gardening problem of having nothing one week and 200 radishes the next.
You can also replace finished cool-season crops with warm-season crops. For example, early spinach or radishes can be followed by bush beans, basil, or cucumbers. Later in the season, areas that held spring peas may be replanted with fall greens.
Step 14: Rotate Crops Each Season
Crop rotation means avoiding planting the same crop family in the same row year after year. Rotation helps reduce disease buildup, pest pressure, and nutrient imbalance. For example, tomatoes, peppers, eggplants, and potatoes are all in the nightshade family. Broccoli, cabbage, kale, and cauliflower are brassicas. Beans and peas are legumes.
Keep a simple garden map each year so you know where crops were planted. Next season, move crop families to different rows when possible. Even a small garden benefits from basic rotation.
Common Mistakes to Avoid When Planting Vegetable Rows
Planting Rows Too Close Together
Narrow spacing may look efficient at planting time, but mature plants need room. A tomato seedling may look tiny in May, but by midsummer it can become a leafy beast with ambitions. Leave enough room for growth, airflow, and harvesting.
Forgetting Pathways
Paths are part of the garden design. If you do not leave enough walking space, you will step into planting rows, compact soil, and damage roots. Make paths wide enough for your feet, tools, baskets, and wheelbarrow if you use one.
Ignoring Seed Depth
Seeds planted too deep may struggle to emerge. Seeds planted too shallow may dry out or wash away. Follow the seed packet. As a general idea, small seeds are usually planted shallowly, while larger seeds are planted deeper.
Skipping Labels
Label every row. Many seedlings look similar at first, and memory is not always reliable. A simple label can prevent you from pulling carrots because you thought they were weeds.
Experience-Based Tips for Planting a Vegetable Garden in Rows
After planting row gardens for several seasons, one lesson becomes very clear: the garden rewards preparation. The rows that perform best are usually not the ones planted fastest. They are the rows where the soil was loosened well, compost was added thoughtfully, spacing was measured, and watering was planned before seeds ever touched the ground. A garden row is like a kitchen recipe. You can improvise, but if you forget half the ingredients, dinner gets weird.
One useful experience is to start with fewer crops and grow them well. Beginners often want tomatoes, peppers, carrots, lettuce, beans, corn, cucumbers, pumpkins, melons, onions, potatoes, herbs, and possibly a vineyard by Tuesday. The better approach is to choose vegetables your household actually eats and learn their habits. For a first row garden, try a simple plan: one row of lettuce and radishes for spring, one row of bush beans, one row of tomatoes with basil, one row of peppers, and one row of carrots or beets. This gives variety without turning the backyard into a full-time job.
Another practical tip is to make rows only as long as you can comfortably maintain. Long rows look impressive, but shorter rows are easier to weed, water, and harvest. In a small home garden, several shorter rows can be more useful than one long row of a single crop. For example, instead of planting a 30-foot row of lettuce all at once, plant 8 feet, then plant another 8 feet two weeks later. Your salads will arrive in waves instead of forming a leafy emergency.
Mulched paths are also worth the effort. Bare soil between rows can become muddy after rain and crusty after heat. Mulch makes the garden cleaner and easier to walk through. Straw, shredded leaves, or dried grass clippings can work well when applied in a reasonable layer. The best part is psychological: when the paths look tidy, the whole garden feels more manageable. A neat garden invites you in; a weedy garden silently judges you from the yard.
Watering is another area where experience matters. New gardeners often sprinkle the garden lightly every day, but vegetables usually do better with deeper watering that reaches the roots. Check soil moisture with your finger. If the soil is dry an inch or two down, it is time to water. If it is still moist, wait. Overwatering can be just as troublesome as underwatering, especially in heavy soil.
Finally, keep notes. Write down planting dates, varieties, spacing, weather surprises, pest problems, and harvest results. These notes become your personal gardening guide. Next year, you will know which tomato variety produced well, which row stayed too wet, which crop needed more space, and which vegetable your family ignored despite your heroic effort. Gardening in rows is not about perfection. It is about learning, adjusting, and enjoying the small miracle of turning soil, seeds, water, and sunlight into dinner.
Conclusion
Learning how to plant a vegetable garden in rows is one of the best ways to begin growing fresh food at home. Rows create order, improve access, simplify watering, and make it easier to manage weeds, spacing, and harvests. The key steps are straightforward: choose a sunny location, start with a manageable size, prepare the soil, mark straight rows, follow correct spacing, plant seeds or transplants carefully, water consistently, mulch paths, thin seedlings, and keep simple records.
A row garden does not need to be perfect to be productive. Some rows may wiggle. A few seeds may sprout where you did not expect them. One zucchini plant may act like it owns the property. That is all part of the fun. With planning, patience, and regular care, your vegetable rows can become a reliable source of fresh, flavorful food season after season.