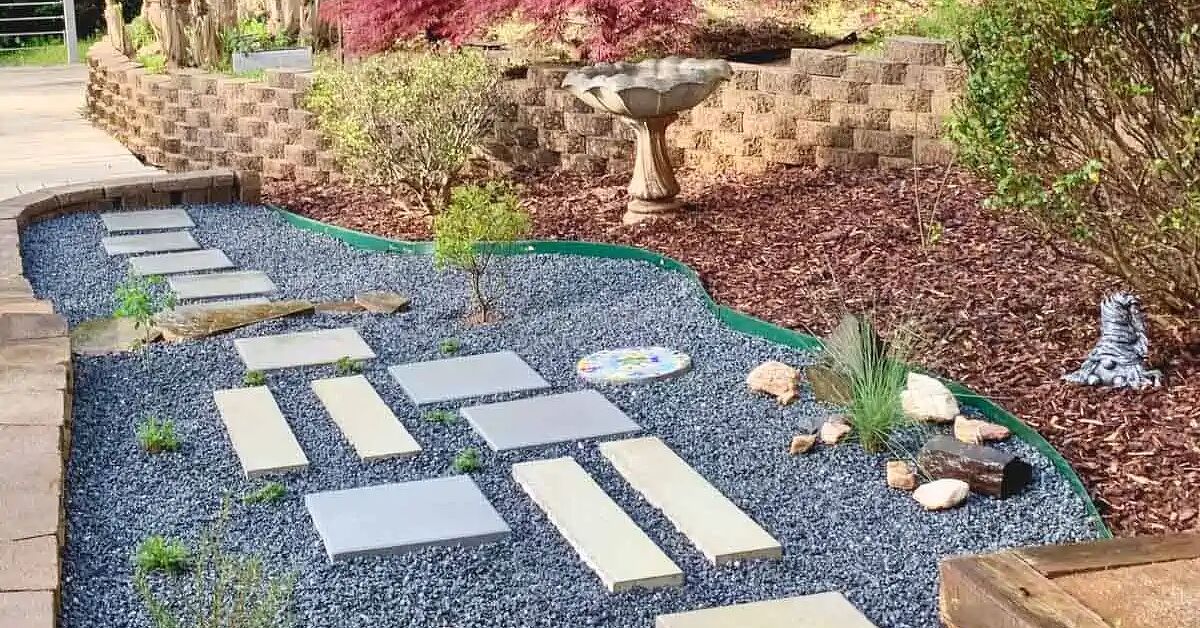
A gravel path with stepping stones is one of those backyard projects that looks impressively “landscape designer” but is still friendly to real people with shovels, sneakers, and a weekend playlist. It adds structure to a garden, keeps shoes out of the mud, improves drainage, and gives your yard that charming “I casually stroll to pick herbs” energyeven if you are really walking out to rescue a soccer ball from the bushes.
The beauty of this project is its balance. Gravel provides a soft, natural-looking surface that drains well and adapts to curves. Stepping stones give your feet a stable place to land, especially in high-traffic areas. Together, they create a walkway that works for cottage gardens, modern side yards, vegetable beds, patios, and entry paths.
This guide explains how to make a gravel path with stepping stones from start to finish: planning, materials, excavation, edging, base preparation, stone placement, gravel installation, and maintenance. The process is simple, but the details matter. A path that is too shallow, poorly edged, or unevenly set can turn into a crunchy obstacle course. A well-built one can last for years with only light upkeep.
Why Choose a Gravel Path with Stepping Stones?
A gravel walkway is practical, affordable, and attractive. Unlike a poured concrete sidewalk, it does not require heavy forms, curing time, or a dramatic commitment to straight lines. Gravel allows rainwater to move through the surface, which can help reduce puddling when the path is properly built. Stepping stones add comfort, rhythm, and visual direction.
This type of walkway is especially useful in areas where grass gets worn down from repeated foot traffic. Think side yards, garden gates, paths to sheds, routes between patios, or walkways through flower beds. Instead of fighting muddy ruts every rainy season, you can build a defined path that tells everyone, politely but firmly, “Please walk here.”
Best Materials for a Gravel and Stepping Stone Path
Before grabbing a shovel, choose materials that match your style, budget, and climate. Not all gravel behaves the same, and not all stepping stones are equally comfortable underfoot.
Gravel Options
Pea gravel is popular because it has a rounded, pleasant look and comes in soft natural colors. It is comfortable in casual garden settings, but because the stones are rounded, it can shift underfoot. Crushed stone or decomposed granite locks together more firmly because of its angular edges. For a main walkway, angular gravel is often easier to walk on and less likely to scatter.
For most residential garden paths, a gravel depth of about 2 to 3 inches is enough. Too little gravel may expose the fabric or base underneath. Too much gravel can feel like walking through a miniature ball pit designed by a very patient geologist.
Stepping Stone Options
Good stepping stones should be thick, durable, and large enough for a comfortable step. Natural flagstone, slate, bluestone, limestone, concrete pavers, and large precast stepping stones can all work. A thickness of at least 1.5 inches is a smart target for durability, especially if the stones will rest in a compacted base and handle regular foot traffic.
For comfort, choose stones around 16 to 24 inches wide where possible. Smaller stones may look cute in the store but feel awkward once installed. Your walkway should not require guests to hop like they are crossing a lava field in a children’s game.
Edging Materials
Edging is not optional if you want the gravel to stay where it belongs. Without edging, gravel slowly migrates into nearby lawn and planting beds. Use metal edging for a clean modern look, brick for a classic garden feel, cobblestone for cottage charm, or pressure-treated wood for a budget-friendly rustic path.
Tools and Supplies You Will Need
- Garden hose, rope, or marking paint
- Shovel and square spade
- Wheelbarrow
- Rake
- Tape measure
- Hand tamper or plate compactor
- Level
- Landscape fabric or geotextile fabric
- Landscape staples
- Edging material
- Crushed stone base or paver base
- Sand or stone dust for leveling stones
- Stepping stones
- Decorative gravel
- Rubber mallet
- Work gloves and safety glasses
Step 1: Plan the Path Like a Person Who Actually Walks
The first rule of walkway design is simple: build the path where people naturally want to go. If your family already cuts across the lawn between the patio and the gate, that is your path location. Fighting natural walking routes is like arguing with gravity. You may be technically passionate, but gravity will win.
Use a garden hose or rope to lay out the shape. Curved paths feel relaxed and organic, while straight paths look formal and efficient. A side yard path may work best as a straight line, while a garden path often looks better with gentle curves.
A comfortable walking path is usually 30 to 36 inches wide. A narrow garden path can be closer to 24 inches, but if two people may walk side by side, aim for 42 to 48 inches. Once the outline looks right, walk it several times. Carry a watering can or basket if that is how you will use the space. Practical testing prevents decorative regret.
Step 2: Place the Stepping Stones Before You Dig
Lay the stepping stones on the ground along your planned route. Space them according to a natural stride. For most adults, the center-to-center distance between stones is about 24 inches, but your stones, body, and path design may vary. Walk across them before digging. Your feet should land squarely and comfortably.
If the path will be used by children, older adults, or anyone with mobility concerns, reduce the gap between stones and choose larger, flatter pieces. Avoid wobbly shapes, sharp edges, and dramatic height changes. A beautiful path is less impressive if it behaves like a prank.
Step 3: Excavate the Path Area
Mark the path edges with spray paint or a spade, then remove the sod and soil. For a gravel path with stepping stones, dig about 4 to 6 inches deep. This allows room for a compacted base, landscape fabric, gravel, and the thickness of the stepping stones.
The goal is for the finished stepping stones to sit slightly above the gravel or nearly flush with it, depending on your preference. They should never be buried so low that gravel spills over them, and they should not stick up so high that they become toe-stubbers.
Remove roots, large rocks, and soft organic material. If the soil is loose, muddy, or recently disturbed, tamp it firmly before adding base material. A strong path begins underneath, where nobody can see it. This is unfair but true.
Step 4: Install Edging to Hold the Shape
Install edging along both sides of the path before adding gravel. Follow the manufacturer’s instructions for metal or plastic edging, or set bricks and stones into a shallow trench. The edging should rise high enough to contain the gravel but not so high that it becomes a tripping hazard.
On curves, take your time. Smooth curves look intentional; jagged curves look like the garden hose panicked. Secure edging firmly with stakes or compacted soil so it does not drift over time.
Step 5: Add and Compact the Base
Spread 2 to 3 inches of crushed stone base, paver base, or compactable gravel over the excavated path. Rake it evenly, then compact it with a hand tamper or plate compactor. Lightly dampening the base before tamping can help reduce dust and improve compaction.
This compacted layer is what keeps the path from sinking, shifting, or developing low spots. If you skip it, the path may look fine for a few weeks and then begin to resemble a very small archaeological site.
Check the slope as you work. A slight crown or gentle side-to-side pitch helps water move away instead of sitting in the middle. In most yards, the path should drain away from the house and should not direct runoff toward foundations, patios, or basement windows.
Step 6: Lay Landscape Fabric
Roll landscape fabric over the compacted base and overlap seams by several inches. Secure it with landscape staples. Fabric helps separate the gravel from the soil and can reduce weed growth, although it will not make the path magically weed-proof forever. Wind, birds, and nearby plants will still bring in seeds because nature enjoys paperwork.
Cut slits where needed around curves or edging. Keep the fabric flat so it does not bunch under the stones or show through the gravel later.
Step 7: Set the Stepping Stones
Place each stepping stone where it belongs, then adjust the base underneath as needed. Use a thin layer of sand or stone dust under each stone for leveling. Tap the stone with a rubber mallet and check it with a level. The stone should not wobble, tilt, or rock when stepped on.
For irregular flagstone, dig or build up beneath each piece individually so the top surface is stable. Pack material tightly around the edges. Step on every stone before moving to the next one. If it shifts now, it will definitely shift later, probably while someone is carrying lemonade.
Step 8: Fill Around the Stones with Gravel
Pour gravel into the path and rake it evenly around the stepping stones. Aim for a finished gravel depth of about 2 to 3 inches. Keep gravel slightly below the top of the stones so the walking surface remains clear and comfortable.
Use the back of a rake to smooth the gravel, then walk the path and make adjustments. Add more gravel to low spots and pull gravel away from areas where stones are getting buried. The finished path should feel stable, intentional, and easy to navigate.
Step 9: Water, Settle, and Fine-Tune
Lightly spray the path with water to help settle dust and reveal uneven areas. Do not blast it with a hose like you are power-washing a driveway. A gentle shower is enough. After a few days of use, rake the gravel again and top off any thin sections.
Most gravel paths improve after a short settling period. The stones nestle into place, the gravel finds its level, and the path starts to look like it has always belonged there.
Design Ideas for a Better-Looking Gravel Path
Use Contrast
Dark stepping stones look striking against pale gravel. Warm tan gravel pairs beautifully with buff limestone or sandstone. Gray gravel and bluestone create a calm, modern look. Contrast helps the stepping stones stand out and makes the path easier to read visually.
Add Plants Along the Edge
Low-growing plants can soften the edges of a gravel walkway. Creeping thyme, sedum, ornamental grasses, dwarf mondo grass, and compact herbs can work depending on your climate and sun exposure. Keep plants from swallowing the path, unless your design goal is “enchanted but slightly suspicious forest.”
Make the Entrance Wider
Widening the beginning or end of the path creates a welcoming transition. This works especially well near patios, gates, porches, and garden seating areas. A generous entrance makes a simple walkway feel more designed.
Common Mistakes to Avoid
- Skipping edging: Gravel needs boundaries, or it will slowly escape.
- Using too much gravel: Deep gravel is harder to walk on and can hide stepping stones.
- Setting stones too far apart: Awkward spacing makes the path uncomfortable.
- Ignoring drainage: Water should move away from structures and not pool in the walkway.
- Choosing thin stones: Thin pieces may crack under regular use.
- Not compacting the base: Loose soil and loose base material lead to settling.
How Much Does a Gravel Path with Stepping Stones Cost?
The cost depends on path size, stone type, gravel selection, edging material, and whether you already own the tools. A small garden path using basic gravel and concrete stepping stones can be very budget-friendly. A long walkway with natural flagstone, steel edging, and premium decorative gravel will cost more but can still be less expensive than a fully mortared stone or concrete walkway.
To estimate materials, measure the path length and width to calculate square footage. Multiply length by width, then plan for a gravel depth of 2 to 3 inches. Many landscape suppliers sell gravel by the cubic yard, while bagged gravel is practical for small paths but more expensive for larger areas.
Maintenance Tips for a Long-Lasting Path
A gravel and stepping stone path is low-maintenance, not no-maintenance. Rake the gravel occasionally to even out thin areas. Pull weeds when they are small. Sweep or blow leaves off the path before they break down into organic matter, which can create a cozy little nursery for weeds.
After heavy rain, check for washed-out areas or gravel that has migrated beyond the edging. Refill low spots as needed. Every year or two, you may want to add a light top-up layer of gravel to refresh the surface.
Extra Field Notes: Real-Life Experience Making a Gravel Path with Stepping Stones
The most useful lesson from building this kind of path is that comfort beats perfection. On paper, evenly spaced stones look tidy. In real life, people have different stride lengths, carry things, walk with pets, and sometimes wander outside half-awake with coffee. Before digging, place the stones and walk the route several times. If one step feels strange, move the stone. Do not assume you will “get used to it.” You will not. You will simply glare at that stone every Tuesday.
Another practical experience: buy a little more gravel than the math suggests. Gravel settles, spreads, and disappears into edges more than expected. Having extra material on hand saves a second trip to the store, which is especially valuable after you have already shoveled, tamped, leveled, and emotionally bonded with your wheelbarrow. A small surplus can be stored in a bucket or corner of the yard for future touch-ups.
Edging is also more important than many beginners expect. A path without edging may look charming on day one, but after rain, foot traffic, pets, and lawn mowing, the gravel begins to wander. Metal edging is excellent for crisp lines, while brick or stone edging feels more traditional. Wood can look warm and natural, but it should be suitable for ground contact and local weather conditions.
When setting stepping stones, stability is everything. A stone that rocks even slightly should be fixed immediately. Add or remove sand underneath, tap it down, and test again. It is much easier to correct one stone during installation than to dig it out after gravel has been spread around it. The best test is simple: step on all four corners. If it moves, it is not ready.
For side yards, drainage deserves extra attention. Narrow spaces between houses often collect water, and a gravel path can help only if the base is prepared correctly and the slope sends water in a safe direction. Do not create a path that channels water toward the foundation. If the area already has serious drainage problems, solve those first or consult a professional.
Finally, do not underestimate the design power of small details. A slight curve can make a short path feel graceful. Larger stones at the entrance make the walkway feel welcoming. Matching gravel color to nearby stone, siding, or patio materials makes the whole landscape look more cohesive. A gravel path with stepping stones is not just a way to avoid mud. It is a design feature, a garden organizer, and a quiet invitation to explore the yard.
Conclusion
Learning how to make a gravel path with stepping stones is a rewarding DIY project because it delivers beauty, function, and flexibility without requiring advanced masonry skills. The key steps are straightforward: plan a natural route, choose durable materials, excavate properly, install edging, compact the base, use landscape fabric, set each stepping stone securely, and fill around the stones with the right amount of gravel.
Done well, this walkway can make a muddy side yard usable, connect garden rooms, improve curb appeal, and give your outdoor space a polished but relaxed feel. It is affordable enough for a weekend upgrade and customizable enough to fit nearly any landscape style. Plus, every time you walk across it, you get the satisfaction of knowing you built something useful with your own handsand possibly only complained about the shovel twice.