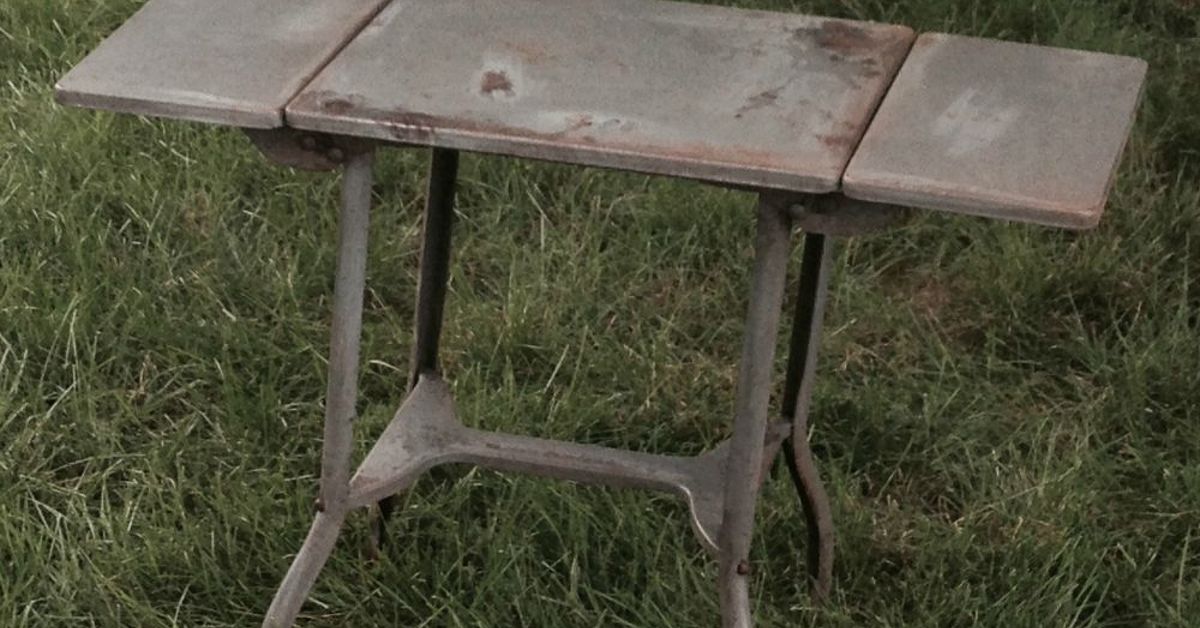
There is something wonderfully stubborn about a vintage typewriter table. It was built for a machine that could survive a newsroom deadline, a frustrated novelist, and probably a minor earthquake. Decades later, the typewriter may be gone, but the table is often still standingusually under a coat of mysterious brown paint, a little rust, and enough dust to qualify as an archaeological layer.
A vintage typewriter table makeover is one of those DIY projects that can deliver a dramatic transformation without requiring a furniture-making degree or a workshop filled with intimidating machinery. Many old typewriter stands combine metal legs or frames with wood, veneer, laminate, or composite tops. That mixture of materials makes the project interesting, but it also means preparation matters.
The goal should not automatically be to make the table look brand-new. A successful makeover keeps the character that makes vintage furniture worth rescuing while repairing the parts that simply look tired. Scratches can be charming. Flaking paint the size of cornflakes usually is not.
Why Vintage Typewriter Tables Are Worth Saving
Old typewriter tables were designed as practical office furniture. Many were compact, strong, and easy to move. Depending on the model, you might find casters, folding leaves, retractable platforms, steel frames, adjustable components, or surprisingly clever mechanisms.
That practical construction gives these tables plenty of second-life possibilities. A restored typewriter stand can become a side table, printer station, laptop desk, plant stand, coffee bar, craft table, record-player stand, or compact entryway console.
Better yet, the relatively small size means you can experiment with colors and finishes that might feel terrifying on a six-foot dining table. A smoky green base with a walnut-colored top? Go for it. Matte black metal with warm natural wood? Classic. Dusty blue with brass details? Your grandparents’ office just became considerably cooler.
Inspect Before You Sand Anything
The most important part of furniture refinishing happens before the first paintbrush comes out. Start by determining what you actually own.
Check the Structure
Place the table on a level floor and gently test it from different directions. Look for loose fasteners, bent brackets, cracked wood, missing screws, unstable casters, and joints that wobble.
If the stand has movable leaves or a mechanical typewriter platform, operate everything slowly. Decades-old mechanisms often work surprisingly well, but forcing a frozen hinge is an excellent way to turn a simple makeover into an unscheduled metalworking project.
Tighten loose screws and nuts before refinishing. Replace obviously damaged hardware only when necessary. Original hardware adds personality, and many odd vintage fasteners are difficult to replace exactly.
Identify the Top Material
Do not assume the tabletop is solid wood simply because it looks woody. It may be veneer, laminate, plywood, or another manufactured material.
Solid wood generally tolerates more aggressive sanding. Veneer does not. Sand through a thin veneer layer and you may reveal a dramatically less attractive substrate underneath. Think of veneer as the haircut of furniture restoration: take off a little at a time because putting it back is difficult.
Be Careful With Unknown Old Coatings
If a vintage table has a very old painted finish of unknown origin, avoid immediately attacking it with aggressive dry sanding. Old coatings can contain hazardous substances, and sanding creates fine dust that can spread through the work area. Evaluate questionable coatings before disturbing them, use appropriate protective equipment, and follow current safety guidance for old painted surfaces.
Supplies for a Vintage Typewriter Table Makeover
You will not necessarily need every item below, but this basic toolkit handles most projects:
- Protective gloves and safety glasses
- Appropriate respirator or dust protection
- Drop cloth or protective plastic
- Degreasing cleaner
- Soft rags and lint-free cloths
- Screwdrivers, pliers, and adjustable wrench
- Wire brush for rusty metal
- Sandpaper in several grits
- Sanding block or random-orbit sander when appropriate
- Wood filler for minor wood damage
- Primer suited to wood, laminate, or metal
- Furniture or cabinet paint
- Metal-compatible spray paint if desired
- Wood stain if preserving natural wood
- Protective clear finish when required
- Painter’s tape
- Small quality brush or mini roller
Always follow the instructions for the specific primer, paint, stain, and protective coating you choose. Drying and recoating windows vary substantially among products.
Step 1: Disassemble What You Can
Remove loose shelves, knobs, casters, handles, and other detachable parts when practical. Taking hardware off generally produces cleaner paint lines and makes sanding easier.
Photograph complicated mechanisms before disassembly. Vintage furniture has a special talent for turning six perfectly logical screws into six existential questions when reassembly begins.
Place small parts in labeled containers or zipper bags. If different screws belong in specific positions, label them individually.
Step 2: Clean the Table Thoroughly
Never confuse sanding with cleaning. Sanding dirty furniture can grind oils, wax, and contamination farther into the surface.
Start by removing loose debris and dust. Then clean painted or finished surfaces with a suitable degreasing cleaner. Typewriter tables may have accumulated hand oils, furniture polish, smoke residue, grease, or decades of unidentified office grime.
Cleaning is especially important because waxes, oils, and silicone-based furniture products can interfere with the adhesion of new coatings. A table can look clean while still carrying invisible contaminants capable of ruining a beautiful finish.
Let the piece dry completely before continuing.
Step 3: Repair Before Refinishing
Fix structural problems before applying decorative finishes. Fill small holes or gouges in wooden components when the final design calls for a smooth painted surface. Reglue loose wood joints where appropriate and repair damaged edges.
On the metal frame, remove loose rust and failing paint with a wire brush or suitable abrasive method. You do not necessarily have to make every inch of metal shiny and new. The priority is removing unstable material and creating a firm surface for subsequent coatings.
If the original patina looks attractive and is stable, consider keeping some of it. Vintage character is difficult to manufacture convincingly. Sometimes the most interesting makeover is the one that knows when to stop.
Step 4: Sand for Adhesion and Smoothness
Sanding serves two purposes: smoothing damage and helping the new finish bond properly.
For painted wood, a progression around 120- to 150-grit can provide a good foundation when substantial surface preparation is needed. Existing sound finishes may require only lighter scuff sanding. Very rough areas may need a coarser starting grit.
Avoid sanding more aggressively than necessary, particularly on veneer. Sand in the direction of the wood grain whenever possible and pay attention to edges, where thin veneer can disappear surprisingly quickly.
After sanding, remove all dust. Paint sticks much better to furniture than it does to a miniature mountain range of sanding powder.
Step 5: Decide Between Paint, Stain, or a Combination
This decision largely determines the personality of the finished typewriter table.
Option 1: Painted Frame and Natural Wood Top
This is one of the most versatile approaches. Refinish a worthwhile wooden top with stain or clear finish while painting the metal legs in matte black, charcoal, olive, navy, or another period-friendly color.
The contrast highlights the table’s industrial construction while adding warmth from the wood.
Option 2: Full Painted Makeover
If the tabletop is badly damaged, inexpensive, or made from material that is not attractive enough to expose, painting everything can create a cohesive new look.
Muted greens, warm whites, deep blues, black, and earthy neutrals tend to complement vintage furniture especially well. Brighter colors can turn a humble utility stand into an intentional accent piece.
Option 3: Preserve the Existing Finish
Before stripping a table simply because it is old, ask whether the existing finish is actually bad. Minor scratches may be repairable, and a worn original finish can sometimes carry more visual interest than a perfectly uniform new coating.
Older or potentially collectible furniture also deserves careful evaluation before irreversible changes are made. A makeover should increase usefulness without automatically erasing history.
Step 6: Prime the Correct Surfaces
Primer is particularly useful when covering bare wood, slick surfaces, dramatic color changes, or metal. Choose a primer compatible with both the substrate and the topcoat.
Metal pieces that show rust benefit from products specifically formulated for metal and corrosion resistance. Slick laminate surfaces usually require cleaning, scuff sanding, and a high-adhesion primer.
Apply primer in thin, controlled coats rather than one thick layer. Thick primer can run, pool around hardware, and make detailed components look as though they were dipped in pancake batter.
Step 7: Paint the Metal Frame
Spray paint can work particularly well on intricate metal typewriter-table bases because it reaches narrow tubing, brackets, and corners without leaving obvious brush marks.
Work in an appropriately ventilated location and protect surrounding surfaces from overspray. Multiple light coats generally produce a smoother result than one heavy coat.
Move the spray consistently instead of stopping over one area. Runs usually happen when enthusiasm remains stationary for too long.
If using brushed furniture enamel instead, a small high-quality brush can provide excellent control. Allow each coat to dry according to the manufacturer’s directions before recoating.
Step 8: Refinish the Wood Top
If the top contains attractive natural wood, refinishing it can become the star of the project.
Remove deteriorated finish carefully, repair blemishes, and sand evenly. Once the surface is properly prepared, apply your chosen stain according to its instructions. Always test color on an inconspicuous location first because the same stain can appear dramatically different across wood species and existing conditions.
For a natural vintage appearance, medium walnut, warm brown, or similar traditional tones can complement dark-painted metal beautifully.
After staining, protect the surface with an appropriate clear finish. A typewriter table repurposed as a laptop desk, drink station, or side table will encounter substantially more handling than decorative furniture.
Step 9: Know When a Protective Topcoat Makes Sense
Not every paint system requires an additional clear coat. Some modern furniture and cabinet coatings are designed to cure into durable surfaces on their own. Adding an incompatible topcoat can change sheen, color, or performance.
If your chosen paint does require protection, select a compatible product and apply thin coats. High-touch surfaces deserve particular attention.
Remember that dry and fully cured are not always the same thing. A finish may feel dry relatively quickly while still needing more time before it reaches maximum durability. Avoid immediately stacking books, appliances, or your collection of twelve-pound vintage dictionaries on the freshly finished surface.
Design Ideas for a Vintage Typewriter Table
Industrial Black and Walnut
Combine a satin or matte black frame with a warm wood top. This simple treatment works especially well in industrial, farmhouse, traditional, and modern interiors.
Vintage Office Green
A muted olive or deep green references old institutional furniture without turning the table into a museum exhibit. Add black hardware for a restrained look.
Two-Tone Neutral
Pair an off-white or beige base with a medium-toned wood surface. This option softens an industrial frame and works nicely in cottage-style interiors.
Deep Navy With Warm Metal Details
Navy can make a basic typewriter stand feel surprisingly sophisticated. Small brass-colored accents can add warmth, although original hardware should be preserved when it contributes character.
Common Vintage Furniture Makeover Mistakes
The fastest way to spend twice as long on a makeover is to rush the preparation stage.
- Painting over grease: New finishes may peel or separate.
- Oversanding veneer: Once the veneer is gone, the repair becomes substantially more complicated.
- Ignoring rust: Painting directly over loose corrosion rarely produces durable results.
- Applying heavy paint coats: Thick applications encourage runs, soft finishes, and uneven curing.
- Painting moving hardware: Hinges and mechanical components can become stiff or clogged.
- Skipping product instructions: Recoat windows and cure times exist for a reason.
- Assuming every antique should be painted: Original finishes and historically interesting pieces sometimes deserve preservation instead.
How to Repurpose the Finished Typewriter Stand
Once restored, the table no longer needs to spend retirement waiting for a Smith-Corona that may never arrive.
Its compact footprint makes it useful as a laptop desk in a small apartment. A printer can sit on top while paper occupies a lower shelf. Add a coffee grinder and pour-over setup and suddenly you have a mobile coffee station.
Plant lovers can use the sturdy top for an indoor garden, provided water is kept away from vulnerable finishes. Record collectors may appreciate the industrial appearance as a turntable stand. In an entryway, a typewriter table can hold keys, mail, and a small lamp without consuming much floor space.
The best repurposing idea is the one that allows the furniture to remain useful. Old furniture survives because people keep finding reasons not to throw it away.
Realistic Experience: What a Vintage Typewriter Table Makeover Teaches You
A realistic vintage typewriter table makeover rarely follows the beautifully edited sequence shown in a thirty-second social media video. The project usually begins with optimism, followed by dirt, one unexpectedly stubborn screw, more dirt, and eventually genuine satisfaction.
One of the first lessons is that the ugliest furniture can hide surprisingly good construction. A table that looks terrible in a thrift store may simply suffer from a bad previous paint job. Once loose paint and accumulated grime disappear, the frame often looks far more substantial than expected.
The second lesson is that cleaning can change your original plan. What appears to be damaged wood may actually be old wax and dirt. Conversely, what looks like lovely dark stain may reveal itself as badly worn veneer once the surface is cleaned. That is why deciding on paint colors before inspecting the table can be premature.
Another common experience is discovering that the metal frame takes longer to prepare than the tabletop. Thin tubular legs contain corners, brackets, wheels, bolts, and joints that are easy to overlook. A flat tabletop can be sanded relatively quickly; a complicated base demands patience.
Spray painting the frame is often the most visually rewarding stage because the transformation happens quickly. A rust-speckled brown stand can suddenly look sharp after primer and several controlled coats of dark paint. The temptation at this point is to touch it immediately. Resist. Fresh paint has an almost supernatural ability to attract fingerprints precisely where they will be most visible.
The wood top provides a different lesson: sanding harder is not necessarily sanding better. On an older veneered top, careful hand sanding around edges can be safer than aggressive power sanding. Preserving a little age in the wood often looks better than forcing every scratch out of existence.
Color selection also changes once the parts come together. A dramatic paint chip that looked perfect under hardware-store lighting may compete with the natural wood. This is why testing colors near the actual tableand in the room where it will liveis worthwhile.
Reassembly is when photographs taken earlier become extremely valuable. Hardware has an impressive capacity to look obvious during disassembly and completely alien three days later. Labeled bags save time, particularly when bolts have slightly different lengths.
Finally, expect the finished table to look better after a few days than it does five minutes after the last coat. Once coatings cure, hardware returns, and the table is placed in a real room, the makeover stops looking like a workshop project and starts looking like furniture.
The biggest lesson is that successful furniture restoration is less about dramatic tricks and more about a sequence of ordinary jobs performed carefully: inspect, clean, repair, sand, prime, finish, and allow everything enough time to cure.
That may not sound glamorous, but the result can be. A discarded utility table that once looked destined for the curb can become a distinctive piece of furniture with another few decades of useful life ahead of it. And unlike mass-produced furniture, it comes with scars, mechanical quirks, and a historywhich is considerably more interesting than an instruction manual and an Allen wrench.
Conclusion
A vintage typewriter table makeover is an ideal project for anyone who enjoys combining furniture restoration, creative painting, and practical repurposing. These compact tables were designed to work hard, which is precisely why so many remain good candidates for restoration decades after their original office careers ended.
Take time to evaluate the materials, preserve worthwhile original details, clean everything thoroughly, and prepare each surface according to what it is made from. Use compatible primers and finishes, build paint with thin coats, and give the completed surfaces sufficient time to cure.
Most importantly, do not feel obligated to erase every sign of age. A tiny dent or worn edge can be evidence of history rather than a defect. The best makeover is not necessarily the one that makes vintage furniture look factory-new. It is the one that makes an old table useful, attractive, and ready for its next job.