If you have an awkward nook, a blank wall, a guest room that mostly stores laundry baskets with big dreams, or a home office that occasionally needs to moonlight as a sleeping spot, a built-in day bed is one of the smartest upgrades you can make. It gives you the cozy charm of custom millwork, the usefulness of a real bed, and the satisfying feeling of saying, “Yes, I built that,” every time someone compliments it. That is worth at least two points in home-improvement glory.
The best part is that an instant built-in day bed does not have to mean weeks of custom carpentry or a garage full of fancy tools. With the right layout, a solid base, a plywood top, simple trim, and a mattress that fits standard dimensions, you can create the built-in look much faster than most people expect. This project is especially great for small spaces because it works as a sofa by day, a bed by night, andwhen designed wella storage zone all the time.
In this guide, you will learn how to plan, build, style, and troubleshoot a DIY built-in day bed that looks intentional instead of improvised. The goal is simple: create something sturdy, attractive, and comfortable without turning your weekend into a dramatic televised renovation special.
Why a Built-in Day Bed Is Such a Smart DIY Project
A built-in day bed earns its keep. Unlike a regular bed that mostly says, “Please leave this room and close the door,” a day bed can act as seating, lounging, reading space, nap station, guest bed, and visual focal point all at once. That versatility is exactly why it works so well in small bedrooms, offices, bonus rooms, attic nooks, and window-seat-style alcoves.
Another reason homeowners love this project is that it can be customized without becoming wildly complicated. You can build a base from stock cabinets for a fast built-in effect, or frame one from 2x4s and plywood if you want more control over height, depth, and storage. Either way, trim, paint, and pillows do a lot of the visual heavy lifting. Once those finishing touches go on, the project starts looking less like “weekend lumber decision” and more like “custom designer feature.”
There is also a budget advantage. A true custom built-in from a contractor can get expensive fast. A DIY version lets you decide where to spend and where to save. Maybe you splurge on a better mattress and save on basic painted trim. Maybe you reuse cabinets or build open cubbies instead of drawers. Maybe you call it “bespoke” because that sounds better than “I stared at plywood for three hours before cutting it.” All valid.
Before You Build: The Planning Stage Matters
Choose the Right Location
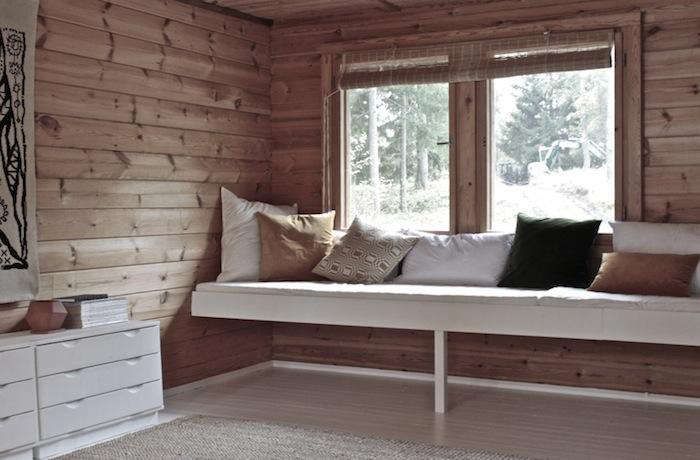
The easiest places for an instant built-in day bed are alcoves, walls between bookcases, corners, bay windows, or under windows where the architecture already suggests a niche. A blank wall works too, especially if you plan to flank the bed with shelving or vertical paneling to create a more built-in appearance.
Measure not only the width of the space but also the ceiling height, window trim clearance, outlet locations, and baseboards. If the room has doors that swing inward, vents near the floor, or sloped walls, those details need to be accounted for before you cut material. Nothing humbles a DIY project faster than discovering your perfect platform blocks the heat register.
Pick a Mattress Size First
Your mattress size determines nearly everything. A twin is the classic day bed choice because it fits most nooks and still functions well as seating. A full-size mattress can work beautifully if the room is wider and you want a more lounge-like look. Always confirm the exact size of the mattress you plan to use before building, because “close enough” is not a great strategy when wood is involved.
When planning your dimensions, leave a little room for bedding and ease of installation. A fit that is too tight will make changing sheets feel like wrestling an alligator in a closet.
Decide on the Look
There are two common directions:
- Clean and architectural: flat panels, painted trim, crisp corners, and minimal hardware.
- Cozy and layered: beadboard, shiplap, wall sconces, storage cubbies, and lots of pillows.
Neither is wrong. The best option is the one that matches the rest of your home so the day bed looks like it belongs there instead of arriving from a completely different decorating universe.
Best Build Approaches for an “Instant” Result
Option 1: Stock Cabinets as the Base
This is the speediest route. Install a row of sturdy base cabinets or low storage cabinets, secure them level, add a plywood top, then trim out the front and sides. You get built-in storage almost automatically, and the cabinetry gives the project a finished look fast. This method is especially useful in offices, guest rooms, and under windows where you want a tailored furniture-like effect.
Option 2: 2×4 Frame and Plywood Top
If you want more control over the exact size, height, and storage openings, build a simple rectangular frame from 2x4s, anchor it properly, and top it with plywood. Then add face trim, drawer fronts, or open cubbies depending on your design. This route feels more custom and can be more budget-friendly, though it requires a little more measuring and a little less improvisational courage.
Option 3: Platform Base with Open Storage
This is a great middle ground. Build a platform-style base and leave the lower front open for baskets, bins, or decorative cubbies. It is simpler than installing drawers and still gives you useful storage for bedding, books, toys, or those extra throw blankets people insist are “decor” even though everyone uses them immediately.
Materials and Tools You Will Likely Need
Basic Materials
- 2×4 lumber for framing
- 3/4-inch plywood for the top and visible panels
- Wood screws
- Wood glue
- Trim boards or MDF trim
- Paintable caulk
- Primer and paint
- Mattress or cushion
- Optional drawer hardware, cabinet fronts, or baskets
Basic Tools
- Tape measure
- Drill/driver
- Level
- Circular saw or miter saw
- Stud finder
- Sander
- Brad nailer or finish nails
- Painter’s supplies
If you already own the basics, this project is very manageable. If not, many homeowners can still complete it with a small set of beginner-friendly tools and careful cuts from the home center.
Step-by-Step: How to Build a DIY Instant Built-in Day Bed
Step 1: Measure the Space Precisely
Measure the width, depth, and desired finished height of your day bed. Standard seat-bed height should feel comfortable both for sitting and sleeping. Think about who will use it most. A reading nook for adults may need a slightly different height than a kid-friendly playroom bed.
Step 2: Build or Install the Base
If using cabinets, level them and secure them together and to the wall as needed. If framing from scratch, build a box-like base using 2x4s with internal supports spaced evenly so the top will not sag. Check for level constantly. A built-in only looks expensive when it is straight.
Step 3: Add the Top
Cut plywood to size and attach it securely to the base. If your mattress manufacturer recommends airflow, consider a slatted support or a ventilated approach rather than a completely solid deck. The goal is good support without creating a stale, trapped setup underneath the mattress.
Step 4: Create Storage Features
You can keep it simple with open cubbies, add rolling bins underneath, or install drawers if you want a polished built-in-storage look. Drawers are excellent for guest bedding, but baskets are faster, cheaper, and a lot more forgiving if your measuring confidence is still growing.
Step 5: Trim It Out
This is the magic step. Add trim to the front edges, sides, and any exposed plywood seams. Consider vertical face-frame details, baseboard-style trim, or side panels that tie into nearby walls. Once caulked and painted, trim helps the project read as architectural rather than assembled.
Step 6: Prime and Paint
Sand rough edges, fill screw holes, caulk seams, prime everything, and paint in a durable finish. Semi-gloss or satin is often practical because it wipes clean more easily. Match the trim color in the room for a seamless look, or use a contrasting shade if you want the day bed to feel like a focal point.
Step 7: Add the Mattress and Styling Layers
Use a fitted sheet, then pile on back pillows and side pillows so the bed functions like a sofa. A day bed looks best when it clearly knows how to do both jobs. During the day, layer lumbar pillows, textured throws, and one or two larger cushions against the wall. At night, strip off the decorative extras and let it do honest sleeping work.
How to Make It Look Truly Built In
Add Vertical Elements
Built-ins look more convincing when they connect visually to the wall around them. Try adding shiplap, beadboard, board-and-batten, or even a painted framed panel behind the bed. A wall-mounted reading light or sconce instantly makes the setup feel intentional.
Frame It with Shelving
Built-in shelves on one or both sides make a basic platform look custom. This approach works especially well in reading nooks, guest rooms, and kids’ rooms. Shelves also solve the practical issue of where to set a phone, water glass, or half-finished mystery novel.
Use Matching Trim and Paint
If your home has traditional trim, copy it. If your room is more modern, keep the lines crisp and simple. Matching existing baseboards, casing profiles, and wall color is one of the easiest ways to make a DIY project feel integrated with the room.
Comfort Matters More Than Pinterest Pretends
A built-in day bed that looks amazing but feels like lying on a stack of receipts is not a success. Invest in comfort where it counts. Choose a mattress with enough support for actual sleeping if guests will use it often. For occasional use, a quality foam mattress can work well. If the bed is mostly for reading and lounging, prioritize good back pillows and washable textiles.
Also think about the wall behind the day bed. If people will sit there often, add pillows, a padded backrest, or upholstered panels. Hard walls and long movie nights are not best friends.
Common DIY Mistakes to Avoid
- Building before buying the mattress: always start with the exact mattress dimensions.
- Ignoring baseboard and trim clearance: walls are rarely as simple as they look.
- Skipping level checks: even a small tilt becomes obvious in a built-in.
- Underbuilding the support: this is furniture people sit and sleep on, not a decorative prop.
- Forgetting storage access: drawers that cannot fully open are decorative disappointment.
- Overstyling it: a day bed should look cozy, not like a pillow avalanche zone.
Easy Styling Ideas for Different Rooms
Guest Room Day Bed
Use neutral bedding, hidden drawer storage, and two or three polished accent pillows. Add a small sconce and a floating shelf for overnight essentials.
Home Office Day Bed
Keep the palette simple and tailored so the bed reads like built-in seating during the workday. Use drawers or baskets for office overflow and guest linens.
Kid or Teen Room Day Bed
Choose washable fabrics, open cubbies, and a durable paint finish. A day bed is especially useful in smaller bedrooms because it frees up floor space and doubles as hangout seating.
Reading Nook Day Bed
Go all in on texture: layered pillows, a throw blanket, nearby shelving, and warm lighting. This is the version that quietly tells everyone in the house, “I was here first, and yes, this spot is taken.”
Final Thoughts
A DIY instant built-in day bed is one of those rare projects that delivers on style and function at the same time. It can make a small room feel smarter, a guest room feel warmer, and an awkward wall finally make sense. More importantly, it can look custom without requiring custom-level chaos.
If you plan carefully, build a sturdy base, finish it with trim and paint, and style it like the hybrid piece it is, your day bed can look polished enough to fool people into thinking it came with the house. Smile mysteriously when that happens. You earned it.
Experience: What Building an Instant Built-in Day Bed Actually Feels Like
One of the most interesting things about building a day bed is that it changes how you see “unused” space. Before the project, an empty alcove or awkward wall often feels like a decorating problem. After the project, that same area becomes one of the most popular spots in the house. That shift is part of what makes this DIY so satisfying. You are not just building furniture; you are changing how the room works.
In real life, the process usually starts with a mix of excitement and overconfidence. You measure the nook, imagine a perfect custom setup, and briefly assume this will be a breezy little afternoon project. Then the wall turns out to be slightly uneven, the floor is not perfectly level, and the baseboard has strong opinions about your plan. That moment is normal. In fact, it is practically a rite of passage. The good news is that a built-in day bed is still very forgiving compared with more technical carpentry projects. Once the base is square, level, and solid, the rest becomes a series of manageable finishing decisions.
Another common experience is realizing how much the finish work matters. The frame gets the structure in place, but the trim, caulk, paint, and styling are what create the “Wow, that looks built in” reaction. Many DIYers say the project looks average on build day and dramatically better once it is painted and accessorized. That is why it helps to judge the result at the end, not during the awkward middle stage when the room looks like a lumberyard with ambition.
There is also a strong practical payoff. Once finished, the day bed tends to become the fallback seat for everything: reading, scrolling, napping, working, chatting, and hosting overnight guests. In a family home, it often becomes the first place someone disappears to when they want five quiet minutes. In a guest room, it makes the room useful every day instead of only when company visits. In a kid’s room, it often works as bed, couch, fort, and dramatic storytelling stage within the same week.
Perhaps the best part is the emotional one. A built-in day bed looks thoughtful. It suggests that the room has been considered, edited, and made more personal. Even if your cuts were not perfect and even if you muttered at least one regrettable sentence at a crooked board, the finished result feels custom because it is custom. It was built for your room, your needs, and your habits. That kind of usefulness never goes out of style.
And once you complete it, you may find yourself walking by it more often than necessary. Not because you forgot something, but because there is a special kind of pride in seeing a formerly awkward corner become a genuinely beautiful place to land. That is the real reward of this project. Sure, you end up with a day bed. But you also end up with a room that finally makes sense.